Share:
Eric Giannini was the iOS developer advocate at Nexmo. He is really passionate about both Objective-C and Swift, especially the latter. Eric blogs often about this, that or the other iOS thing, hacking apps, building SDKs, or rapidly prototyping. He also meets with iOS developers or other strongly typed Swift types at conferences, Meetups, and other variadic functions.
Build a Conversational UI with Nexmo In App Messaging
Time to read: 6 minutes
In this tutorial we will review the brand new feature Apple released at WWDC 2017 called Safe Area Layout. After the review, we will lay out a basic conversational user interface with the Safe Area Layout, adding conversational functionality with Nexmo In-App Messaging!
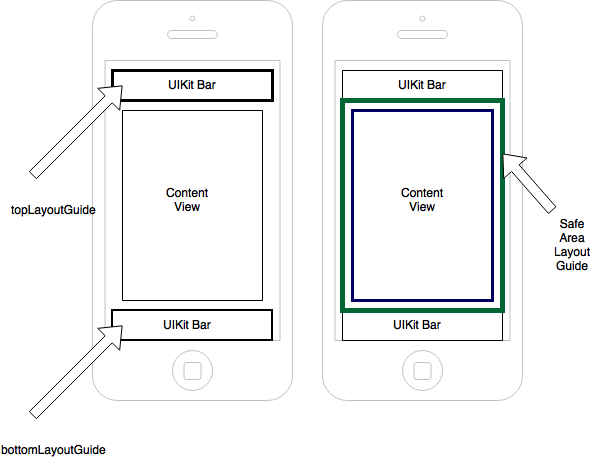
What is the Safe Area Layout? With iOS 7, Apple introduced the topLayoutGuide and the bottomLayoutGuide as properties of UIViewController to enable flexibility in layouts whose outermost edges touch upon areas designated for UIKit bars like status, navigation, and tab. Apple, however, deprecated these guides with a replacement called the Safe Area Layout Guide, which is detailed in WWDC 2017 Session 412, Auto Layout Techniques in Interface Builder. Here is a visual breakdown:
 Auto Layout Guides
The basic difference is going from two rectangles to one. Whereas the topLayoutGuide referred to the lower edge of an upper rectangle or the bottomLayoutGuide referred to the upper edge of a lower rectangle, the new Safe Area is the area surrounded by these rectangles (i.e., a simplified reduction). It is a minor difference that makes for a major change in the way Auto Layout maps its constraints to views. If either of the UIKit bars were to disappear, the Safe Area Layout would adjust accordingly.
Let's build out the basic conversational interface now.
Let's create an .xcodeproj with the deployment target set to iOS 11 or higher. Inside of the .xcodeproj program find the ViewController.Swift.
Our basic conversation user interface will be really basic so inside of ViewController.Swift let's add functionality for two outlets and one action. The action will be for a UIButton. The remaining will be outlets.
With the controllers set up let's turn to their corresponding UI elements such as textView, UITextField, and UIButton.
Switch from ViewController.Swift to Main.storyboard with Shift + Option + Command + Enter in our .xcodeproj. Let's control drag an instance of textView onto the ViewController.Swift's scene.
Note: If you would like a quick breakdown of what the constraints ought to be in the document outline, scroll down to the bottom of this section.
Control drag from the top of the text view to the top of the safe area with a constant at zero. Control drag from the text view's trailing space to the safe area's trailing space with a constant at zero. Control drag from the text view's leading space to the safe area's leading space with a constant at zero.
Control drag an instance of UIButton to the lower right-hand corner of the content view below the text view. Control drag from the button to the trailing space of the Safe Area Layout. Control drag from the button to the bottom of the Safe Area Layout. Fix the constant for these constraints to 15.
Control drag an instance of UITextField to the lower left-hand corner of the content view below the text view. Control drag from the text field to the leading space of the Safe Area Layout. Control drag from the text field to the bottom of the Safe Area Layout. Fix the constant for these constraints to 15.
Note: Optionally you can set these two sets of constraints simultaneously by shift clicking in the document outline from the instance to the view.
Control drag from the text field to the button. Click on horizontal spacing and last baseline. To resolve the fatal warning regarding these two instances competing for horizontal spacing, select a content hugging priority for the button that is higher than for the text field, say 251. Accordingly, the text field's horizontal spacing shall thereafter fluctuate in response to the device size's screen size without the space between the button and the text or the size of the button changing at all.
Finally, control drag from the bottom of the text view to the top of the text field selecting vertical spacing with a constant at 15.
Here is a quick breakdown of what the constraints ought to be in the document outline:
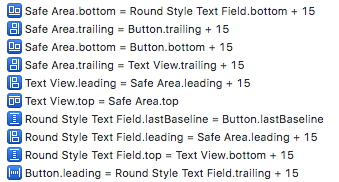 Safe Layout Guide Constraints
With our basic conversational interface laid out with the Safe Area Layout we will implement conversational functionality with Nexmo In-App Messaging.
Nexmo In-App Messaging is now in developer preview and you're invited to be among the first to use this technology to create branded chat experiences on your mobile or web applications.
Extend your user communication channels in environments such as contact centers or online marketplaces. With Nexmo In-App Messaging, you can easily build these messaging experiences—and any others you can conceptualize—to provide your users with an intuitive and familiar messaging interface.
Nexmo In-App Messaging includes:
Cross-platform SDKs: Integrate iOS, Android, and JavaScript SDKs so users can seamlessly chat on any device.
Feature-rich chat: Build an experience that showcases typing indicators and when messages were sent, delivered and read.
Offline sync: With built-in caching, messages are saved when a device goes offline and sent or received once the device is back online.
Try out Nexmo In-App Messaging by signing up for a Nexmo Account. After signing up, we can begin to integrate the iOS SDK into our .xcodeproj.
Extensive detail on the process of creating Nexmo conversation is listed in an iOS quickstart here. A quick breakdown is the following:
$ nexmo app:create "Conversation iOS App" http://example.com/answer http://example.com/event --type=rtc --keyfile=private.key
> Application created: aaaaaaaa-bbbb-cccc-dddd-0123456789ab
Take note of the application ID. We'll refer to this as YOUR_APP_ID later.
$ nexmo conversation:create display_name="Nexmo Chat"
> Conversation created: CON-aaaaaaaa-bbbb-cccc-dddd-0123456789ab
Take note of the conversation ID. We'll refer to this as YOUR_CONVERSATION_ID later.
$ nexmo user:create name="jamie"
> User created: USR-aaaaaaaa-bbbb-cccc-dddd-0123456789ab
Take note of the user ID. We'll refer to this as YOUR_USER_ID later.
$ nexmo member:add YOUR_CONVERSATION_ID action=join channel='{"type":"app"}' user_id=YOUR_USER_ID
$ USER_JWT="$(nexmo jwt:generate ./private.key sub=jamie exp=$(($(date +%s)+86400)) acl='{"paths": {"/v1/sessions/**": {}, "/v1/users/**": {}, "/v1/conversations/**": {}}}' application_id=YOUR_APP_ID)"
$ echo USER_JWT
Take note of the JWT generated. We'll refer to this as USER_JWT later.
Navigate to the project's root directory in the Terminal. Run: pod init. Open the file entitled PodFile. Configure its specifications accordingly:
platform :ios, '9.0'

source "https://github.com/Nexmo/PodSpec.git"
source 'git@github.com:CocoaPods/Specs.git'

target 'QuickStartOne' do
# Comment the next line if you're not using Swift and don't want to use dynamic frameworks
use_frameworks!
pod "NexmoConversation", :git => "https://github.com/nexmo/conversation-ios-sdk.git"
end
With the Cocoapod added let's connect the view from earlier with the controller. Make sure to create a connection from the instance of UIButton to the action, while making connecting the instances of text view and text field to their respective outlets.
In ViewController.Swift let's log the user in with the USER_JWT generated earlier.
override func viewDidLoad() {
super.viewDidLoad()
let client: ConversationClient = {

ConversationClient.configuration = Configuration(with: .info)

return ConversationClient.instance
}()

client.login(with: USER_JWT).subscribe()
}
To send a message we simply need to call send() on our instance of conversation; send() takes one argument, a String message.
// sendBtn for sending text
@IBAction func sendBtn(_ sender: Any) {

do {
// send method
try conversation?.send(textField.text!)

} catch let error {
print(error)
}

}
In viewDidLoad() we want to add a handler for handling new events like the TextEvents we create when we press the send button. We can do this like so:
// a handler for updating the textView with TextEvents
conversation?.events.newEventReceived.addHandler { event in
guard let event = event as? TextEvent, event.isCurrentlyBeingSent == false else { return }
guard let text = event.text else { return }

self.textView.insertText(" (text) n")
}
After integrating the Nexmo In-App Messaging iOS SDK into your project, your instances of TextEvent should appear in the Safe Area Layout. Try it out in either your iPhone or the iOS Simulator! The finished product will look like this:
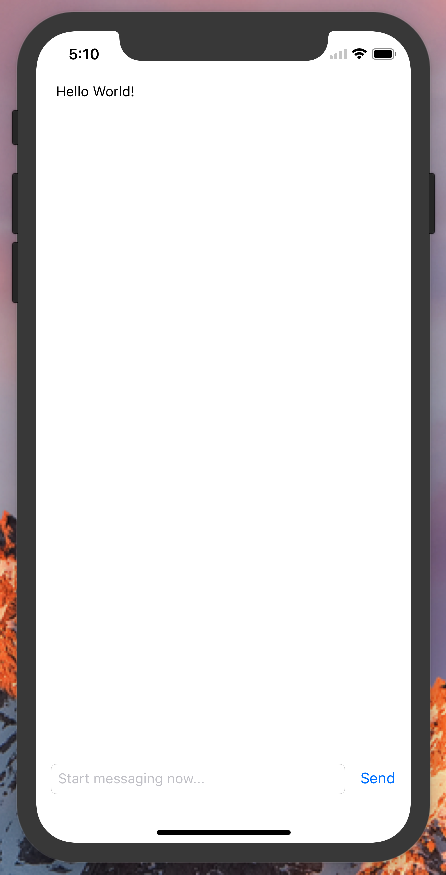 iPhone X
In this tutorial, we reviewed the brand new feature Apple released at WWDC 2017 called Safe Area Layout. After reviewing it, we laid out a basic conversational user interface with the brand new Safe Area Layout. With the layout, we added conversational functionality with Nexmo In-App Messaging. Voilà!
If you’re an active Swift developer or just getting started with the language, we encourage you to get involved in the Nexmo Developer Community. Check out the projects hosted on the Nexmo GitHub or follow us on Twitter @NexmoDev.
We welcome you to interact with our team of developer advocates, check out our code repositories and more. If you'd like to check out more tutorials about how to use Nexmo In-App Messaging for iOS, check out our other quickstarts.
Questions? Contact us at our Nexmo Community Slack or email us.
Share:
Eric Giannini was the iOS developer advocate at Nexmo. He is really passionate about both Objective-C and Swift, especially the latter. Eric blogs often about this, that or the other iOS thing, hacking apps, building SDKs, or rapidly prototyping. He also meets with iOS developers or other strongly typed Swift types at conferences, Meetups, and other variadic functions.