
Share:
Liz Acosta is a Developer Advocate at Vonage. While her career path from film student to marketer to engineer to Developer Advocate might seem unconventional, it’s pretty typical for Developer Relations! Liz loves pizza, plants, pugs, and Python.
Build a Conference Call System with Python
Time to read: 14 minutes
In this tutorial, you’ll learn how to build a conference call system with Python using the Vonage Voice API. A conference call is a single phone call in which three or more people are connected. Conference calls are helpful when more than two people need to communicate synchronously and more immediately than a group text chat. A conference call is useful when multiple people need to make last minute changes to plans or an urgent group decision.
 By the end of this tutorial, you will be able to successfully implement a conference call using Vonage, a Python FastAPI app, and ngrok to tunnel a connection from a locally hosted server to the public internet.
This tutorial is structured to accommodate different reading and learning styles. Each section is atomic, so feel free to consume them in whatever order works best for you:
A conference call using the Voice API is implemented similarly to receiving inbound calls. In addition to the talk action for playing text-to-speech to the caller, you will use a conversation action in the Vonage Call Control Object (NCCO) to create a conference call. An NCCO is a JSON array used by the Voice API to dictate the flow of voice calls. In other words, they are building blocks you can use to construct flexible and sophisticated voice applications. In this tutorial, we are creating a NCCO with the Talk and Conversation actions to produce a conference call system that greets and informs a caller and then adds them to a conference call. Using this flow, the first person to call the number initiates the Conversation and subsequent callers are added to it. You can read more in the Voice API documentation.
In order to complete this tutorial, we will rely on technical concepts and tools outside of Vonage that may be helpful in other areas of software development.
A webhook is how one web-based application pushes data or event notifications to another such application, enabling automatic communication instead of one application having to constantly poll the other for updates. In general, this means interacting over the web via an API using an HTTP request. In this particular tutorial, we will use a webhook to notify your web application that someone has called your virtual number and to return an NCCO with a talk and conversation action.
FastAPI is a high-performance web framework for building HTTP-based service APIs in Python. What makes FastAPI different from other Python web frameworks is its close alignment with Pydantic, a data validation library for Python. This coupling enables FastAPI to validate, serialize, and deserialize data. This provides a more declarative method of specifying the structure and types of data for incoming requests such as HTTP bodies and outgoing responses. FastAPI also automatically generates OpenAPI specs. All of these features combined make it especially suited for modern REST APIs, microservices development, and applications that require real-time functionality.
In this tutorial, we will create a web application and run it locally on your machine. Because it will be running locally, it cannot be accessed by the public internet, and if your web app cannot be accessed, then Vonage cannot make a request to the webhook. That’s where tunneling comes in. Tunneling exposes local servers to the public internet through temporary or static public URLs. ngrok is a software platform that provides this service.
In summary, we will create a Python FastAPI web app with a webhook and use ngrok to make your local application accessible via tunneling to a public URL so Vonage can actually post to the webhook and make a conference call happen.
In this tutorial, we will use FastAPI to define a webhook that the Voice API can make a request to when someone calls your virtual number. We will use ngrok to expose the webhook to the public internet. And we will use Vonage to purchase a virtual number as well as the Voice API to complete the conference call.
In order to complete this tutorial, you will need the following:
Python 3.8+
An ngrok account and installation
Additional phone numbers or friends to participate in a conference call
Before we begin building, let’s get everything in order.
To complete this tutorial, you will need a Vonage API account and a virtual phone number. You can purchase a number from the developer dashboard. Make sure to buy a number in your country code and with Voice features.
The Voice API must be able to access your webhook so that it can make requests to it, therefore, the endpoint URL must be accessible over the public internet.
In order to do that for this tutorial, we will use ngrok. Check out our ngrok tutorial to learn how to install and use it.
In a terminal window, run the following to create a new project directory and navigate into it:
Now that you’ve got everything set up, it’s time to start building.
Here is an overview of the steps we will be taking to complete this tutorial:
Python virtual environments allow you to install packages in a location isolated from the rest of your system. This helps prevent system-wide clutter and conflicts with different Python versions and packages. You can learn more about virtual environments here.
In your project directory, run the following commands to create a virtual environment and activate a virtual environment:
You should now see your terminal prompt prefaced with (venv). To deactivate your virtual environment, run the deactivate command.
In order to install the dependencies we need for this tutorial, run the following:
Create a file called confcall.py that includes the following code:
import os
from fastapi import FastAPI
from vonage_voice import Conversation, NccoAction, Talk

VOICE_CONFERENCE_NAME = “confcall”

app = FastAPI()

@app.get('/webhooks/answer')
async def answer_call():

	ncco: list[NccoAction] = [Talk(text="Please wait while we connect you to the conference"), Conversation(name=VOICE_CONFERENCE_NAME),]

return [action.model_dump(by_alias=True, exclude_none=True) for action in ncco]This code creates the /webhooks/answer endpoint. When this endpoint receives a request from the Voice API, it creates and iterates through a NCCO list with a Talk and Conversation action. This is what is responsible for the text-to-speech a caller hears when they dial the number and then adding the caller to the conference (identified by the VOICE_CONFERENCE_NAME variable). You can read more about making conference calls with the Voice API here.
In your terminal window, run:
This will spin up a local server with your webhook endpoint on port 3000.
The Voice API must be able to access your webhook so that it can make requests to it. So the endpoint URL must be exposed to the public internet. This is what ngrok is for.
In a separate terminal window, run:
This command will generate the public URLs your local server will tunnel to on port 3000. Take note of the public Forwarding URL – it should look something like this:
Please note that unless you are using one of ngrok’s paid plans, the generated public URLs are not persistent. In other words, every time you run the ngrok command, the resulting URLs will change and you will have to update your Vonage application configuration. To prevent this, leave ngrok running for the duration of this tutorial.
You now need to create a Voice API application. The “application” we are referring to here is not the same as the FastAPI web application you wrote the code for earlier in this tutorial. In this particular context, an application is a container for the configuration and security information you need for the Voice API.
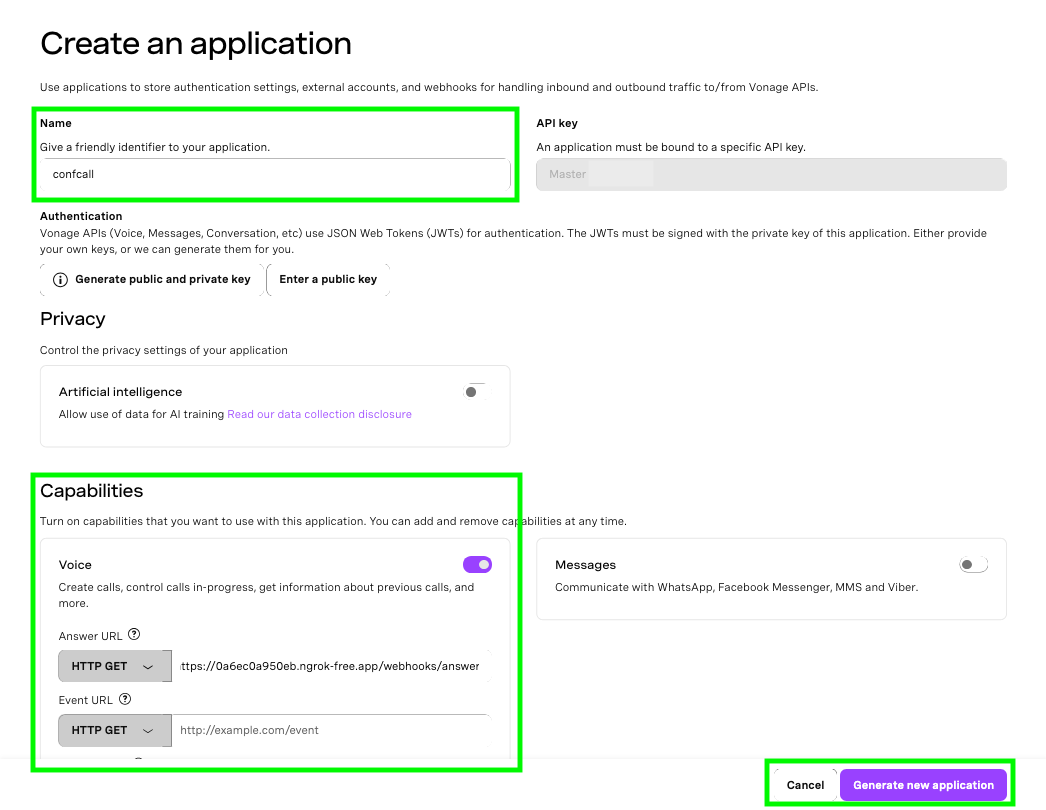
Create an application in the developer dashboard by navigating to the Applications window from the left hand menu and clicking the “Create new application” button. This will open the application creation menu. Give your application the name “confcall” since this is the name we provided in our FastAPI app.
Under the Capabilities section, toggle the option for Voice, which will reveal a list of text fields. In the text field labeled “Answer URL,” provide the ngrok public URL amended with the webhook you defined in your FastAPI app. This will look something like this: https://0a6ec0a950eb.ngrok-free.app/webhooks/answer
Click the “Generate new application” button.
 Now that your application has been created, you can link your number to it by clicking on the “Link” button in the table of available numbers.
Either with a couple of friends or with a couple of different phone numbers, initiate the conference call by calling the Vonage virtual number. You will be greeted with the text you provided in the Python code. Once the conference call is initiated, other people can call the same Vonage virtual number and you should all be able to talk to each other on the same call at the same time.
And that’s just the beginning! The Voice API provides many more options for managing a multi participant call such as the ability to create a moderated conference, play hold music before the call starts, or mute specific participants. Check out the links to our docs below for more details and happy coding!
Have a question or want to share what you're building?
Subscribe to the Developer Newsletter
Follow us on X (formerly Twitter) for updates
Watch tutorials on our YouTube channel
Connect with us on the Vonage Developer page on LinkedIn
Stay connected and keep up with the latest developer news, tips, and events.