
Compartilhar:
)
Diana é defensora de desenvolvedores na Vonage. Ela gosta de comer ostras frescas.
Como criar um jogo de RPG com o Vonage AI Studio e o Notion
Tempo de leitura: 7 minutos
Quando eu era mais jovem, parte do meu tempo de lazer era preenchido por videogames que recebia de herança — verdadeiras joias por si só, mas com os quais, admito, passava tempo demais, o que muitas vezes me rendia uma ou duas broncas. Eu gostava de vários tipos de jogos, desde simulações sociais e jogos de plataforma até jogos de tiro em primeira pessoa e meus favoritos, os jogos de RPG (role-playing games). Sem que eu percebesse na época, cada hora que passava nesses mundos de fantasia estava, sutilmente, aprimorando minhas habilidades de resolução de problemas e minha criatividade. Avançando no tempo, foram justamente essas aventuras nos jogos que lançaram as bases para este blog.
No ano passado, a Larian Studios lançou Baldur's Gate 3, um RPG baseado no jogo de tabuleiro Dungeon & Dragons. Pense em um RPG como mergulhar em um livro onde, em vez de apenas ler a história, você se torna o personagem principal. Você vai passar por aventuras, tomar decisões, interagir com outros personagens e moldar o desfecho da história com base nas suas escolhas. É uma chance de vivenciar uma narrativa de forma interativa, em que o mundo reage ao que você decide.
Eu mesmo joguei o jogo e fiquei profundamente impressionado com o quão única e envolvente era a experiência de cada jogador, já que seguia o estilo “escolha sua própria aventura”. Então, senti-me motivado a recriar uma versão mais simples de um RPG usando o Vonage AI Studio e Messages API — o Gate da Vonage!
Veja como vamos criar uma experiência narrativa em que os jogadores decidem o destino de seus personagens. Agora, concentre-se no seu personagem principal e vamos começar a criar!
Como prática recomendada, armazenaremos todos os valores utilizados na jogabilidade em um banco de dados — para este exemplo, usaremos o Notion!
É uma opção fácil de usar, não exige conhecimentos avançados de banco de dados e é superprático, pois as alterações aparecem instantaneamente — perfeito para manter nosso conteúdo atualizado e responsivo. Embora seja menos escalável do que os bancos de dados tradicionais, ele dá conta de tudo o que precisamos para este aplicativo. A melhor parte é que ele se integra facilmente ao Vonage AI Studio e a outras plataformas de baixo código, facilitando muito a nossa vida!
Crie sua planilha
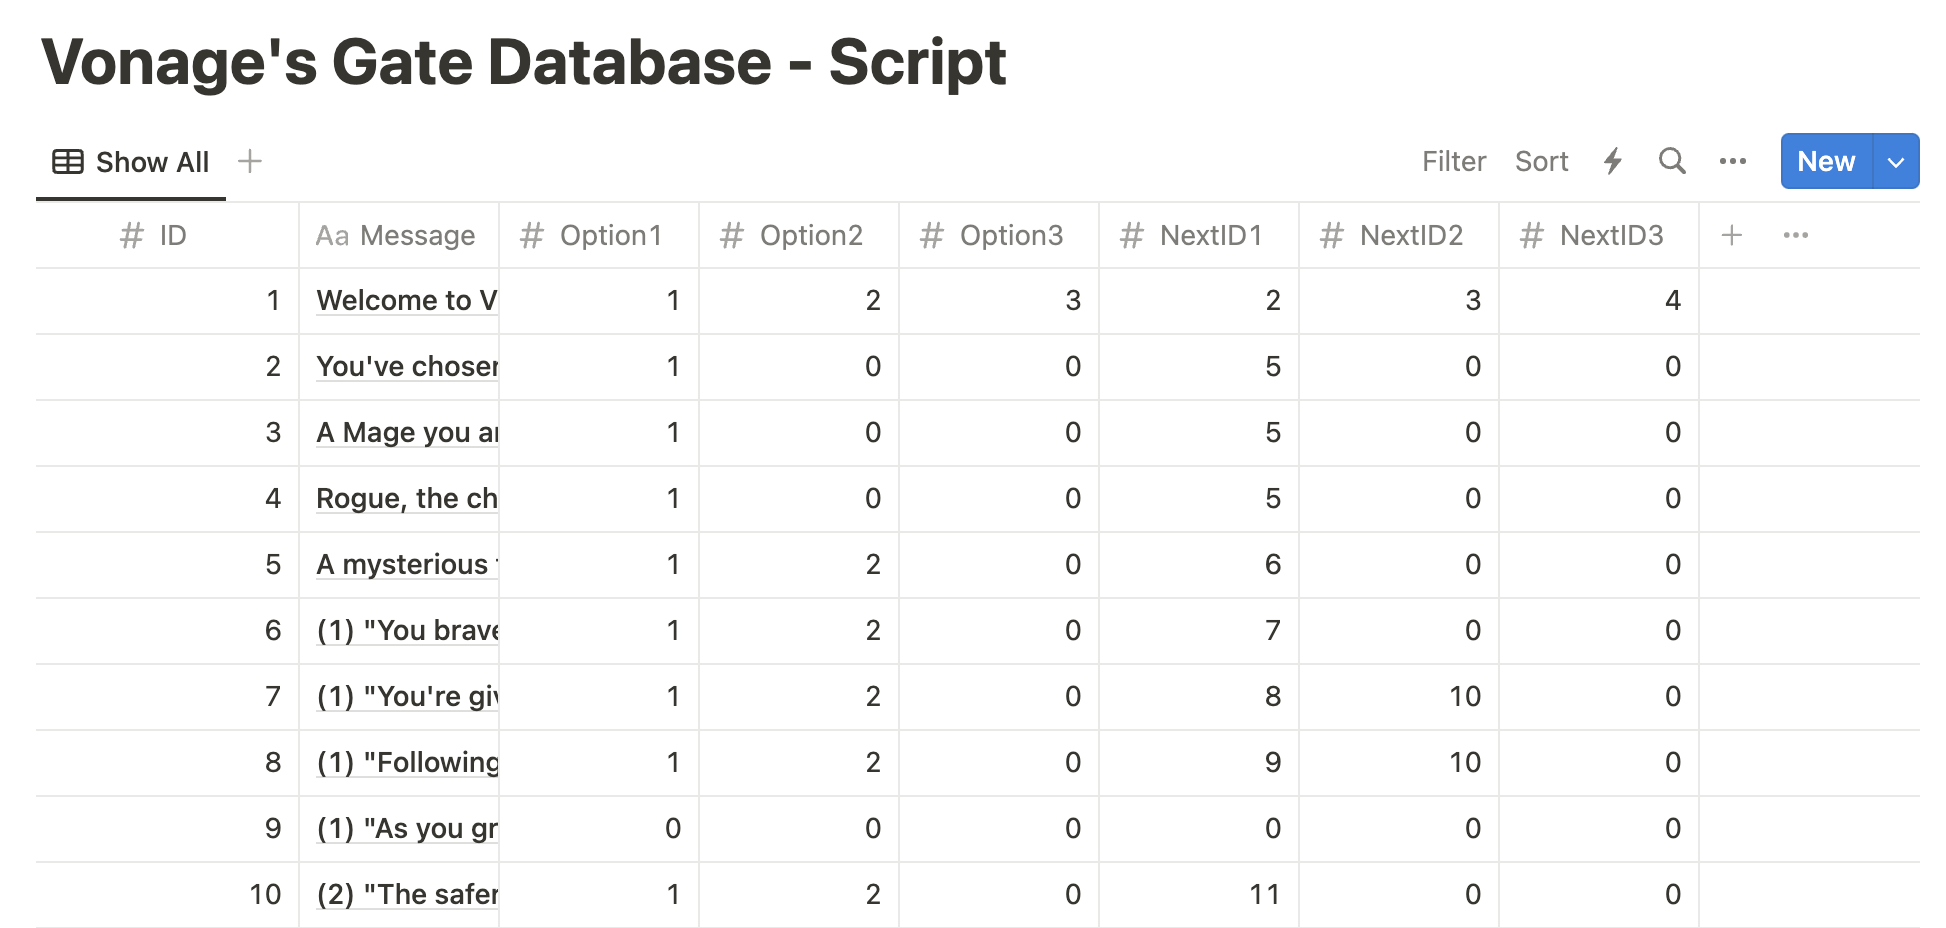
Acesse Notion. Clique no botão (+) para adicionar uma página. Na nova página, na seção BANCO DE DADOS, clique em “Tabela”. Crie as seguintes colunas:
ID (tipo: número) — o ID da mensagem é enviado por MMS
Mensagem (tipo: título) — o texto propriamente dito enviado
Opção 1 (tipo: número) — a resposta que um jogador envia ao escolher a opção 1
Opção 2 (tipo: número) — a resposta que um jogador envia ao escolher a opção 2
Opção 3 (tipo: número) — a resposta que um jogador envia ao escolher a opção 3
NextID1 (tipo: número) — o ID da próxima mensagem que o jogador recebe após escolher a opção 1
NextID2 (tipo: número) — o ID da próxima mensagem que o jogador recebe após escolher a opção 2
NextID3 (tipo: número) — o ID da próxima mensagem que o jogador recebe após escolher a opção 3
Você pode personalizar o enredo da maneira que quiser. Na minha história, o jogador acaba ficando com o artefato. As mensagens enviadas ao jogador são acionadas pelas respostas dele à mensagem anterior.
Criação de Personagem
Mensagem inicial: Envie uma breve apresentação e uma opção simples para a criação do personagem.
No meu banco de dados, dá para ver que o ID 1 exibe a mensagem inicial: “Bem-vindo ao Portão da Vonage! Escolha uma classe: (1) Guerreiro, (2) Mago ou (3) Ladino.”
Confirmação do personagem: Assim que eles responderem com uma escolha, envie uma confirmação com uma breve descrição do personagem.
Progressão no jogo
Imediatamente após a confirmação do personagem, apresente o primeiro cenário simples que exija uma decisão. Quando o jogador fizer uma escolha, responda com um breve resultado e outro ponto de decisão. Continue com uma série de pontos de decisão simples que mantenham a história em andamento sem exigir interações complexas. Para esta demonstração, faremos com que os jogadores respondam com mensagens de um único caractere. Após algumas rodadas de decisões, podemos encerrar a demonstração com um final simples.
 Database Setup
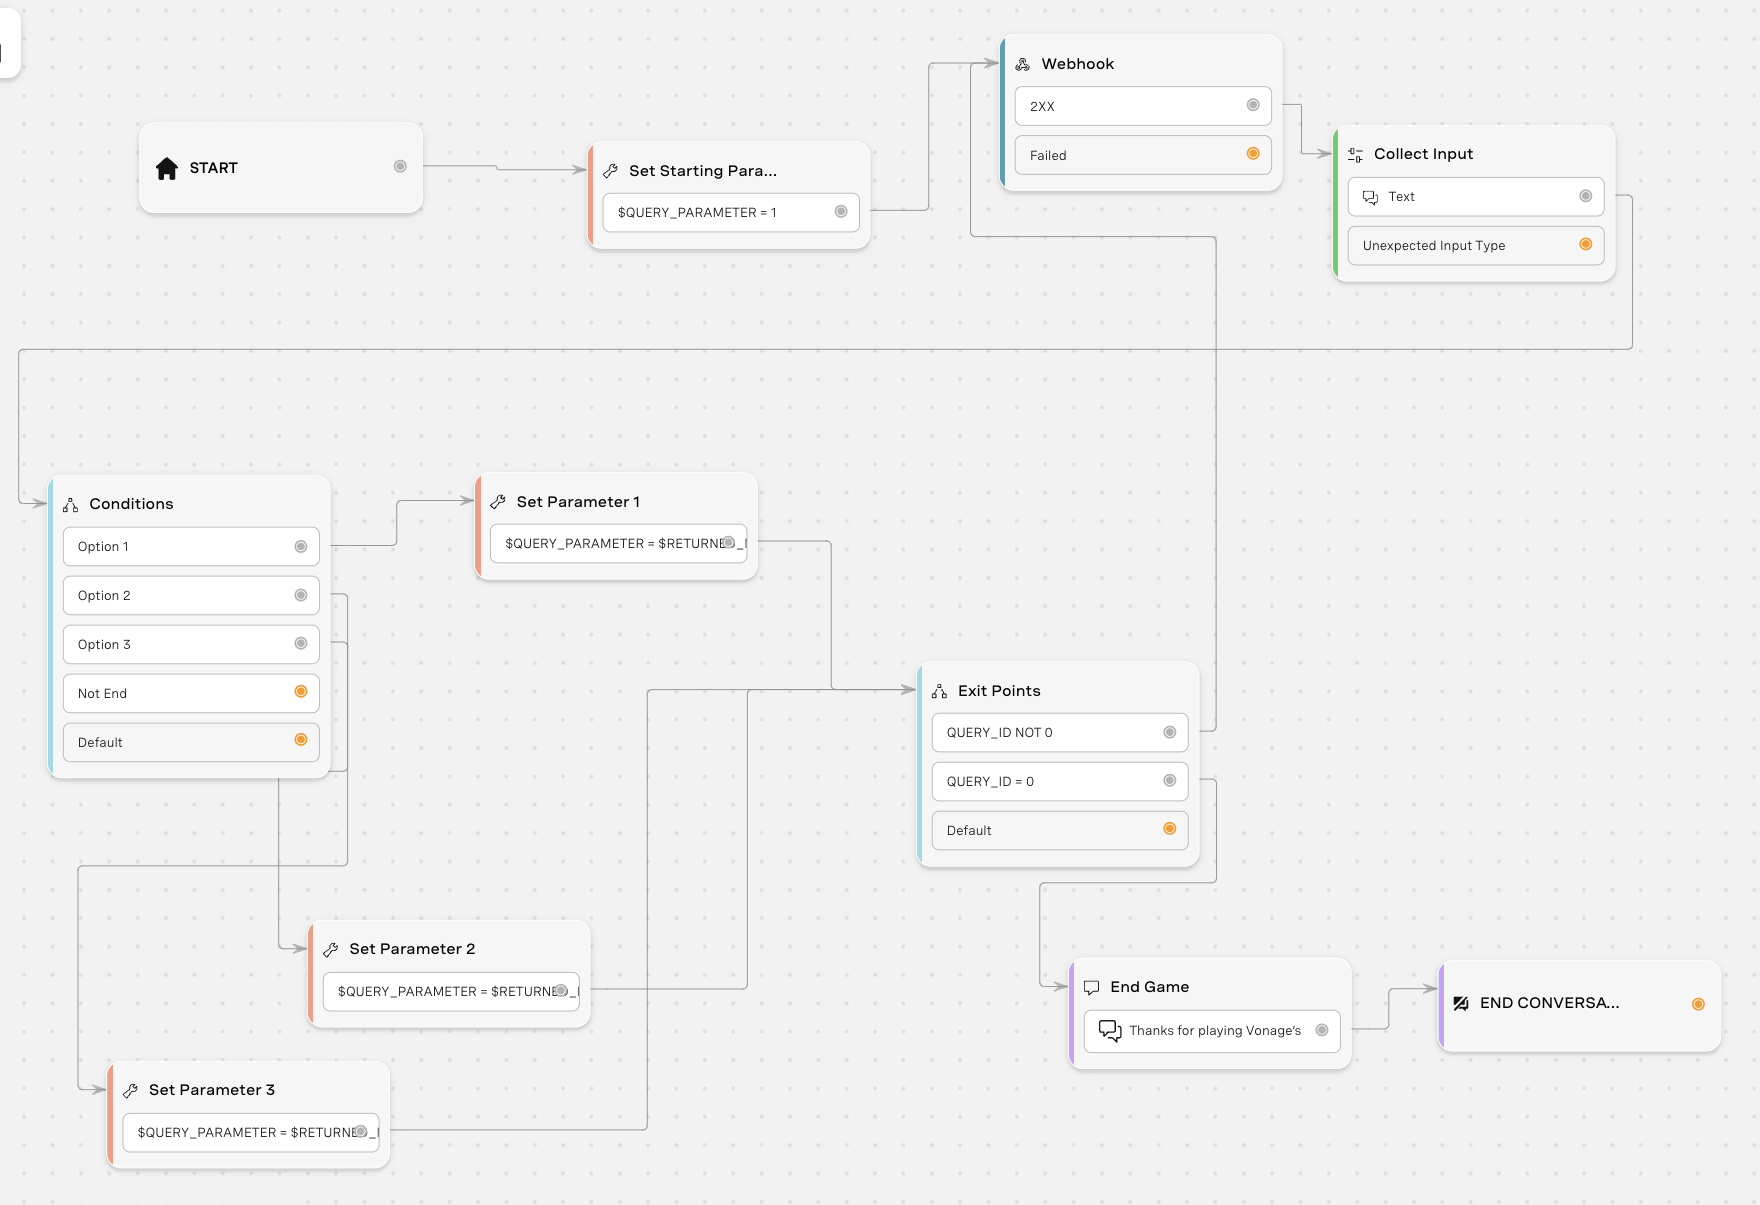
Agora vem a parte divertida! Com a interface fácil de usar do Vonage AI Studio, você pode criar o fluxo de conversação do seu chatbot. A configuração é feita por arrastar e soltar, o que significa que você não precisa ter conhecimentos de programação para começar. Você pode adicionar diferentes nós de diálogo e definir respostas.
Nosso fluxo deve ficar assim:
 Conversation Flow
Primeiro, configure o Vonage AI Studio.
A seguir, vamos criar nós e propriedades para conectá-los entre si, a fim de definir o fluxo da conversa. Você também pode baixar o arquivo zip deste exemplo e importar o agente no Vonage AI Studio. Se você quiser construir isso do zero, aqui estão os nós que precisaremos criar e quais nós e propriedades precisamos conectar a eles:
Propriedades > Parâmetros
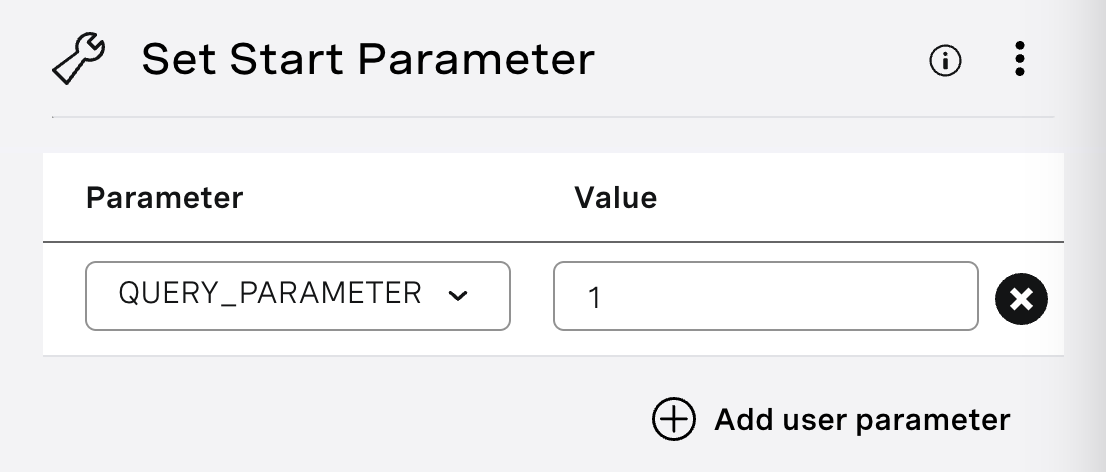
Nome da propriedade: Definir parâmetro inicial
Crie um parâmetro chamado QUERY_PARAMETER e defina-o como 1, já que nosso primeiro ID começa em 1.
Conexão(ões): START (à esquerda) e $QUERY_PARAMATER = 1 para o Webhook
 Set Start Parameter
NODES > Integrações > Webhook
Nome do nó: Webhook
Método: POST URL da solicitação: https://api.notion.com/v1/databases/<databaseid>/query
Para encontrar o ID de um banco de dados, acesse a URL do banco de dados no seu espaço de trabalho do Notion. O ID é a sequência de caracteres na URL que fica entre a barra após o nome do espaço de trabalho (se houver) e o ponto de interrogação. O ID é uma sequência alfanumérica de 32 caracteres.
Cabeçalhos (Cabeçalho HTTP: Valor)
Autorização: Portador $NOTION_ACCESS_TOKEN
Versão do Notion: 28/06/2022
Para obter seu $NOTION_ACCESS_TOKEN, siga o processo de autorização para um integração interna no Notion.
Corpo
Coloque o seguinte texto no corpo:
{
 "filter": {
  "property": "ID",
  "unique_id": {
   "equals": $QUERY_PARAMETER
  }
 }
}Mapeamento de respostas
Tipo de resposta: Caminho do objeto JSON
Depois de preencher as informações acima em nosso nó de webhook, verifique se o webhook está funcionando clicando no botão “Testar solicitação”, no canto superior direito. Na seção “Resposta”, você verá que ele retorna todos os dados da nossa tabela do Notion. Usando a resposta, defina o caminho do objeto e mapeie-o para um parâmetro. Se precisar de ajuda, confira meu blog, que [aborda o mapeamento de respostas com mais detalhes](LINK PARA MEU BLOG).
Conexão(ões): 2xx para coletar dados de entrada
![The image displays a section of a user interface titled "Response Mapping" for a software application, likely related to API or database interaction. It shows a configuration setup for handling JSON responses, with mappings from object paths in the JSON structure to named parameters. For example, "results[0].properties.Message.title[0].plain_text" is mapped to the parameter "$RETURNED_MESSAGE," and similar mappings are made for "Option1," "Option2," "Option3," "NextID1," "NextID2," and "NextID3," each pointing to their respective returned parameters. This setup is used to extract specific pieces of data from a JSON response and assign them to variables within the application The image shows a graphical user interface for mapping JSON response data to specific parameters within a software application. It lists various JSON object paths such as "results[0].properties.Message.title[0].plain_text" and corresponding parameters like "$RETURNED_MESSAGE". The mapping is designed to translate the structured JSON data into variables that the application can use in its operations.](https://s3.amazonaws.com/a.storyblok.com/f/270183/203701/1dc90d45ac/response-mapping.png) Response Mapping
Response Mapping
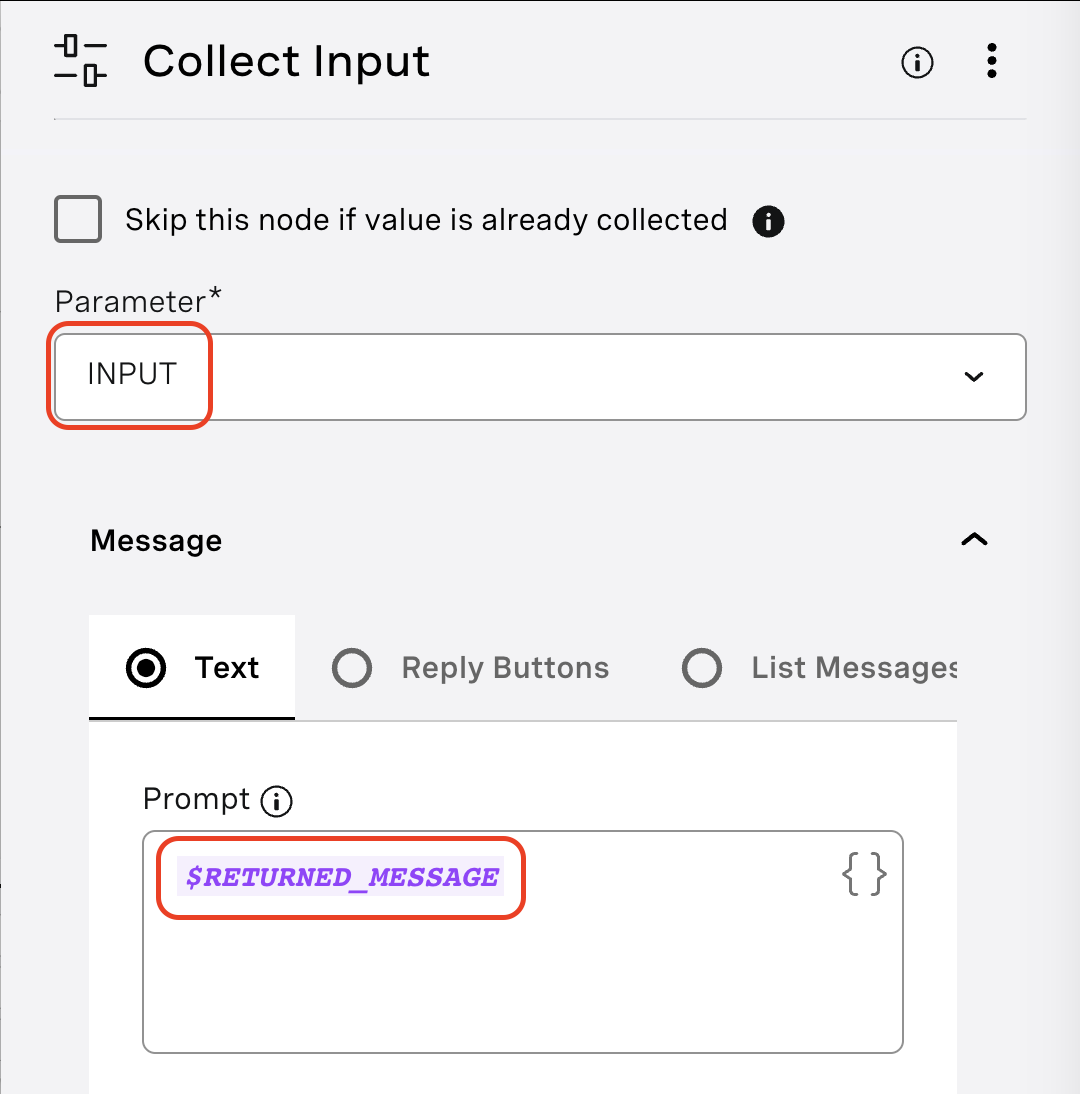
NÓS > Conversa > Coletar opiniões
Nome do nó: Coletar entrada
Parâmetro: ENTRADA
Texto de prompt: $RETURNED_MESSAGE (talvez seja necessário digitar isso manualmente, em vez de copiar e colar este texto)
Entrada esperada: Texto
Conexão(ões): Texto para Condições
 Collect Input
Nós > Conversa > Condições
Nome do nó: Condições
Nome(s) da(s) condição(ões):
Opção 1
* Parameter: INPUT * Operation: Is equal to * Value: $RETURNED_OPTION1CopiarOpção 2
* Parameter: INPUT * Operation: Is equal to * Value: $RETURNED_OPTION2CopiarOpção 3
* Parameter: INPUT * Operation: Is equal to * Value: $RETURNED_OPTION3CopiarNão é o fim
* Parameter: RETURNED_ID
* Operation: Is equal to
* Value: 9

	_or_

* Parameter: RETURNED_ID
* Operation: Is not equal to
* Value: 11

	_or_

* Parameter: RETURNED_ID
* Operation: Is not equal to
* Value: 12

	_or_

* Parameter: RETURNED_ID
* Operation: Is not equal to
* Value: 15

	_or_

* Parameter: RETURNED_ID
* Operation: Is not equal to
* Value: 16

	_or_

* Parameter: RETURNED_ID
* Operation: Is not equal to
* Value: 18

	_or_

* Parameter: RETURNED_ID
* Operation: Is not equal to
* Value: 19
Copiar
Conexão(ões):
- Opção 1 para definir o parâmetro 1
- Opção 2 para definir o parâmetro 2
- Opção 3 para definir o parâmetro 3
 Conditions
Propriedades > Parâmetros
Nome da propriedade: Definir parâmetro 1
Parâmetro: QUERY_PARAMETER
Valor: $RETURNED_NEXT_ID1
Conexão(ões): $QUERY_PARAMETER aos pontos de saída
Dependendo da opção escolhida pelo jogador, essa propriedade indicará o ID da próxima mensagem que o jogador deverá receber após enviar “1”.
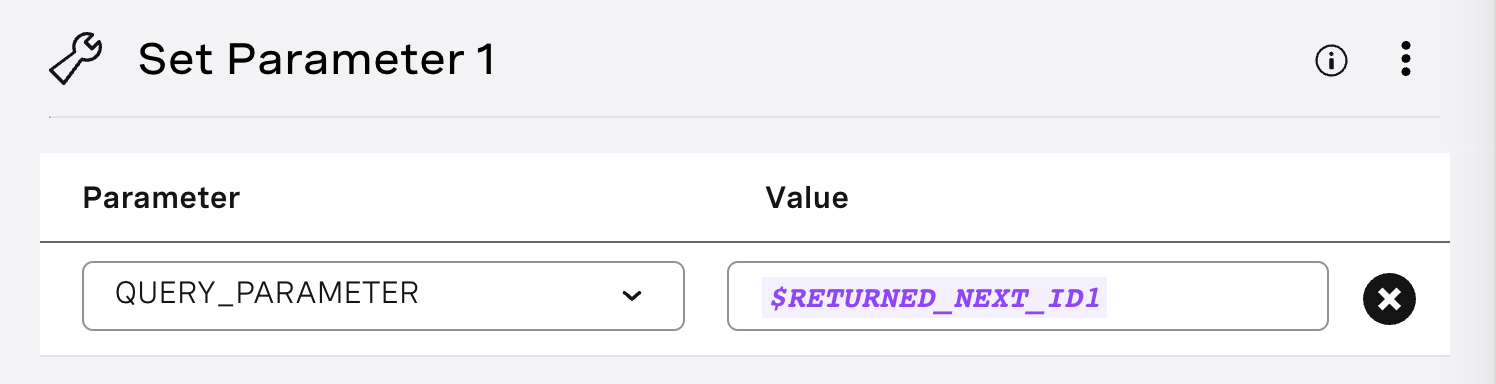 Set Parameter 1
Propriedades > Parâmetros
Nome da propriedade: Definir parâmetro 2
Parâmetro: QUERY_PARAMETER
Valor: $RETURNED_NEXT_ID2
Conexão(ões): $QUERY_PARAMTER aos pontos de saída
Dependendo da opção escolhida pelo jogador, essa propriedade indicará o ID da próxima mensagem que o jogador deverá receber após enviar “2”.
Propriedades > Parâmetros
Nome da propriedade: Definir parâmetro 3
Parâmetro: QUERY_PARAMETER
Valor: $RETURNED_NEXT_ID3
Conexão(ões): $QUERY_PARAMTER aos pontos de saída
Dependendo da opção escolhida pelo jogador, essa propriedade indicará o ID da próxima mensagem que o jogador deverá receber após enviar “3”.
Nós > Conversa > Condições
Nome do nó: Pontos de saída
Nome(s) da(s) condição(ões):
QUERY_ID NÃO É 0
*Parameter: QUERY_PARAMETER* Operation: Is not equal to *Value: 0* Connection(s): $QUERY_ID NOT 0 to WebhookCopiarQUERY_ID = 0
*Parameter: QUERY_PARAMETER*
	 Operation: Is equal to
	 *Value: 0*
	 Connection(s): $QUERY_ID = 0 to End Game
Copiar
Nós > Conversa > Enviar mensagem
Nome do nó: End Game
Texto: Obrigado por jogar o Gate da Vonage! Compartilhe sua opinião no Twitter e marque @dianasoyster e @VonageDev
Conexão(ões): Obrigado por jogar. FIM DA CONVERSA
 Send Message
Este nó é enviado depois que o jogador chega ao fim de sua aventura. Isso significa que todos os valores da tabela são 0 e ele envia um “1” para continuar, conforme solicitado.
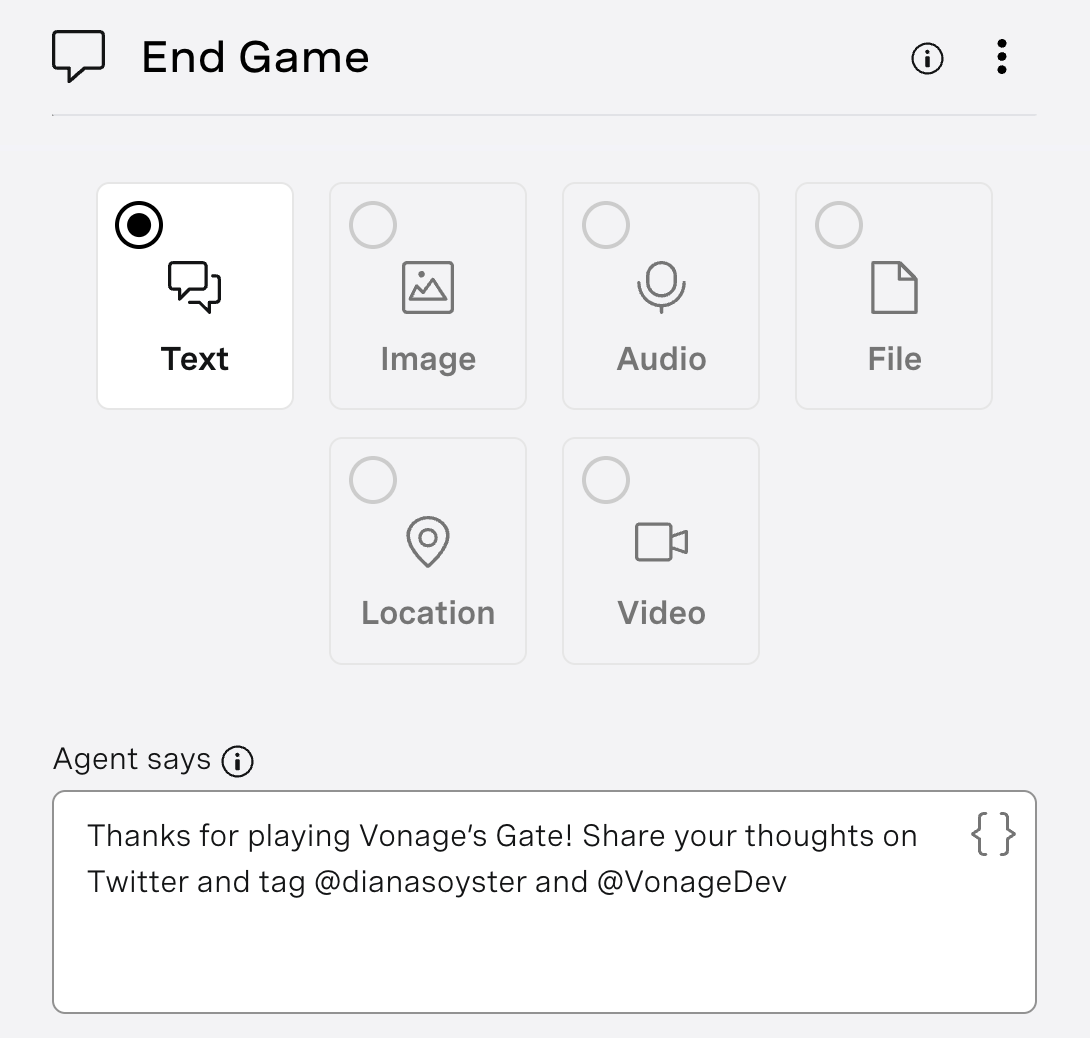 End Game
Nós > Ações > Encerrar conversa
Nome do nó: Encerrar conversa
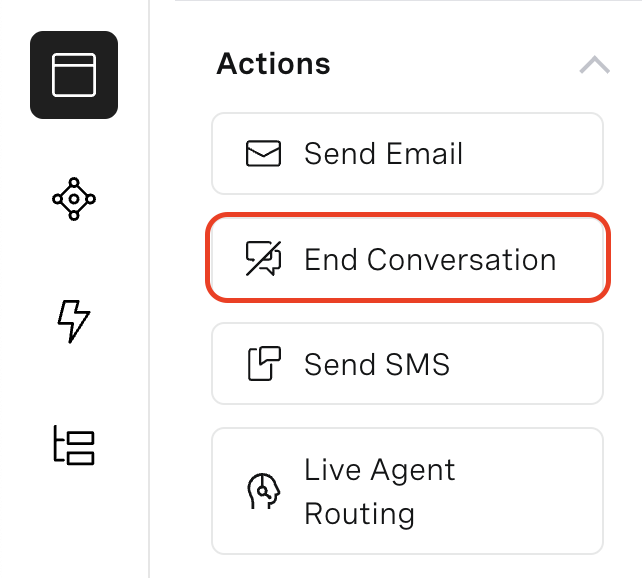 End Conversation
Tecnicamente, você não precisa desse nó, mas, por uma questão de boas práticas, devemos incluí-lo.
No canto superior direito do Vonage AI Studio, há um botão preto chamado “Tester”. Clique nele para jogar.
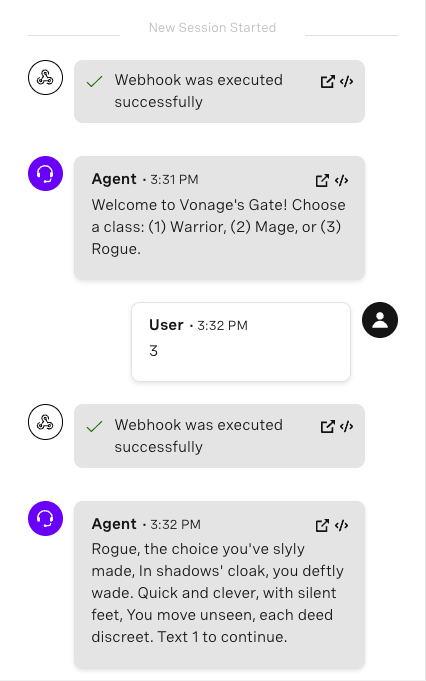 Testing the Agent in AI Studio - Part 1
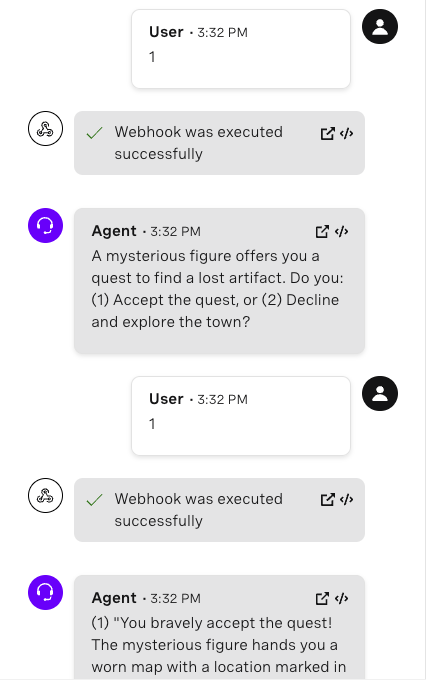 Testing the Agent in AI Studio - Part 2
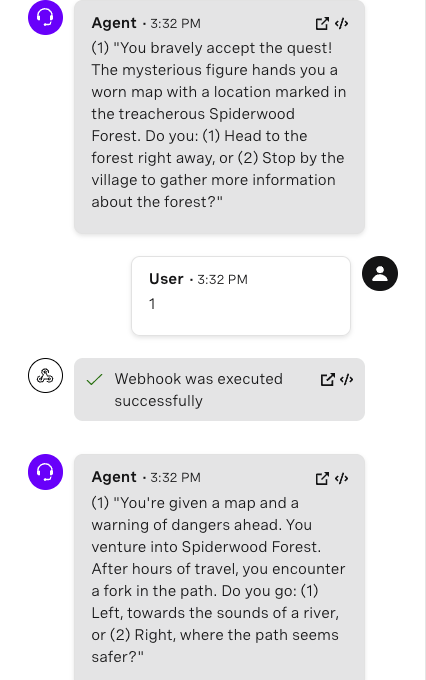 Testing the Agent in AI Studio - Part 3
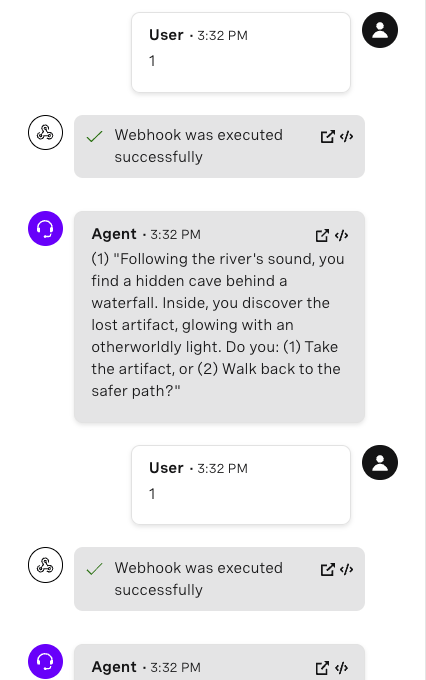 Testing the Agent in AI Studio - Part 4
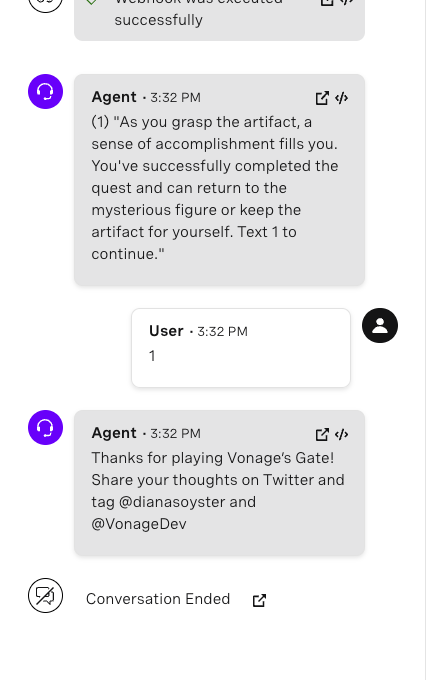 Testing the Agent in AI Studio - Part 5
Conforme citado em Baldur’s Gate 3: “Não se pode fazer concessões ao mal. No fim das contas, ele sempre sai ganhando.” Neste tutorial, aprendemos como aplicar as melhores práticas ao armazenar dados, para que você não precise lidar com a “maligna” dívida técnica caso precise fazer alterações em seus textos no futuro. Também aprendemos a integrar um banco de dados com o Vonage AI Studio e a Messages API. Se você quiser os dados deste exemplo, fique à vontade para participar da nossa “turma” de desenvolvedores no Slack e nos seguir no X, antes conhecido como Twitter. Se você criar uma aplicação semelhante, compartilhe-a e me marque — adoraria saber mais sobre sua aventura!