会話の詳細を取得する
Conversation APIを使用すると、音声通話のConversationオブジェクトの詳細を取得できます。
このチュートリアルでは、特に音声通話の詳細を取得することに焦点を当てますが、ビデオ通話やテキストチャットセッションなど、他の機能を持つ他の多くのユースケースが考えられます。このチュートリアルの目的は、会話の構造を理解することです。会話はVonageの技術の多くを支える重要なオブジェクトです。すべてのコミュニケーションは会話を通して行われるため、コミュニケーション活動の基本的なデータ構造です。
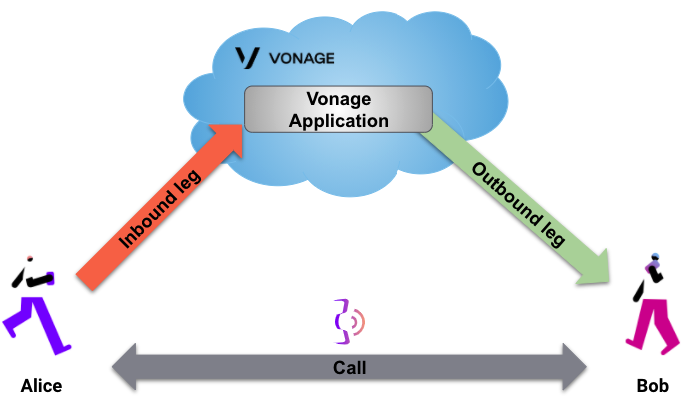
このチュートリアルで行うセットアップを下図に示す:
このチュートリアルでは
前提条件
- Vonageアカウントの作成 - これがなければ、遠くへは行けない。
- Vonage番号のレンタル - ユーロのフリークレジットがあるはずだ。十分すぎるほどだ。
- Vonageコマンドラインツールのインストール - 必要なもの ノード をインストールする必要がありますが、Vonage CLIを使うのが早くて便利です。
- を持つべきだ。 パイソン3 そして フラスコ をインストールします。これらはウェブフック・サーバーに必要です。
このチュートリアルでは ングロク を実行する。 ウェブフック サーバーをローカルに設置する。
ングロックをご存じない方は、以下をご参照ください。 チュートリアル 先に進む前に。
また、このチュートリアルでは、2台の携帯電話にアクセスする必要があります!
だから、もし続ける準備ができているのなら...。
Vonageアプリケーションの作成
まず、Vonage Applicationsを作成する必要があります:
この前のコマンドでは demo あなたのセットアップに当てはまるものを選んでください。
生成されたアプリケーションID(APP_ID)、JWTを生成する際に必要となる。
アプリケーションにVonage Numbersをリンクする
すでにVonage番号(VONAGE_NUMBER)、ダッシュボードまたはコマンドラインからVonage Numberとアプリケーションをリンクすることができます:
JWTの作成
Conversation APIはJWTを使用して認証されます。以下のコマンドでJWTを生成できる:
を交換する必要がある。 APP_ID をアプリケーションのIDと一緒に入力してください。また private.key は、この同じアプリケーションに関連するキーである。
注: このJWTは1日間有効です。
そして、JWTを見ることができる:
ヒント JWTのVerifyは以下のサイトで行えます。 jwt.io.
ウェブフックサーバーを実行する
進行中のコールのConversation IDを取得するために、Webhookサーバーを実行する必要があります。以下のPythonコードで十分です:
from flask import Flask, request, jsonify
from pprint import pprint

app = Flask(__name__)

ncco = [{
        "action": "connect",
        "endpoint": [{
            "type": 'phone',
            "number": 'TO_NUMBER'
        }]
}]

@app.route("/webhooks/answer")
def answer_call():
    params = request.args
    pprint(params)
    return jsonify(ncco)

if __name__ == '__main__':
    app.run(port=3000)
重要: を交換する必要がある。 TO_NUMBER を2台目の電話番号「電話2(Bob)」に置き換えてください。
このウェブフック・サーバーをローカルで実行する:
Vonage番号に電話をかける
電話機1(Alice)でVonage番号にダイヤルします。着信コールは2番目の電話、電話2(ボブ)に転送されます。電話2(Bob)で電話に出ます。この時点で通話をキャンセルしないでください。
ウェブフック・サーバーによって生成されたログを確認してください。以下のようなものが表示されるはずです:
...
{
   'conversation_uuid': 'CON-bc643220-2542-499a-892e-c982c4150c06',
   'from': '447700000001',
   'to': '447700000002',
   'uuid': '797168e24c19a3c45e74e05b10fef2b5'
}
...
あなたが興味があるのは、次のような会話IDだけだ。 CON-<uuid>.そのIDをコピーして便利な場所に貼り付ける。
会話の詳細を見る
別のターミナルタブで以下のコマンドを実行すれば、現在のコールの会話オブジェクトの詳細を取得できる。
注: 必ず交換してください。 $CONVERSATION_ID 以前に取得したIDと $JWT を、以前に作成したJWTで指定する。
以下を使用して、音声通話の会話詳細を取得する:
コードを書く
get-conversation.sh に以下を追加する:
curl "https://api.nexmo.com/v1/conversations/$CONV_ID" \
     -H 'Authorization: Bearer '$JWT\
-H 'Content-Type: application/json'コードを実行する
このファイルをあなたのマシンに保存し、実行する:
前提条件
npm install @vonage/server-sdkget-conversation.js という名前のファイルを作成し、以下のコードを追加する:
const { Vonage } = require('@vonage/server-sdk');

const vonage = new Vonage({
  applicationId: VONAGE_APPLICATION_ID,
  privateKey: VONAGE_PRIVATE_KEY,
});コードを書く
get-conversation.js に以下を追加する:
vonage.conversations.getConversation(CONV_ID)
  .then((conversation) => console.log(conversation))
.catch((error) => console.error(error));コードを実行する
このファイルをあなたのマシンに保存し、実行する:
前提条件
build.gradle に以下を追加する:
implementation 'com.vonage:server-sdk:9.3.1'GetConversation という名前のファイルを作成し、main メソッドに以下のコードを追加する:
VonageClient client = VonageClient.builder()
        .applicationId(VONAGE_APPLICATION_ID)
        .privateKeyPath(VONAGE_PRIVATE_KEY_PATH)
.build();コードを書く
GetConversation ファイルのmain メソッドに以下を追加する:
var conversation = client.getConversationsClient().getConversation(CONV_ID);
System.out.println(conversation);コードを実行する
Gradle用のアプリケーション プラグインを使うことで、アプリケーションの実行を簡単にすることができます。build.gradle を以下のように更新する:
apply plugin: 'application'
mainClassName = project.hasProperty('main') ? project.getProperty('main') : ''以下のgradle コマンドを実行し、com.vonage.quickstart.conversation をGetConversation を含むパッケージに置き換えてアプリケーションを実行する:
前提条件
Install-Package VonageGetConversation.cs という名前のファイルを作成し、以下のコードを追加する:
using System;
using System.Threading.Tasks;
using Newtonsoft.Json;
using Vonage;
using Vonage.Conversations.GetConversation;
using Vonage.Request;GetConversation.cs に以下を追加する:
var credentials = Credentials.FromAppIdAndPrivateKeyPath(VONAGE_APPLICATION_ID, VONAGE_PRIVATE_KEY_PATH);
var client = new VonageClient(credentials);コードを書く
GetConversation.cs に以下を追加する:
var response = await client.ConversationsClient.GetConversationAsync(GetConversationRequest.Parse(CONV_ID));前提条件
composer require vonage/clientget-conversation.php という名前のファイルを作成し、以下のコードを追加する:
use Vonage\Conversation\ConversationObjects\CreateConversationRequest;

require_once __DIR__ . '../../config.php';
require_once __DIR__ . '../../vendor/autoload.php';

$keypair = new \Vonage\Client\Credentials\Keypair(
    file_get_contents(VONAGE_APPLICATION_PRIVATE_KEY_PATH),
    VONAGE_APPLICATION_ID
);

$client = new \Vonage\Client($keypair);コードを書く
get-conversation.php に以下を追加する:
$conversation = $client->conversation()->getConversationById(CONVERSATION_ID);コードを実行する
このファイルをあなたのマシンに保存し、実行する:
このAPIコールでは、以下のようなレスポンスが返ってくる:
{
    "id": "CON-bc643220-2542-499a-892e-c982c4150c06",
    "name": "NAM-1b2c4274-e3f2-494e-89c4-46856ee84a8b",
    "timestamp": {
        "created": "2018-10-25T09:26:18.999Z"
    },
    "sequence_number": 8,
    "numbers": {},
    "properties": {
        "ttl": 172800,
        "video": false
    },
    "members": [
        {
            "member_id": "MEM-f44c872e-cba9-444f-88ae-0bfa630865a6",
            "user_id": "USR-33a51f4d-d06b-42f6-a525-90d2859ab9f6",
            "name": "USR-33a51f4d-d06b-42f6-a525-90d2859ab9f6",
            "state": "JOINED",
            "timestamp": {
                "joined": "2018-10-25T09:26:30.334Z"
            },
            "channel": {
                "type": "phone",
                "id": "797168e24c19a3c45e74e05b10fef2b5",
                "from": {
                    "type": "phone",
                    "number": "447700000001"
                },
                "to": {
                    "type": "phone",
                    "number": "447700000002"
                },
                "leg_ids": [
                    "797168e24c19a3c45e74e05b10fef2b5"
                ]
            },
            "initiator": {
                "joined": {
                    "isSystem": true
                }
            }
        },
        {
            "member_id": "MEM-25ccda92-839d-4ac6-a7b2-de310224878b",
            "user_id": "USR-b9948493-be4a-4b36-bb4d-c96bcc2af85b",
            "name": "vapi-user-f59c1ff26c0543fdb6c02fd30617a1c0",
            "state": "JOINED",
            "timestamp": {
                "invited": "2018-10-25T09:26:19.385Z",
                "joined": "2018-10-25T09:26:30.270Z"
            },
            "invited_by": "USR-b9948493-be4a-4b36-bb4d-c96bcc2af85b",
            "channel": {
                "type": "phone",
                "id": "30cecc87-7ac9-4d03-910a-e9d69558263c",
                "from": {
                    "number": "Unknown",
                    "type": "phone"
                },
                "leg_ids": [
                    "30cecc87-7ac9-4d03-910a-e9d69558263c"
                ],
                "to": {
                    "number": "447700000001",
                    "type": "phone"
                },
                "cpa": false,
                "preanswer": false,
                "ring_timeout": 60000,
                "cpa_time": 5000,
                "max_length": 7200000
            },
            "initiator": {
                "invited": {
                    "isSystem": true
                }
            }
        }
    ],
    "_links": {
        "self": {
            "href": "https://api.nexmo.com/v0.3/conversations/CON-bc643220-2542-499a-892e-c982c4150c06"
        }
    }
}
この対応については 会話 というトピックがある。
これで電話1(Alice)と電話2(Bob)を切って通話を終了することができます。
結論
Conversation APIを使用して、音声通話のConversationオブジェクトを取得する方法を説明しました。