シェア:
PranavはMoneycontrolのシニアソフトウェアエンジニアで、ReactとNext.jsを使って次世代ウェブアプリを構築している。また、LearnersBucketでパフォーマンスと最適化について執筆している。
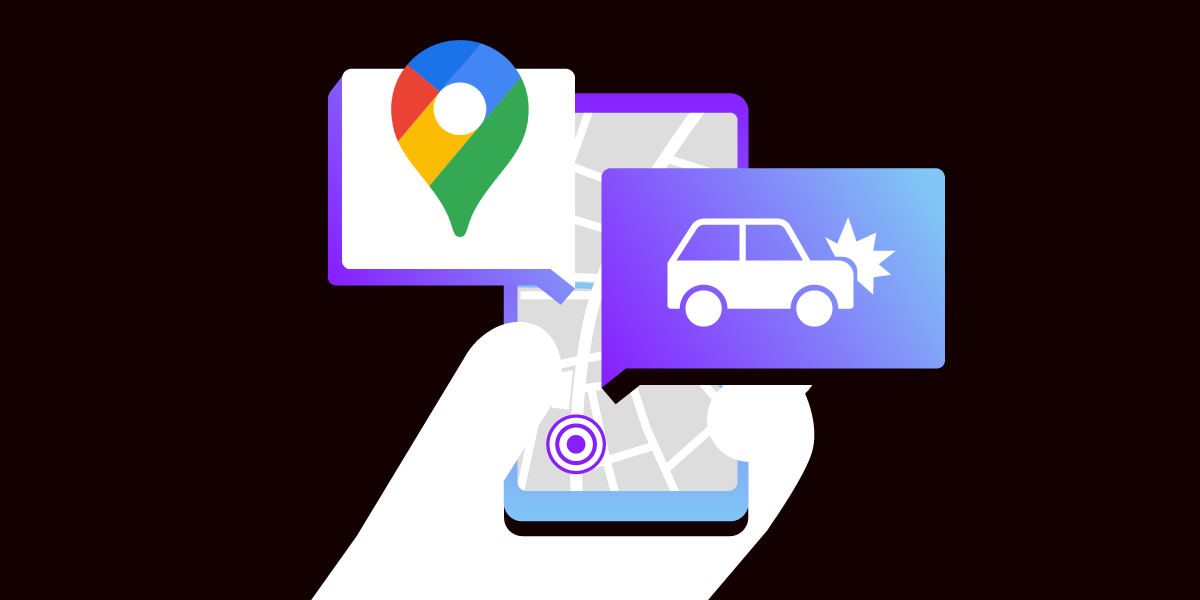
VonageとGoogle Maps APIを使用したSMSによる交通警報
所要時間:5 分
この慌ただしく、喧騒に満ちた世界では、生活の断片が絶えず動いているため、ユーザーはできるだけ便利に情報を取得することを重視する。特にインドのように遠隔地でのインターネット・ネットワークの普及率が低い国では、これは必ずしも容易ではない。
例えば、忙しい一日を終えて帰宅するためにオフィスを出ようとしていて、ルート上の交通状況を確認したいが、インターネット接続が遅いとしよう。SMSに出発地と到着地を送って、交通情報を即座に入手できたらどうだろう?それは救世主となるだろう!
この記事では、Node.jsでVonageとGoogle Maps APIを使ってSMSによる交通警報を作成する方法を紹介する。
作業を始める前に、以下のものがインストールされていることを確認してください:
Node.js.Node.jsはオープンソースのクロスプラットフォームJavaScript実行環境です。
ngrok- 無料アカウントが必要です。このツールを使用すると、開発者はローカルの開発サーバーをインターネットに公開することができます。
Vonage CLI- Node.jsがインストールされたら
npm install -g @vonage/cliを使ってインストールすることができます。このツールでVonageアプリケーションを作成・管理できます。
アカウントを作成すると、API キーと API シークレットは次のように表示されます。 Vonage APIダッシュボード.
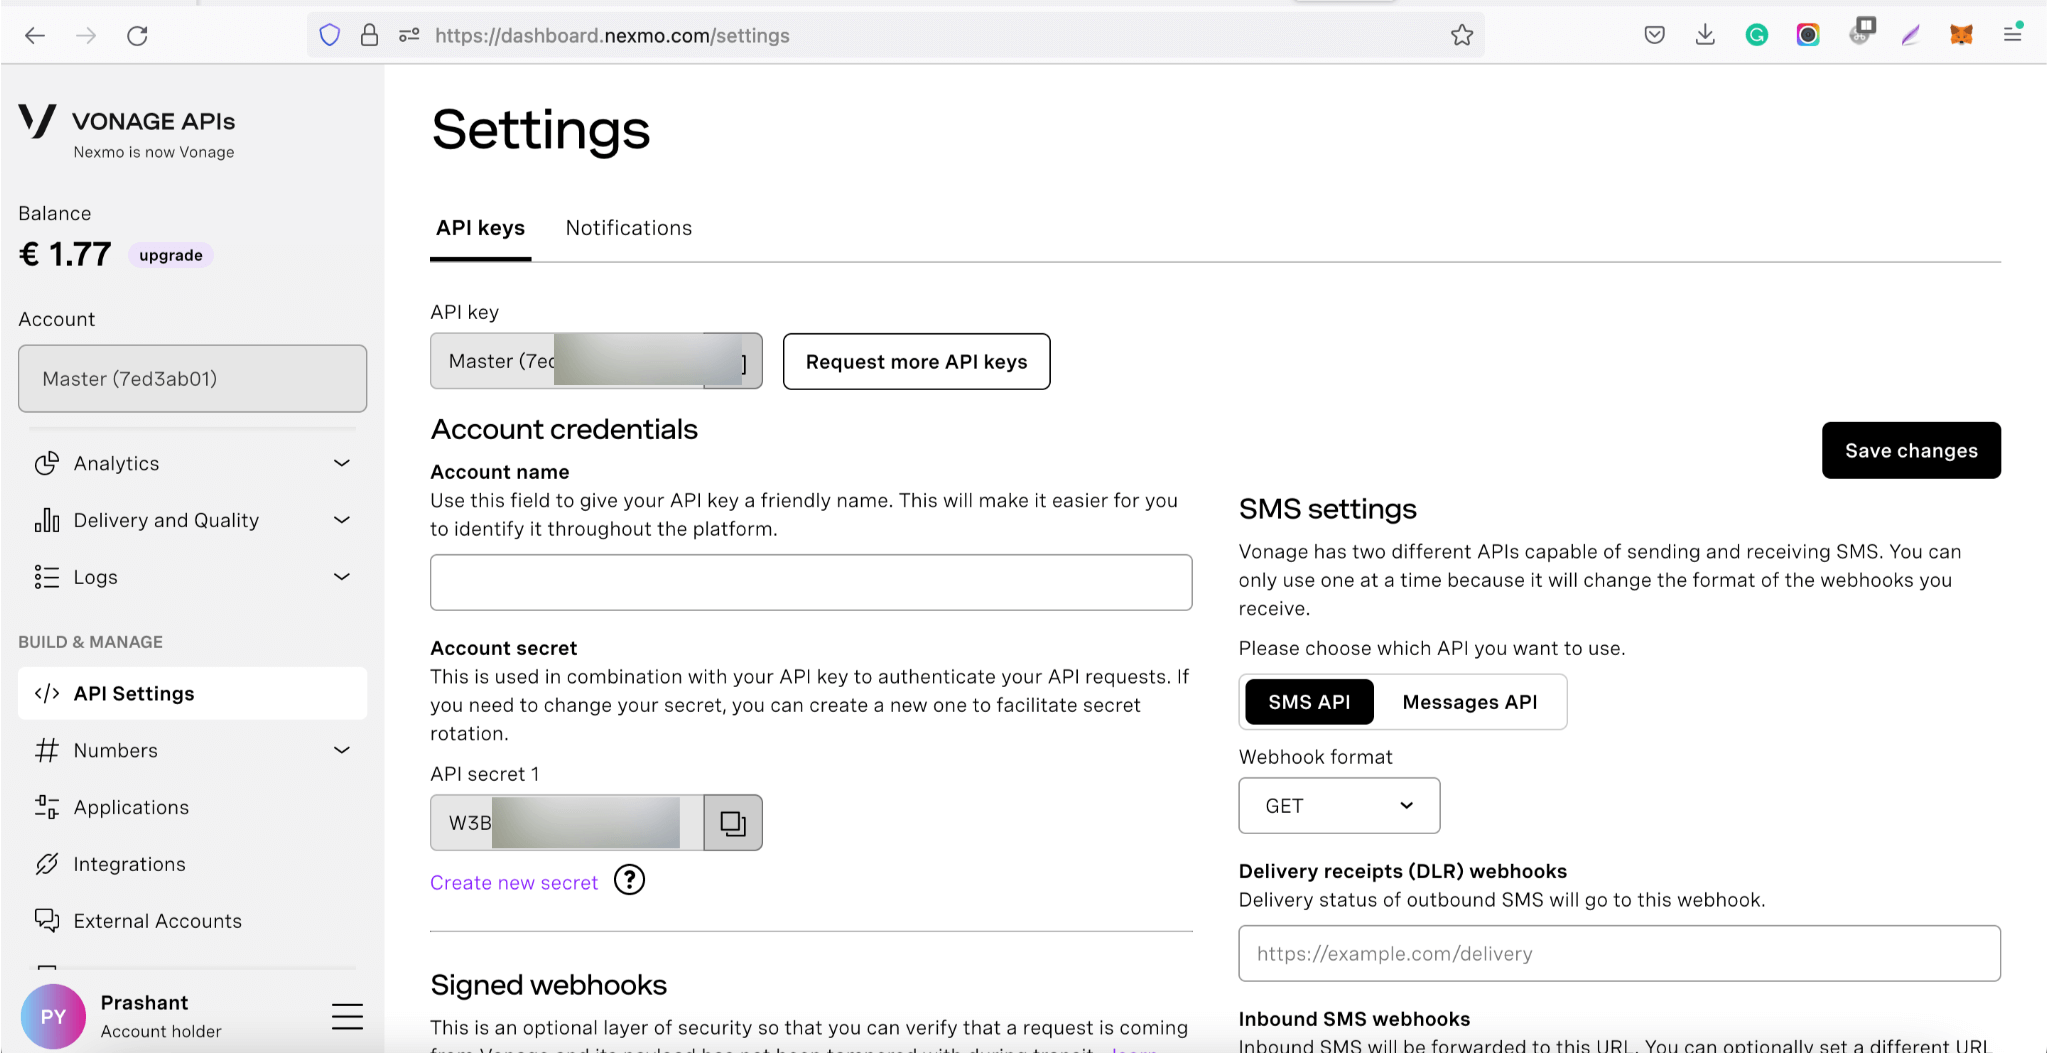
APIキーを受け取ったら APIキーと APIシークレットを受け取ったら、それを SMS API.
我々はまた、以下を必要とする Google Direction API.Google アカウントを作成し、ログインして Google API を使用するための無料クレジットと APIキー.
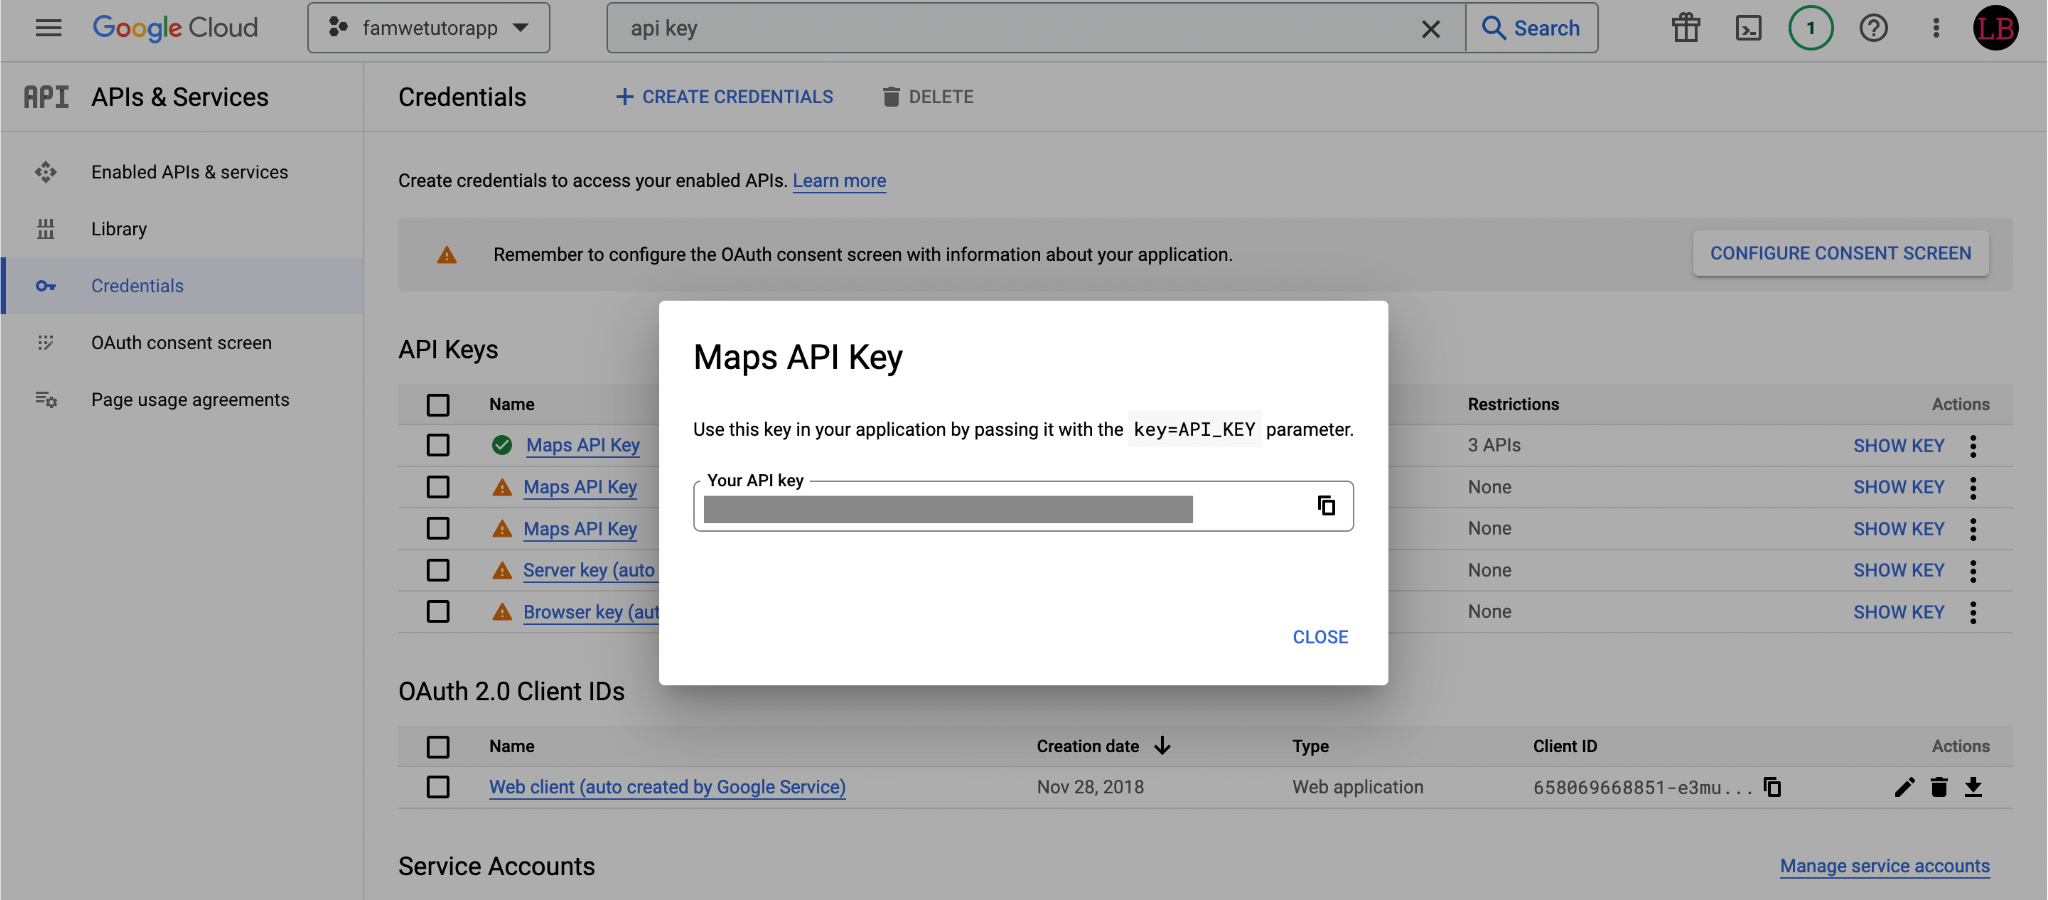
Google Maps API キーを取得します:
Googleマッププラットフォーム グーグルマッププラットフォーム> 認証情報のページ.
認証情報ページで クレデンシャルを作成 > APIキー.をクリックします。 APIキー作成ダイアログに、新しく作成した APIキー.
閉じるをクリックする。新しい APIキーは、Credentials ページの APIキー.
このアプリケーションの実装は3つの部分に分けられる:
SMSメッセージを受信して読む。
SMSテキストから発信地と目的地を抽出し、Google Maps APIからトラフィックの詳細を取得します。
トラフィックデータを処理し、テキスト形式および人間が読める形式でSMSを送り返す。
私たちのアプリケーションはNode.jsで開発されるため、必ず Nodejsがインストールされていることを確認してください。
ターミナルで次のコマンドを実行して、依存関係をインストールする:
という名前のファイルを1つ作成する。 App.jsという名前のファイルを作成する。 3000で実行し、その中ですべての処理を行う
環境変数を取得するために dotenvnpmパッケージを使って環境変数を取得した。これを使えば、秘密を安全に保存できる。
const app = require('express')()
const bodyParser = require('body-parser')

if (process.env.NODE_ENV !== "production") {
    require("dotenv").config();
}

app.use(bodyParser.json())
app.use(bodyParser.urlencoded({ extended: true }))

app.listen(process.env.PORT || 3000, "127.0.0.1", () => {
    console.log("Server Running on Port ", process.env.PORT || 3000);
});
環境変数を保存してアクセスするには、ルート・ディレクトリに .envファイルを作成し、プロパティを追加する。
PORT = 3000これらのプロパティには process.env.PORT
最初のステップはSMSを受信し、それを読むことです。Vonageは、Nodeアプリケーション内でSMS Clientを使用するためのNode.js SDKを提供しています。
このチュートリアルに沿って このチュートリアルを参照してください。
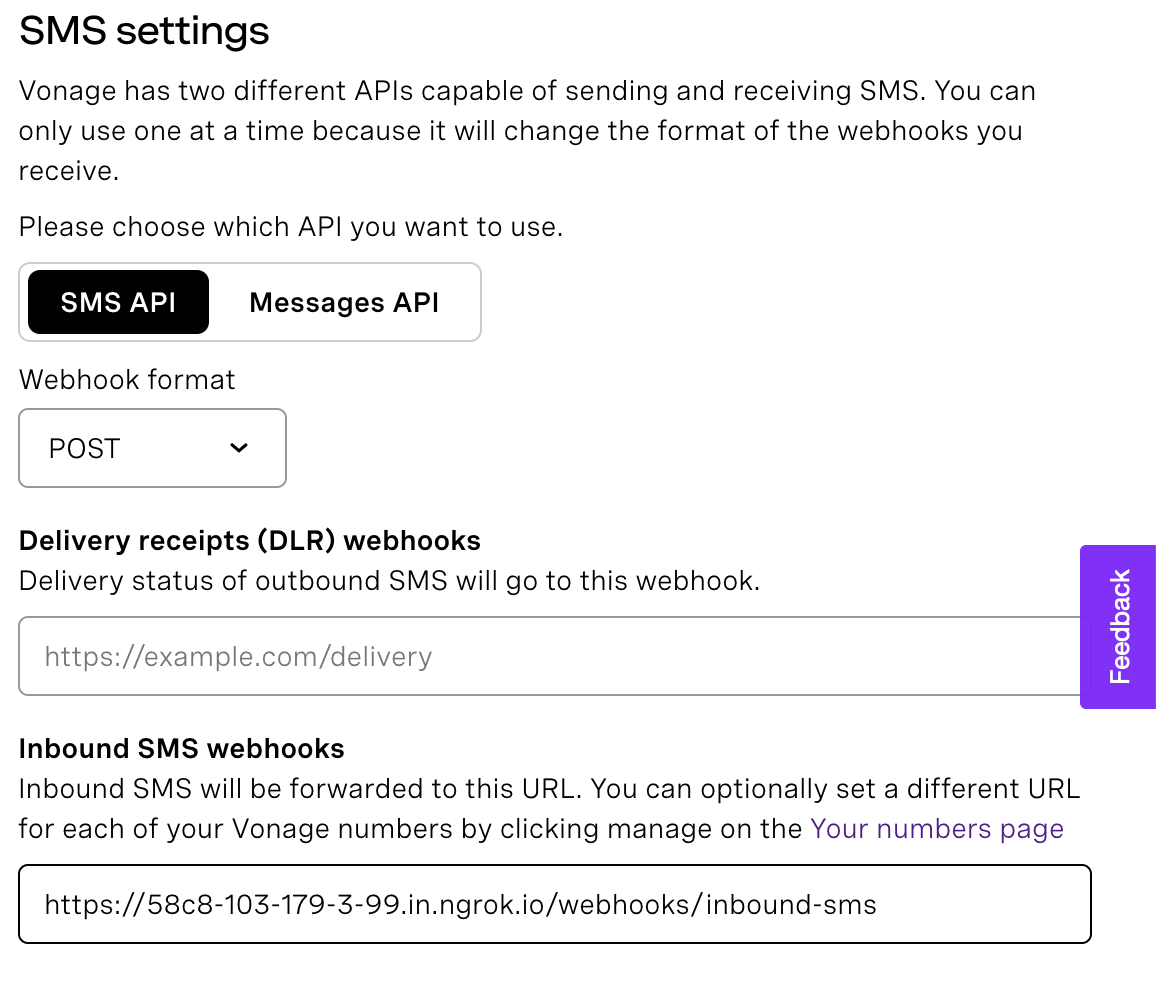
次のステップは、受信APIを設定し、Vonageコンソールに追加することである。こうすることで、私たちの番号にSMSが送信されるたびに、受信APIが呼び出され、そのSMSを読むことができる。
詳細なチュートリアルがあります。 インバウンドAPIをセットアップし、SMSを読む方法についての詳細なチュートリアルがあります。.
インバウンドAPIは、サードパーティのアプリケーションに公開し、彼らがデータを送信するものだ。
どれでも GETまたは POSTリクエストは /webhooks/inbound-smsに渡されます。 handleInboundSms関数に渡されます。
app.route("/webhooks/inbound-sms")
.get(handleInboundSms)
.post(handleInboundSms);

function handleInboundSms(request, response) {
    // reads the SMS body
    const params = Object.assign(request.query, request.body);

    // process the SMS text
    getTrafficDetailsAndSendSMS(params);

    // notify that we have received SMS
    response.status(204).send();
}このインバウンドAPIを動作させるには、アプリケーションをライブに設定する必要がある。それには ngrok.
アプリケーションを稼動させるには、まず ngrokをセットアップする.
そして、nodeアプリをローカルで実行する。
ローカル・アプリが実行されたら、ngrokを使ってそれをマッピングし、ライブに設定することができる。
期待される出力
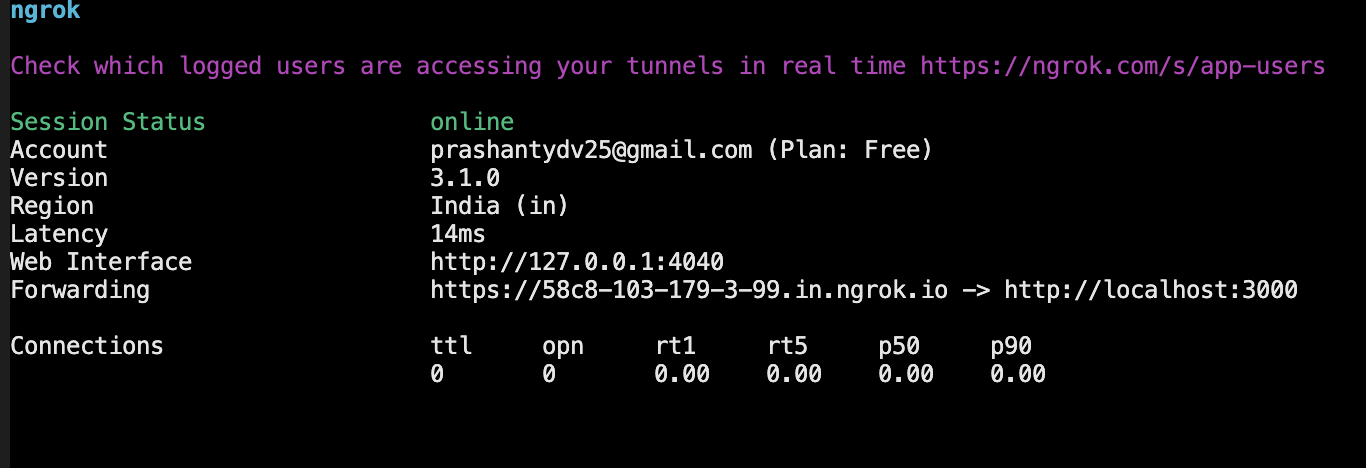
アプリが公開されると、公開URLを受け取ります。 https://58c8-103-179-3-99.in.ngrok.io
このURLをVonageダッシュボードに追加し、インバウンドAPIをリッスンできるようにする。
SMSを受信できるようになったので、テキストを処理してGoogleから交通情報を取得しよう。
Inbound APIを通じて受信したSMSから送信元と宛先の情報を抽出するには、SMSテキストを解析しやすくするために、一定のフォーマットにしておく必要があります。より簡単に処理できるシンプルなテンプレートを作成しました。
例えば、ムンバイ-プネー間の交通情報を受信するために、次のようなSMSを作ってみましょう:
Traffic between Mumbai and Pune上の例では Mumbaiがソースで Puneはデスティネーションである。
この getTrafficDetailsAndSendSMS(params);関数では、SMS本文を受け取り、ソースを抽出することができる。
function getTrafficDetailsAndSendSMS(params) {
    // get the source and destination by parsing the text
    const { origin, destination } = parseText(params);

    // get the traffic details and routes
    const routes = getTrafficDetails({ origin, destination });

    // send back the SMS
    sendSMS(params.msisdn, routes);
}
経路を見つけるには、受信したSMSから送信元と宛先を抽出しなければならない。
この parseText(params)メソッドはSMSテキストから送信元と宛先を抽出し、それを返します。
function parseText({ text }) {
    let sampleText = "Traffic between mumbai and pune";
    if (text) {
   	 sampleText = text;
    }

    sampleText = sampleText.trim();
    const characters = sampleText.split(" ");
    const origin = characters[2];
    const destination = characters[4];

    return { origin, destination };
}
これと sourceと destinationを グーグル距離マトリックスAPIに渡すことができる。
アプリケーションからAPIを呼び出すには axiosその依存関係を追加しよう。
トラフィック情報を取得するには、クエリーパラメーターに departure_timeをクエリ・パラメータに渡す必要があります。その値として nowを渡して、現在のトラフィックの詳細を取得しています。
また modeとして driving.これは設定可能にすることができ、より良いユーザーエクスペリエンスを提供するために、ルートと一緒にSMSで受け付けることができます。
async function getTrafficDetails({ origins, destinations }) {
    try {
   	 const YOUR_API_KEY = process.env.GOOGLE_MAP_API_KEY;
   	 const mode = "driving";
   	 const departure_time = "now";

   	 var  config = {
   		 method:  "get",
   		 url:  `https://maps.googleapis.com/maps/api/directions/json?origins=${origins}&destinations=${destinations}&mode=${mode}&departure_time=${departure_time}&language=en-US&key=${YOUR_API_KEY}`,
   	 };

   	 let response = await axios(config);
   	 response = await response.data;

   	 const  routes = getRoutes(response);
   	 return  routes.join(" \n\n ");
    } catch (e) {
   	 console.error("There was some error while getting routes details", e);
    }
}
以下はGoogle Maps APIからのレスポンスのサンプルです。
const response = {
  	routes: [
    	{
      	bounds: {
        	northeast: { lat: 41.8781139, lng: -87.6297872 },
        	southwest: { lat: 34.0523525, lng: -118.2435717 },
      	},
      	copyrights: "Map data ©2022 Google, INEGI",
      	legs: [
        	{
          	distance: { text: "579 km", value: 932311 },
          	duration: { text: "8 hours 48 mins", value: 31653 },
          	duration_in_traffic: { text: "8 hours 55 mins", value: 932311 },
          	end_address: "Panvel",
          	end_location: { lat: 37.0842449, lng: -94.513284 },
          	start_address: "Mumbai",
          	start_location: { lat: 41.8781139, lng: -87.6297872 },
          	steps: [],
          	traffic_speed_entry: [],
          	via_waypoint: [],
        	},
        	{
          	distance: { text: "217 km", value: 349512 },
          	duration: { text: "3 hours 17 mins", value: 11799 },
          	duration_in_traffic: { text: "3 hours 40 mins", value: 932311 },
          	end_address: "Alephata",
          	end_location: { lat: 35.4675612, lng: -97.5164077 },
          	start_address: "Panvel",
          	start_location: { lat: 37.0842449, lng: -94.513284 },
          	steps: [],
          	traffic_speed_entry: [],
          	via_waypoint: [],
        	},
        	{
          	distance: { text: "1,328 km", value: 2137682 },
          	duration: { text: "19 hours 28 mins", value: 70097 },
          	duration_in_traffic: { text: "20 hours 22 mins", value: 932311 },
          	end_address: "Pune",
          	end_location: { lat: 34.0523525, lng: -118.2435717 },
          	start_address: "Alephata",
          	start_location: { lat: 35.4675612, lng: -97.5164077 },
          	steps: [],
          	traffic_speed_entry: [],
          	via_waypoint: [],
        	},
      	],
      	summary: "I-55 S and I-44",
      	warnings: [],
      	waypoint_order: [0, 1],
    	},
  	],
  	status: "OK",
};私たちはGoogle Direction APIから受け取ったレスポンスを処理し、そこから読み取り可能な文字列を作成した。
文字列を形成するために、与えられた経路のすべてのパス、その距離、目的地に通常とトラフィックがある場合の到達時間を取った。
すべてのルートを人間が読める文字列に変換し、それらをまとめて返します。
レスポンスを処理するために、ヘルパー関数を使用する。
const  getRoutes = ({ routes }) => {

// calculate the overall distance of all the routes

return  routes.reduce((a, b, l) => {
const { legs } = b;


let  via = "";
let  normalTime = 0;
let  timeInTraffic = 0;


// for each route, calculate the distance path wise, from one to another

const  distance = legs.reduce((x, y, i) => {

const { distance, duration, duration_in_traffic, steps, start_address, end_address } = y;

normalTime += getTimeInMinutes(duration.text);

timeInTraffic += getTimeInMinutes(duration_in_traffic.text);


if (i !== legs.length - 1) {

via = via ? via + " -> " + end_address : end_address;

}

const  string = `From ${start_address} to ${end_address} it takes ${duration.text} normally and ${duration_in_traffic.text} in traffic to cover a distance of ${distance.text}`;

x.push(string);
return  x;
}, []);

// for the final string
const  finalString = `Route${l + 1} via ${via} will take ${processTime(
normalTime
)} normally and ${processTime(
timeInTraffic
)} in traffic. Path via breakdown is: ${distance.join(" AND ")}`;

// push the string
a.push(finalString);
return  a;
}, []);
};

// helper function extract to hours and minutes from text
// and return time in minutes

const  getTimeInMinutes = (timeText) => {

timeText = timeText.split(" ");

let  hrs = timeText[0];

let  mins = timeText[2];

return  parseInt(hrs) * 60 + parseInt(mins);

};


// helper function to get hours and mins from the time

const  processTime = (time) => {

const  hrs = Math.floor(time / 60);

const  mins = time % 60;

return  `${hrs} hours ${mins} mins`;

};
このメソッドは、通常時と渋滞時の経路経由の距離と経路の配列を返し、それらをテキスト形式で返すことができる。
関数では getTrafficDetails()関数では、トラフィック API レスポンスを処理し、このレスポンスを使ってトラフィックの詳細を含むテキストを生成しています。出力テキストは以下のようになる:
"Route1 via Panvel -> Alephata will take 31 hours 33 mins normally and 32 hours 57 mins in traffic. Path via breakdown is:  From Mumbai to Panvel it takes 8 hours 48 mins normally and 8 hours 55 mins in traffic to cover a distance of 579 km AND From Panvel to Alephata it takes 3 hours 17 mins normally and 3 hours 40 mins in traffic to cover a distance of 217 km AND From Alephata to Pune it takes 19 hours 28 mins normally and 20 hours 22 mins in traffic to cover a distance of 1,328 km"

"Route2 via Eastern Express Highway -> Lonavala will take 11 hours 33 mins normally and 12 hours 57 mins in traffic. Path via breakdown is:  From Mumbai to Eastern Express Highway it takes 7 hours 48 mins normally and 7 hours 55 mins in traffic to cover a distance of 579 km AND From Eastern Express Highway to Lonavala it takes 2 hours 17 mins normally and 2 hours 40 mins in traffic to cover a distance of 200 km AND From Lonavala to Pune it takes 1 hours 28 mins normally and 2 hours 22 mins in traffic to cover a distance of 1,28 km"
この生成されたテキストには、通常時とピーク時の、発信地から目的地までの所要時間が含まれている。この情報は、入力を受け取ったのと同じ電話番号に送り返すことができる。
私たちはVonage SMS APIを利用して情報を送り返すことができます。SMSを受信すると、送信者の携帯電話番号も受信し、その番号にSMSを送り返すことができます。
async function sendSMS(msisdn, routes) {
    try {
   	 const data = qs.stringify({
   		 from: "Vonage APIs",
   		 text: routes,
   		 to: msisdn,
   		 api_key: process.env.VONAGE_API_KEY,
   		 api_secret: process.env.VONAGE_API_SECRET,
   	 });

   	 const config = {
   		 method: "post",
   		 url: "https://rest.nexmo.com/sms/json",
   		 headers: {
   		 "Content-Type": "application/x-www-form-urlencoded",
   		 },
   		 data: data,
   	 };

   	 let response = await axios(config);
   	 response = await response.data;
    } catch (e) {
   	 console.error("There was some error while sending sms", e);
    }
}このアプリケーションのソースコードは こちら
SMS通知によるインスタントトラフィックアラートを作成しましたので、この記事を参考に、SMS、またはWhatsAppを使用して別のアラートシステムを作成することができます。 VonageメッセージAPI.
コミュニティからの参加はいつでも大歓迎です。Vonageに参加する GitHubのコードサンプルと コミュニティ・スラックにご参加ください。Vonage開発者に ツイートを送信し、Vonage APIを使用して構築したクールなものについてお知らせください。
また、私のブログ learnersbucket.comでウェブ開発の記事を書いています。