
シェア:
プラシャントはVonageのAPIパートナー・セールス・チームのメンバーです。シンガポール在住。顧客とパートナーがVonage CPaaSの機能をビジネスに活用できるようにするための活動を推進している。余暇には、風光明媚な島をサイクリングしたり、バドミントンの試合で汗を流したりしています。
GlitchでSMSとVoiceを受信するためのWebhookを設定する方法
所要時間:1 分
このチュートリアルでは、Vonageを通信プラットフォームとして、GlitchとNode.jsサーバーを使用して、着信音声通話とSMSメッセージを処理するためのWebhookの設定方法を学びます。Webhookとは、特定のイベントが発生したときに、あるアプリケーションが別のアプリケーションにリアルタイムのデータを送信する方法です。リスナーとして動作し、着信やSMSのようなイベントを待ち、そのイベントが発生したときに事前に定義されたアクションをトリガーします。これにより、サーバーは外部トリガーに即座に反応することができ、ユーザーのインタラクションにタイムリーに対応することができます。
Webhookを実装すると、アプリケーションに大きなメリットがあります。VoiceコールやSMSメッセージのリアルタイム処理を可能にすることで、ユーザーに対してよりインタラクティブで応答性の高いコミュニケーション体験を提供できます。例えば、カスタマーサポートの応答を自動化したり、CRMシステムと統合してやりとりを記録したり、受信メッセージに基づいてワークフローをトリガーしたりできます。これにより、手作業を減らすことで、ユーザーのエンゲージメントと効率を高めることができます。
このガイドが終わる頃には、Vonageを通して着信通話とSMSメッセージをリッスンして処理する、完全に機能するウェブサーバーが出来上がっていることでしょう。それでは始めましょう!
A グリッチアカウント
次のステップで説明しよう:
新しいプロジェクトを作成する。
サーバーを設定します。
依存関係をインストールします。
プロジェクトの共有と設定
VonageアプリケーションにWebhookを統合。
新機能をテストする。
Glitchアカウントにログインしてください。
クリック 「新規プロジェクトをクリックし "グリッチ・ヘロ・ノード".
完了すると、新しいプロジェクトが作成されます。
 Glitch Hello Node
着信および発信の通話とSMSを処理するためにサーバーを設定するには、以下の手順に従ってください:
左側のペインでを見つけてクリックします。
server.js.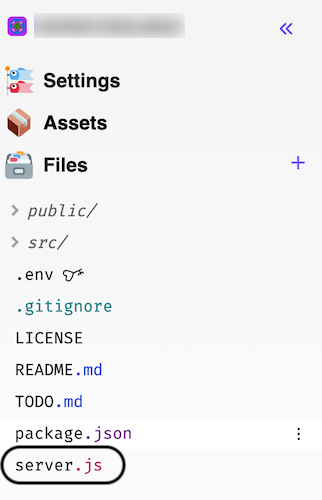 serverjs file
右ペインでの内容をすべて選択し
server.jsの内容をすべて選択し、削除します。提供されたコード・スニペットをコピーしてを
server.js.このコードは、インバウンド、アウトバウンドコールとSMSを処理するためのウェブリクエストを処理できるウェブサーバーを設定します。
const path = require("path");
const app = require('express')();
const bodyParser = require('body-parser');
const fastify = require("fastify")({ logger: true });

fastify.register(require("@fastify/static"), {
  root: path.join(__dirname, "public"),
  prefix: "/",
});

fastify.register(require("@fastify/formbody"));

fastify.register(require('@fastify/express')).after(() => {
  fastify.use(bodyParser.urlencoded({ extended: false })); // for Postman x-www-form-urlencoded
  fastify.use(bodyParser.json());
  fastify.use(app);
});

app.get("/webhooks/answer", function (request, reply) {
  const from = request.query.from;
  const fromSplitIntoCharacters = from.split('').join(' ');
  const ncco = [{
    action: 'talk',
    text: `Thank you for calling from ${fromSplitIntoCharacters}`,
    loop: 10
  }];
  console.log(`logging call from ${fromSplitIntoCharacters}`);
  reply.json(ncco);
});

app.get("/webhooks/inbound-sms", function (request, reply) {
  console.log(`logging incoming sms`);
  const params = Object.assign(request.query, request.body);
  console.log(params);
  reply.status(200).end();
});

app.post("/webhooks/inbound-sms", function (request, reply) {
  console.log(`logging incoming sms`);
  console.log(request.body);
  reply.status(200).end();
});

fastify.listen(
  { port: process.env.PORT, host: "0.0.0.0" },
  function (err, address) {
    if (err) {
      console.error(err);
      process.exit(1);
    }
    console.log(`Your app is listening on ${address}`);
  }
);通話時間を長くしたい場合は、コード・スニペットの loopパラメータを探し、その値を調整する。
const ncco = [{
  action: 'talk',
  text: `Thank you for calling from ${fromSplitIntoCharacters}`,
  loop: 10
}];
console.log(`logging call from ${fromSplitIntoCharacters}`);
reply.json(ncco);ファイルで正しいNode.jsバージョンを使用していることを確認してください。 package.jsonファイルで正しいNode.jsバージョンを使用していることを確認してください:
左ペインの
package.jsonをクリックする。右側のペインで、Node.jsのバージョンを指定する行を見つける。
Node.jsのバージョンが
16.x.そうでない場合は16.x.
"engines": {

  "node": "16.x"

}
をクリックしてください。 「をクリックしてください。ボタンをクリックしてください。
 button以下のコマンドを実行して、既存のパッケージを更新する:
npm update必要な依存関係を以下のコマンドでインストールする:
npm i express @fastify/express body-parser dotenv @vonage/server-sdk @vonage/voiceを実行します。 リフレッシュコマンドを実行する:
refresh
青い "共有"右上のボタンをクリックし、リンクをコピーしてください。
お気に入りのテキストエディタを開き、先ほどコピーしたリンクを貼り付ける。次に、以下のURLを貼り付けます:
回答URL {あなたのリンク}/webhooks/answer
受信URL {あなたのリンク}/webhooks/inbound-sms
 Share Project
ログイン Vonageデベロッパーアカウントにログインします。.
Vonageの電話番号を購入するには、左ペインのメニューから「Numbers」を選択します。 "Numbers "を選択します。次に "番号購入".番号を購入する国を選択します。機能」で「SMSと音声」を選択します。
クリック 検索そして 購入をクリックしてください。
左ペインのメニューから "アプリケーション"次に 「新規アプリケーションの作成" をクリックします。をクリックします。
以下の情報を申請書に追加してください:
アプリケーションにユーザーフレンドリーな名前を付けましょう。
Generate public and private key "ボタンをクリックします。秘密鍵ファイル
private.keyという名前の秘密鍵ファイルがデスクトップにダウンロードされます。このファイルは後で必要になりますので、安全なフォルダに保存してください。Capabilities "セクションで、トグルをオンにする:
Voice
メッセージ
Voice機能を設定します:
回答URL:先ほどコピーしたアンサーURLを貼り付けます。
イベントのURL:同じアンサーURLを貼り付けます。
予備のURL:同じアンサーURLを貼り付ける。
メッセージ機能の設定
インバウンドURL:先ほどコピーしたInbound URLを貼り付けます。
ステータスURL:同じInbound URLを貼り付ける。
右下の "Generate new application "をクリックします。をクリックしてください。
 capabilitiesアプリケーションが作成されたら、「リンク」をクリックして、購入した番号をアプリケーションにリンクします。 「リンクボタンをクリックします。リンクされたVonage番号をコピーして保存してください。
 link number左側のペインで "API設定"をクリックし "Messages API" を選択します。を選択し、変更を保存します。
これで、次のためにウェブフックを統合した。 インバウンドボイスコールテストしてみましょう!
携帯電話からVonage番号に音声通話をかける。
接続すると、"Thank you for calling from... "のようなプロンプトが表示されます。
Vonage Dashboardに移動し、左側のパネルで以下をクリックします。 ログ.ここで、通話が正常に受信されたことを確認できます。
 Inbound Call Log通話時間を長くしたい場合は、「loop」パラメータの値を変更してください。
これで インバウンドSMSをテストしてみましょう!
任意の番号からVonage番号にSMSを送信します。
Vonage Dashboardに移動し、左側のパネルで以下をクリックします。 ログ.ここで、テストが正常に受信されたことを確認できます。
 SMS log
そして、それだけだ!Webhookをセットアップするだけで、これらの通信をリアルタイムで管理できる。あなたのアプリケーションは、インバウンドイベントが発生したときに応答できるようになりました。アウトバウンドボイスコールとアウトバウンドSMSのクライアントコードを追加する方法と、アウトバウンドボイスコールを発信し、アウトバウンドSMSを送信する方法についてのチュートリアルに従えば、このアプリケーションをさらに拡張することができます。このチュートリアルに従ったプロジェクトについて、ぜひお聞かせください!私たちの VonageコミュニティSlackまたは X以前はTwitterとして知られていました。