
シェア:
Héctor is a Computer Systems Engineer based in El Salvador. He works on DevOps, technical writing, and QA. He has plenty of experience with web applications and cloud services. When he is not in front of the computer he loves playing music, videogames and going on adventures with the love of his life: his wife ❤️
React、Express、Apollo GraphQLで学習プラットフォームを構築する方法
所要時間:4 分
2020年は私たちにとって非典型的な年だった。多くの業界がビジネスのやり方を「再考」せざるを得なくなったが、こうした戦略は一時的なものではなく、今後も続く可能性がある。
こうした変化のひとつが、学習方法である。世界中の多くの学校、大学、アカデミーの遠隔授業が増加し、その多くは民間のソリューションに頼っている。
今日は、ビデオ/オーディオ機能、SMS通知、パスワードレス認証を備えた独自の学習プラットフォームを構築する方法について見ていこう。
アプリケーションをビルドして実行するには、以下のリソースが必要です:
Vonage APIアカウント。
Video APIアカウント。 無料サインアップはこちら.
バーチャル電話番号。Vonage APIアカウントを取得したら 番号を取得する方法はこちら.
Video API プロジェクトのキーとシークレットのペア。プロジェクトは Video API アカウントページから作成できます。.
AWSアカウントとキー&シークレットペア。
ファイルをアップロードするためのAWS S3バケット。
Node 12とNPM 6がインストールされていること。
私たちは、教師がリンクを貼るだけで生徒が参加できるインスタント・ビデオ/オーディオ・クラスを作成できるウェブ・アプリケーションを構築します。教師は電話番号で識別された生徒のリストを作成し、後でSMSで通話用のリンクを送ることができます。
教師は課題を作成することもできる。生徒はパスワードなしの認証を使って本人確認を行い、ファイルをアップロードして後で教師が確認することができる。
物事をシンプルに保ち、時間を有効に使うために、認証(ログインとログアウト)や実際のデータベースなど、いくつかの機能は省かれている。その代わり、すべてのページは一般に公開され、データはJavaScriptの配列を使ってメモリに保存される。
もし自分で最終的な製品を体験してみたいという方は、私が作成した Githubリポジトリを作成しました。リポジトリには finalフォルダがあり、そこで完成したサンプルを見ることができます。 starterReact、Express、Apollo GraphQLがあらかじめ設定されているフォルダがあります。
デモ・コードは serverフォルダに分けられています。 Apollo GraphQLサーバーと エクスプレスと clientフォルダには、基本的な 基本的なReactアプリケーションを含むフォルダがある。バックエンドのコードはプレーンなJavaScriptで書かれており、フロントエンドはTypeScriptを使っている。
開始する前に、以下のように各フォルダに入って、npmを使って依存関係をインストールしてください:
シークレットの設定も必要です。フォルダ内の clientフォルダで必要なのは、ファイル名を .envファイルを .env.local.
一方 serverフォルダで、ファイル名を app.envsファイルを .envまた、ファイル内のプレースホルダーの値を、独自のAWSキー、S3バケット名、Vonageキー、Vonage仮想番号に置き換える必要がある。
完成品を実行したい場合は、ターミナル・ウィンドウを2つ別々に開き、以下のようにnpmを使って両方のアプリケーションを起動する:
ブラウザ・ウィンドウが自動的に開き、そこでアプリケーションが動作するのを見ることができます。最初に表示されるのは、クラスを作成するためのボタンがあるウィンドウです。その前に Studentsページに向かい、有効な電話番号を使って何人かの生徒を作ってください。
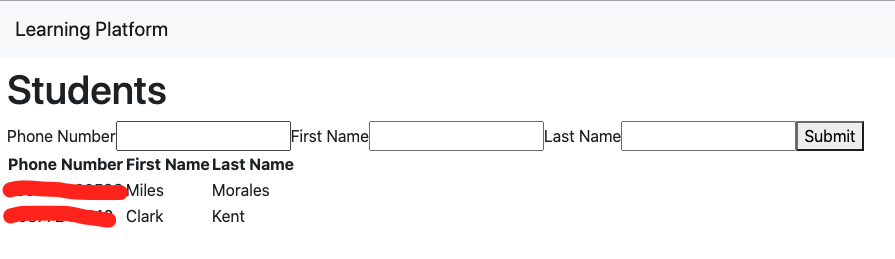 The Students Page
アプリケーションのタイトルをクリックしてメイン画面に戻ります。次に、新しいクラスを開始します。
数秒後、Vonage Video APIセッションになります。生徒リストを使って、生徒にSMS通知を送ることができます。 Inviteボタンをクリックするだけです。
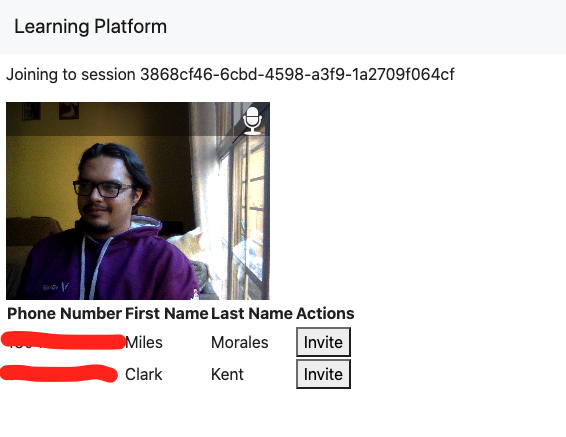 Starting a class
では、生徒がPDF文書をアップロードしなければならない課題を作成したいとしましょう。この場合、実際のアカウントを持っている必要はなく、携帯電話を使って認証することができます。
そのためには Homeworksページにアクセスし、説明を設定して新しい宿題を作成します。次に、生徒として Uploadリンクをクリックします。
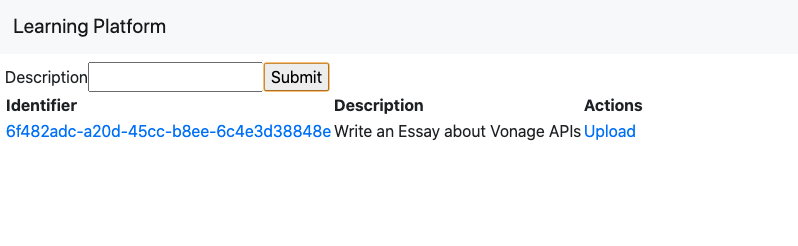 Creating an Assignment
ファイルをアップロードするには、生徒は教師が作成時に使用したのと同じ電話番号を提供する必要があります。確認コードが電話番号に送信され、それをアプリケーションに提供した後、生徒はファイルをアップロードすることができます。
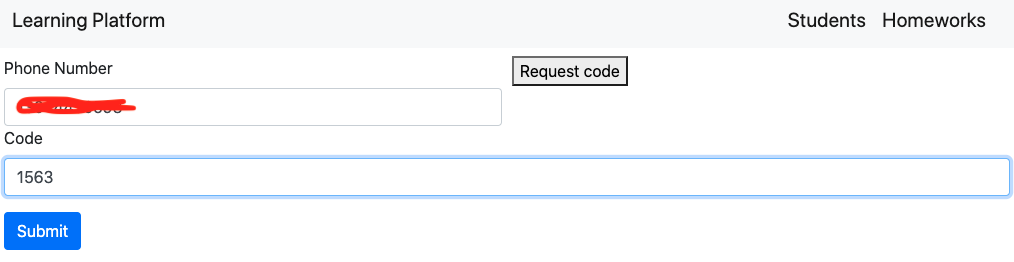 Passwordless Login
 Uploading a File
教師は宿題の自動生成されたUUIDをクリックすることで、各生徒が課題ごとにアップロードしたファイルを見ることができます。
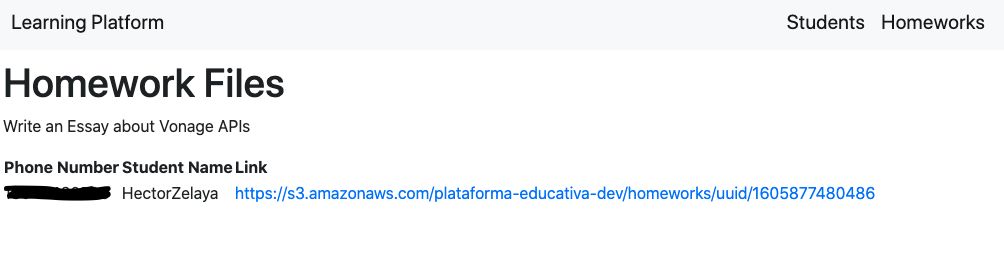 Seeing assignments
もしあなたが、ここで使われている技術のいくつかに詳しくないとしても、私たちがあなたをサポートします。このセクションでは、これらが何であるか、スターターコードでどのように設定されているかを簡単に説明し、より多くの情報を得ることができるようにいくつかの便利なリンクを提供します。すでにGraphQLとReactのプロフェッショナルであれば、このセクションは飛ばして次のセクションに進んでください。 クラスの作成に直行しても構いませんが、デモコードでこれらのピースがどのように組み合わされているかを知るために、とりあえず読んでおくとよいでしょう。
GraphQLは、サーバーから(一般的には複数のソースから)データを照会するためのクエリ言語とランタイムを提供する。データを明確に記述することができ、クライアントに必要なものを正確に尋ねる力を与えます。
Apollo GraphQLはGraphQLの業界標準実装です。単一のグラフでデータベース、API、マイクロサービスを簡単に組み合わせて利用できるサーバーとクライアントのライブラリを提供します。
サーバーフォルダーは、Expressで動作するGraphQLサーバーで構成されています。設定は server/index.jsファイルにあります。設定の最も重要な部分は、タイプ定義とリゾルバです。
型定義は、GraphQLがクライアントが消費できるデータを記述する場所です。これは型を使用して行われます。型定義は server/src/typeDefs.jsファイルで設定します。以下はデモコードの型の例です:
type Student {
  phoneNumber: String!
  firstName: String!
  lastName: String!
}

type Homework {
  uuid: String!
  description: String!
}最も重要なタイプは Queryと Mutation型であり、クライアントがデータに対してどのような "クエリー "や "突然変異 "を実行できるかを実際に公開する。
以下は、デモ・コードで定義されたクエリーとミューテーションです:
type Query {
  homeworks: [Homework]
  homework(uuid: String): Homework
  homeworkFiles(uuid: String): [HomeworkFile]
  sessionDetails(uuid: String) : SessionResponse
  students: [Student]
  student(phoneNumber: String): Student
}

type Mutation {
  addHomeworkFile(url: String!, uuid: String!, token: String!): HomeworkFile
  checkCode(requestId: String!, code: String!, number: String!): CheckCodeResponse
  inviteStudent(phoneNumber: String!, url: String!): OperationResponse
  presignDocument(fileName: String!, isPublic: Boolean, token: String!): String!
  saveHomework(id: Int, description: String!): Homework
  saveStudent(
    id: Int
    phoneNumber: String!
    firstName: String!
    lastName: String!
  ): Student
  startVideocallSession: SessionResponse
  verifyRequest(number: String!): VerifyRequestResponse
}GraphQLの優れた点は、独自のカスタムコードを使用してこれらのクエリや変異の動作を定義し、複数のデータベース、REST API、あるいは他のGraphQLサーバーから情報を取得できることです。作成したカスタムコードは resolvers.
デモコードでは、リゾルバは各クエリと変異に割り当てられている。 server/src/resolvers.jsファイルに割り当てられ、実際のリゾルバ関数は server/src/graphqlフォルダの下にあります。現在のところ、リゾルバは NOT_IMPLEMENTED例外を投げるだけですが、この記事を通してそれを変更します。
const saveHomework = async (_, { description }, __, ___) => {
  throw new Error(NOT_IMPLEMENTED);
};Apolloはまた、サーバーからデータを簡単に消費できるクライアントサイドコード用のライブラリも提供しています。Apolloはキャッシュを維持するので、データがすでに存在する場合、クライアントはサーバーにデータを要求する必要がありません。
GraphQLとApollo Graphqlについてもっと知りたい方は、以下のリンクをご覧ください:
Reactは、コンポーネント・ベースのアプローチでユーザー・インターフェースを構築するためのJavaScriptライブラリである。各コンポーネントは再利用が可能で、変更されると自動的にユーザーインターフェースを更新する独自の状態を維持する。
このプロジェクトでは、Reactコンポーネントを書くためのシンプルかつ強力な方法を提供する関数型コンポーネントを使用している。また、状態やサーバーとの通信などの追加機能を提供するためにフックを使用しています。
デモコードには、TypeScriptで書かれた基本的なReactアプリケーションが含まれている。Apollo Clientライブラリを使用してサーバーと接続し、サーバーから取得したデータを保存するためのキャッシュも提供している。
アプリケーション全体がApolloProviderにラップされ、すべてのコンポーネントでそのコンテキストにアクセスできるようになります。
ReactDOM.render(
  <ApolloProvider client={client}>
    <Pages />
  </ApolloProvider>,
  document.getElementById('root')
);ReactとApolloサーバーとの統合についてもっと知りたい方は、以下のリンクをご覧ください:
よし、ついていきたいなら、手を汚す時が来た。お気に入りのコード・エディターを持ってきて starterフォルダを開いてください。最初にすることは、新しいクラスを作成する機能を追加することです。
コードをサーバーとブラウザーのコードに分割したので、ユーザーが見るものに取り組む前にバックエンドのコードのセットアップを始めるのは理にかなっている。それでは、Vonage Video API サービスにセッションを作成する GraphQL 変異を作成することから始めましょう。
Vonage Video APIで音声/ビデオセッションを作成するには、すでにインストールされている opentokパッケージを使用する。まず最初に、APIキーとシークレットのペアを渡してクライアントを初期化する必要がある。
ファイルに server/src/services/vonage/videoApi.jsファイルに initializeOpentok関数に入力しよう。変数のシングルトンインスタンスを返します。 opentok関数を呼び出すたびに同じインスタンスが返されるようにします。前に定義したkeyとsecretを環境変数としてインポートしていることに注意してください。 apiKeyと apiSecret値を環境変数としてインポートしていることに注意してください。 ../../utils/envsファイルから
const { vonageVideoApiKey : apiKey, vonageVideoApiSecret : apiSecret } = require('../../util/envs');

let opentok = null;
...
const initializeOpentok = () => {
  opentok = opentok ? opentok : new OpenTok(apiKey, apiSecret);
}次のステップは、実際にセッションを作成することです。そのために opentok.createSession関数を使います。この関数は、セッションを設定するオブジェクトを routed.A routedセッションは、Vonageのメディアサーバーを使用することを意味し、マルチパーティセッションでの帯域幅の使用を減らし、録音やSIP相互接続などの高度な機能を有効にすることができます。
// server/src/services/vonage/videoApi.js
...
const opentokSessionArgs = {
  mediaMode: 'routed',
};
...
const createSession = () => {
  return new Promise((resolve, reject) => {
    opentok.createSession(opentokSessionArgs, (err, session) => {
      if (err) {
        reject(err);
      } else {
        resolve(session);
      }
    });
  });
};最後に、セッションのコンテキストでユーザーを認証し、パーミッションを設定するために使用されるJWTトークンを生成する関数を追加します。
// server/src/services/vonage/videoApi.js
...
const generateToken = (sessionId) => {
  return opentok.generateToken(sessionId);
}
...さて、機能が整ったので、あとは実際にクライアントにそれを公開するだけです。そのために、教師がセッションを作成し、生徒がセッションに参加できるようにするために、Reactクライアントが利用できる2つの変異を作成します。
ファイルを開いて server/src/graphql/videoApi.jsファイルを開き、プレースホルダー・リゾルバを入力しよう。
セッションを作成する手順は以下の通りです:
opentok クライアントを初期化します。
セッションを作成する。
URLの一部として使用するセッションのIDを生成する。これには
uuidパッケージを使用します。セッションを永続ストレージに保存する。で定義された配列を使ってメモリに保存します。
server/src/services/db/index.jsしかし、実際のアプリケーションでは、実際のデータベースの方が理にかなっています。セッション用のトークンを生成する。
変異反応の型定義で定義されているフォーマットに従ったデータを返す。
// server/src/graphql/videoApi.js
...
const startSession = async (_, __, ___, ____) => {
  try {
    // initialize opentok
    initializeOpentok();

    // create the session
    const session = await createSession();

    // generate an id
    const uuid = uuidv4();

    // save the session
    videocalls.push({
      uuid,
      sessionId: session.sessionId,
    });

    // generate a token with moderator privileges
    const token = session.generateToken({
      role: 'moderator',
      data: `role=moderator`,
    });

    // return date honoring the format for SessionResponse type
    return {
      uuid,
      token,
      session: session.sessionId,
      apiKey,
    };
  } catch (e) {
    console.error('An error occurredocurred when creating opentok session', e);
  }
};
...セッションを開始するためのミューテーションは、レスポンスタイプとともに、すでに以下で定義されている。 server/src/typeDefs.js.
// server/src/typeDefs.js
...
type SessionResponse {
  uuid: String!
  token: String!
  session: String!
  apiKey: String!
}
...
type Mutation {
  ...
  startVideocallSession: SessionResponse
  ...
}リゾルバ機能もすでに割り当てられている。これは server/src/resolver.jsファイルで見ることができる:
// server/src/resolvers.js
const {
  ...,
  // here we reference the startSession function we have just created
  videoApi: { joinSession, startSession },
} = require('./graphql');
...
const resolvers = {
  ...
  Mutation: {
    ...
    // here we assign that function as the resolver for the startVideocallSession mutation
    startVideocallSession: startSession,
    ...
  },
};次に、学生がすでに作成されたセッションに参加できるようにするリゾルバ関数を作成する必要があります。そのために、以下のステップに従ってください:
UUIDが提供されていることを確認する。
データベースからビデオ通話を探す。
opentok クライアントを初期化します。
セッションを使用して学生のトークンを生成します。
変異の型定義で設定されたフォーマットに従ったデータを返す。
// server/src/resolvers.js
const {
  ...,
  // here we reference the startSession function we have just created
  videoApi: { joinSession, startSession },
} = require('./graphql');
...
const resolvers = {
  ...
  Mutation: {
    ...
    // here we assign that function as the resolver for the startVideocallSession mutation
    startVideocallSession: startSession,
    ...
  },
};前の関数と同じように、リゾルバはすでに型定義とつながっている。唯一の違いは、今回は突然変異の代わりにクエリーであることだ。
// server/src/typeDefs.js
type Query {
  ...
  sessionDetails(uuid: String) : SessionResponse
  ...
}

// server/src/resolvers.js
const {
...
  videoApi: { joinSession, startSession },
} = require('./graphql');
...
const resolvers = {
  Query: {
    sessionDetails: joinSession,
  ...
  },
};これでユーザー・インターフェースを作る準備ができた。
まず、Reactコンポーネントをいくつか作ってみよう。その client/src/components/フォルダーの中に新しい Videocallフォルダを作成します。
新しく作成したフォルダーの中に Room.tsxという名前のファイルを作成します。これがセッションをホストするコンポーネントです。
コンポーネントをビルドするには opentok-reactパッケージを使用します。コンポーネントは uuidプロパティを受け取ります。
// client/src/components/Videocall/Room.tsx
import React from 'react';
import { useQuery } from '@apollo/client';
import { GET_START_CALL_SETTINGS } from '../../data/queries';
import { OTSession, OTPublisher, OTStreams, OTSubscriber } from 'opentok-react';

const Room = (props: any) => {
  // get the uuid from props
  const { uuid } = props;

  // make a query to the server (or not??? we'll talk about this later)
  const { data, loading, error } = useQuery(GET_START_CALL_SETTINGS, {
    variables: { uuid },
  });

  if (loading) {
    return <p>Loading...</p>;
  }

  if (error) {
    return <p>Error!</p>;
  }

  // after the query is complete, get the session details...
  const { apiKey, session, token } = data.sessionDetails;

  // ... and pass them to opentok-react
  return (
    <OTSession apiKey={apiKey} sessionId={session} token={token}>
      <OTPublisher />
      <OTStreams>
        <OTSubscriber />
      </OTStreams>
    </OTSession>
  );
};

export default Room;次に、セッションを作成するボタンを追加しましょう。ここでは、Apolloクライアントの強力な機能であるキャッシュについて説明します。
現在、Room コンポーネントは、既に作成されたセッションの UUID に基づいて、サーバーからセッションの詳細を取得しようとします。
セッションを作成するときにも同じ詳細を得るので、参加するときに2回目のリクエストをするのは意味がありません。代わりに キャッシュに書き込みます。に書き込むことにします。そうすることで、Room コンポーネントはそこからそれを得ることができ、サーバーに新しいリクエストをする必要がなくなります。
ファイルを作成する。 StartButton.tsxファイルを作成し、以下のように入力する:
// client/src/components/Videocall/StartButton.tsx
import { useMutation } from '@apollo/client';
import React from 'react';
import { useHistory } from 'react-router-dom';
import { START_VIDEOCALL_SESSION } from '../../data/mutations';
import { GET_START_CALL_SETTINGS } from '../../data/queries';

const startCallButton = {
  padding: '10pt',
  borderRadius: '3px',
  border: '0px',
};

const StartButton = () => {
  // we use the useMutation hook to create a mutate function
  const [startSession] = useMutation(START_VIDEOCALL_SESSION, {
    // the update() function allows to run code after running the mutation
    update(client, { data: { startVideocallSession } }) {
      // here we write the resulting data into the cache
      client.writeQuery({
        query: GET_START_CALL_SETTINGS,
        data: {
          sessionDetails: startVideocallSession
        },
        variables: {
          uuid: startVideocallSession.uuid
        }
      });
    },
    onCompleted({startVideocallSession}) {
      // after creating the session we move to a different page
      history.push(`/session/${startVideocallSession.uuid}`);
    }
  });
  const history = useHistory();

  // we render the button and call the mutate function on click
  return (
    <div>
      <button
        style={startCallButton}
        onClick={() => {
          startSession();
        }}
      >
        Start Call
      </button>
    </div>
  );
};

export default StartButton;ページの追加に入る前に、まず index.tsxファイルを作成しよう。 client/src/components/Videocallにファイルを作成し、両方のコンポーネントを同じインポートで公開することにしましょう:
// src/components/Videocall/index.tsx
export { default as StartButton } from './StartButton';
export { default as Room } from './Room';の下に新しいページを作成します。 client/src/pages/という名前の VideoSession.tsxという名前の新しいページを作成し、Roomコンポーネントを追加します。ファイルを指定する必要がないことに注意してください。 Roomファイルを指定する必要がなく、単にフォルダレベルでインポートしていることに注目してください。これは index.tsxファイルを追加したおかげです。
// src/pages/VideoSession.tsx
import React from 'react';
import { useParams } from 'react-router-dom';
import { Room } from '../components/Videocall';
import { VideoSessionParams } from '../models';

const VideoSession = () => {
  // get the uuid from the url
  const { uuid } = useParams<VideoSessionParams>();

  // render the Room component and pass the UUID property
  return (
    <>
      <p>Joining to session {uuid}</p>
      <Room uuid={uuid} />
    </>
  );
};

export default VideoSession;次に、VideoSession ルートを src/pages/index.tsxルーティングを追加します:
// src/pages/index.tsx
...
import VideoSession from './VideoSession';

function Pages() {
  return (
    <Router>
      <Navigation />
      <div id="roots" className="p-2">
        <Route path="/session/:uuid" exact component={VideoSession} />
        <Route path="/" exact component={Inicio} />
      </div>
    </Router>
  );
}
...最後に、ボタンを src/pages/Home.tsxページに追加する:
// src/pages/Home.tsx
...
import { StartButton } from '../components/Videocall';

const Inicio = () => {
  return (
    <div>
      <StartButton />
    </div>
  );
};
...
次のステップは、教師が生徒のリストを作成できるようにすることである。全体的なアイデアは、通話が開始されると、教師はリストを確認し、通話に招待するために生徒にSMS通知を送信することができます。
クラスと同様に、まずはGraphQLサーバーで必要な変異とクエリーを作成する。それからユーザーインターフェースを追加する。
教師が生徒を作成できるようにすることからサーバコードを書き始めましょう。物事をシンプルに保つために、生徒を配列に保存しますが、実際のアプリケーションではデータベースの方が理にかなっています。
ファイルを開き server/src/graphql/student.jsファイルを開き、リゾルバ関数を次のように入力する:
// server/src/graphql/student.js
// import the "database" service
const { students } = require('../services/db');
...
const saveStudent = async (_, student, __, ___) => {
  try {
    // push the new student into the array
    students.push(student);

    // return the newly created student
    return student;
  } catch (err) {
    console.error('Error while trying to create student', err);
    throw new Error(INTERNAL_ERROR);
  }
};

const getStudents = (_, __, ___, ____) => {
  // return all the students
  return students;
};次に、Vonageマジックで通知を送るようにしよう。そのために @vonage/server-sdkパッケージがプリインストールされており、シングルトン・インスタンスとして server/src/services/vonage/vonage.jsファイルにシングルトンインスタンスとして初期化されている:
// server/src/services/vonage/vonage.js
// import the npm package
const Vonage = require('@vonage/server-sdk');
// import the Vonage credentials from the environment variables
const { vonageApiKey : apiKey, vonageApiSecret : apiSecret } = require('../../util/envs');

// define the Vonage client
let instance = null;

const getVonageClient = () => {
  // if the client is not already define then initialize it
  if (!instance) {
    instance = new Vonage({
      apiKey,
      apiSecret
    });
  }

  // return the client
  return instance
}

// export the function
module.exports = {
  getVonageClient
}ファイルを開き server/src/services/vonage/sms.jsファイルを開き sendSms関数を次のように入力する:
// server/src/services/vonage/sms.js
...
const sendSms = (to, text) => {
  return new Promise((resolve, reject) => {
    // get the Vonage client
    const vonageClient = getVonageClient();
    // get the Virtual Phone Number used to send the sms
    const from = vonageSenderNumber;

    // Call the sendSms method
    vonageClient.message.sendSms(from, to, text, (err, responseData) => {
      if (err) {
        reject(false);
      } else {
        if (responseData.messages[0]['status'] === '0') {
          console.log('Message sent successfully.');
          resolve(true)
        } else {
          console.log(
            `Message failed with error: ${responseData.messages[0]['error-text']}`
          );
          reject(false);
        }
      }
    });
  });
};
...
最初に、学生を作成し、Videoセッションに招待する際に再利用するコンポーネントを作成します。
の下に新しいフォルダを作成する。 client/src/componentsという名前の Studentsその中にさらに3つのファイルを作成する: index.tsx, StudentForm.tsxと StudentsList.tsx.
フォームを作成するとき、クラスを作成するときと同じようなアプローチを採用します。サーバに生徒を作成する変異を呼び出した後、サーバへのその後のリクエストを防ぐためにローカルキャッシュも更新します。
実際のフォームには 制御コンポーネントを使います。機能コンポーネントを使うので フックフックを使います。
次のように StudentForm.tsxファイルを次のように入力する:
// client/src/components/Students/StudentForm.tsx
import { useMutation } from '@apollo/client';
import React, { useState } from 'react';
import { ADD_STUDENT } from '../../data/mutations';
import { GET_STUDENTS } from '../../data/queries';
import { Student, StudentData, StudentVars } from '../../models';

const StudentForm = () => {
  // set the state for the form
  const [phoneNumber, setPhoneNumber] = useState('');
  const [firstName, setFirstName] = useState('');
  const [lastName, setLastName] = useState('');

  // create the mutate function for adding student
  const [addStudent] = useMutation<{ saveStudent: Student }, StudentVars>(
    ADD_STUDENT,
    {
      onCompleted() { // set the onCompleted function to reset the state
        setPhoneNumber('');
        setFirstName('');
        setLastName('');
      },
      update(cache, { data }) { // set the update function to update local cache
        const existingStudentsdata = cache.readQuery<StudentData>({
          query: GET_STUDENTS,
        });
        cache.writeQuery({
          query: GET_STUDENTS,
          data: {
            students: [
              ...(existingStudentsdata?.students as Student[]),
              data?.saveStudent,
            ],
          },
        });
      },
    }
  );

  // render the form
  return (
    <form
      className="form-inline"
      onSubmit={(e) => {
        e.preventDefault();
        phoneNumber &&
          firstName &&
          lastName &&
          addStudent({
            variables: {
              phoneNumber,
              firstName,
              lastName,
            },
          });
      }}
    >
      <label htmlFor="phone">
        Phone Number
      </label>
      <input
        type="text"
        id="phone"
        name="phone"
        value={phoneNumber}
        onChange={(e) => setPhoneNumber(e.target.value)}
      />

      <label htmlFor="firstName">
        First Name
      </label>
      <input
        type="text"
        id="firstName"
        name="firstName"
        value={firstName}
        onChange={(e) => setFirstName(e.target.value)}
      />

      <label htmlFor="lastName">
        Last Name
      </label>
      <input
        type="text"
        id="lastName"
        name="lastName"
        value={lastName}
        onChange={(e) => setLastName(e.target.value)}
      />

      <button type="submit">
        Submit
      </button>
    </form>
  );
};

export default StudentForm;学生のリストを作成する際、学生に適用できる "アクション "の配列である actionsプロパティを追加します。
それぞれのアクションに対して、カスタム関数をトリガーするボタンをテーブルの "Actions "カラムの下に追加する。編集"、"削除"、"無効化 "などのアクションを考えてください。このプロパティは後ほど、学生をクラスに「招待」するために使用します。
次のように StudentsList.tsxファイルを次のように入力する:
// client/src/components/Students/StudentsList.tsx
import React from 'react';
import { useQuery } from '@apollo/client';
import { GET_STUDENTS } from '../../data/queries';
import { Student, StudentListProps } from '../../models';

const StudentsList = ({ actions = [] }: StudentListProps) => {
  // create the query
  const { data, loading, error } = useQuery(GET_STUDENTS);

  // render the table
  return (
    <>
      {loading && <p>Loading...</p>}
      {error && <p>Error!</p>}
      {data && (
        <table>
          <thead>
          <tr>
            <th>Phone Number</th>
            <th>First Name</th>
            <th>Last Name</th>
            {actions.length > 0 && <th>Actions</th>}
          </tr>
          </thead>
          <tbody>
          {data.students.map((student: Student) => {
            return (
              <tr key={student.phoneNumber}>
                <td>{student.phoneNumber}</td>
                <td>{student.firstName}</td>
                <td>{student.lastName}</td>
                <td>
                  {actions.map((action) => (
                    <button key={action.actionName} onClick={() => action.onAction(student)}>
                      {action.actionName}
                    </button>
                  ))}
                </td>
              </tr>
            );
          })}
          </tbody>
        </table>
      )}
    </>
  );
};

export default StudentsList;では、新しく作成した両方のコンポーネントを index.tsxに公開しよう:
// client/src/components/Students/index.tsx
export {default as StudentsList} from './StudentsList';
export {default as StudentForm} from './StudentForm';次に client/src/pages/StudentPage.tsxページを作成し client/src/page/index.tsxインデックスに追加します。と StudentFormと StudentsListコンポーネントを同じ名前空間からインポートしていることに注目してください。(いつもありがとう、 index.tsx!)
// client/src/pages/StudentPage.tsx
import React from 'react';
import { StudentsList, StudentForm } from '../components/Students';

const Students = () => {
  return (
    <>
      <h1>Students</h1>
      <StudentForm />
      <StudentsList />
    </>
  );
};

export default Students;

// client/src/pages/index.tsx
...
import StudentPage from './StudentPage';

function Pages() {
  return (
    <Router>
      <Navigation />
      <div id="roots" className="p-2">
        ...
        <Route path="/students" exact component={StudentPage} />
      </div>
    </Router>
  );
}
...これで新しい生徒を作成し、リストで見ることができるはずです。
生徒がいることの全体的な考え方は、彼らをコールに招待できるようにすることだ。先ほど話した actionsプロパティを覚えていますか?この機能は、以前作成したコンポーネントとまったく同じものを再利用しながら、生徒のリストにその機能を提供することを可能にします。
という新しいコンポーネントを作りましょう。 Attendees.tsxの下に client/src/components/Videocall/.この新しいコンポーネントの中に、突然変異のトリガーとなるカスタムアクションを作成します。 inviteStudentをトリガーするカスタムアクションを作成します。
// client/src/components/Videocall/Attendees.tsx
import { useMutation } from '@apollo/client';
import React from 'react';
import { useLocation } from 'react-router';
import { INVITE_STUDENT } from '../../data/mutations';
import { Student, StudentListAction } from '../../models';
import { StudentsList } from '../Students';

const Attendees = () => {
  // create the mutate function
  const [inviteStudent] = useMutation(INVITE_STUDENT)
  // get the session url
  const location = useLocation();

  // create the custom action in an array
  const actions = new Array<StudentListAction>(
    {
      // set a name
      actionName: 'Invite',
      // set the action
      onAction: (student: Student) => {
        inviteStudent({
          variables: {
            phoneNumber: student.phoneNumber,
            url: window.location.origin + location.pathname
          }
        })
      }
    }
  )

  // render the StudentsList and pass the action
  return (
    <>
      <StudentsList actions={actions}/>
    </>
  )
}

export default Attendees;また、新しく作成したコンポーネントをビデオコールのインデックスに追加する:
// src/components/Videocall/index.tsx
...
export { default as Attendees } from './Attendees';最後に、VideoSession ページに Attendees コンポーネントを追加します:
// src/pages/VideoSession.tsx
...
import { Room, Attendees } from '../components/Videocall';
...

const VideoSession = () => {
  ...

  return (
    <>
      ...
      <Attendees />
    </>
  );
};有効な電話番号を使って生徒を数人作り、クラスを開始し、「招待」ボタンをクリックして招待する。
デモの最後のステップは学生が課題を送信できるようにすることです。宿題ファイルがどの学生のものかを確実に識別するために、学生登録に使用された電話番号に基づいたパスワードレスログインを使用します。
まず必要なのは、実際の宿題と宿題ファイルを作成できるようにすることです。また、ユーザーがファイルをアップロードできるようにする必要があります。後者については、Presigned POST Requestsを使用したS3バケットを使用する予定です。
宿題と宿題ファイルの作成と取得のためのリゾルバから始めましょう。まず server/src/graphql/homework.jsファイルを開き serverファイルを開き、以下のようにリゾルバを入力する:
// src/graphql/homework.js
...
const saveHomework = async (_, { description }, __, ___) => {
  const uuid = uuidv4();

  try {
    const homework = {
      uuid,
      description
    }
    homeworks.push(homework);

    return homework;
  } catch (err) {
    console.error('Error while trying to create homework', err);
    throw new Error(INTERNAL_ERROR);
  }
};

const getHomeworks = (_, __, ___, ____) => {
  return homeworks;
};

const getHomework = (_, { uuid }, __, ___) => {
  const [homework] = homeworks.filter((homework) => homework.uuid === uuid);
  return homework;
};

const addHomeworkFile = async (_, { url, uuid, token }, __, ___) => {
  // This token comes from the passwordless login
  if (!token) {
    throw new Error(NOT_AUTHENTICATED);
  }

  try {
    const decodedToken = jwt.verify(token, accessTokenSecret);
    const [student] = students.filter((student) => student.phoneNumber === decodedToken.phoneNumber)
    const [homework] = homeworks.filter((homework) => homework.uuid === uuid);
    const homeworkFile = {
      url,
      student,
      homework,
    };
    homeworkFiles.push(homeworkFile);

    return homeworkFile;
  } catch (err) {
    console.log('An error occurredocurred when trying to save homework file', err);
    throw new Error(INTERNAL_ERROR);
  }
};

const getHomeworkFiles = (_, { uuid }, __, ___) => {
  return homeworkFiles.filter(homeworkFile => homeworkFile.homework.uuid === uuid);
};
...次に、S3にファイルをアップロードするために、クライアント側のコードで後で使用できるPOSTリクエストに事前署名するための変異を追加しよう。そのために aws-sdkパッケージを使います。サービスはすでに server/src/services/aws/s3.js.
// server/src/services/aws/s3.js
...
const presignedPostDocument = (keyName, isPublic = false) => {
  const acl = isPublic ? 'public-read' : 'private';
  return new Promise((resolve, reject) => {
    const params = {
      Bucket: s3Bucket,
      Fields: {
        Key: keyName,
      },
      Expires: 300,
      Conditions: [
        ['content-length-range', 0, 5242880],
        ['eq', '$Content-Type', 'application/pdf'],
        { acl },
      ],
    };
    s3.createPresignedPost(params, (err, data) => {
      if (err) {
        reject('Error while creating presigned post', err);
      } else {
        resolve(data);
      }
    });
  });
};
...そこで必要なのは、新しい変異で実際にサービスを利用することだ。新しい server/src/graphql/s3.jsファイルを開き presignDocumentリゾルバ関数を次のように入力する:
// server/src/graphql/s3.js
...
const presignDocument = async (_, { fileName, isPublic, token }, __, ___) => {
  // This token comes from the passwordless login
  if (!token) {
    throw new Error(NOT_AUTHENTICATED);
  }

  try {
    // identify the student
    const data = jwt.verify(token, accessTokenSecret);
    console.info(
      `Student with id ${data.id} is presigning filename ${fileName}`
    );
    // presign the post requests
    const uploadData = await s3.presignedPostDocument(fileName, isPublic);
    // return the response as a stringified JSON
    return JSON.stringify(uploadData);
  } catch (err) {
    console.log('An error ocurred when presigning document:', err);
    throw new Error(INTERNAL_ERROR);
  }
};
...
さて、いよいよVonageマジックでパスワードレス認証を設定する番だ。これにはVerify APIを使用する。まず、サービスを作りましょう。ファイルを開き server/src/services/vonage/verify.jsファイルを開き verifyRequestと checkCode関数を以下のように入力する:
// server/src/services/vonage/verify.js
...
const verifyRequest = (number) => {
  return new Promise((resolve, reject) => {
    // get the Vonage client
    const vonageClient = getVonageClient();
    const brand = 'Vonage APIs';

    // Create a verification request for the given number
    vonageClient.verify.request({number, brand}, (err, result) => {
      if (err) {
        reject(false);
      } else {
        // return the request id which will be used when verifying the code
        resolve(result.request_id);
      }
    });
  });
};

const checkCode = (code, request_id) => {
  return new Promise((resolve, reject) => {
    // get the Vonage client
    const vonageClient = getVonageClient();

    // here pass both the request id and the code sent by the student
    vonageClient.verify.check({
      request_id,
      code
    }, (err, result) => {
      if (err) {
        reject(false);
      } else {
        // if code is correct we authenticate the student
        if (result.status === '0') {
          resolve(true);
        } else {
          reject(false);
        }
      }
    });
  })
}
...最後に、これらのサービスをGraphQLを通して公開しよう。ファイルを開き server/src/graphql/vonage.jsファイルを開き verifyRequestResolverと checkCodeResolverリゾルバ関数を以下のように入力します:
// server/src/graphql/vonage.js
...
const verifyRequestResolver = async (_, { number }, __, ___) => {
  try {
    const requestId = await verifyRequest(number);
    return {
      requestId,
    };
  } catch (err) {
    console.error(err);
    throw new Error(INTERNAL_ERROR);
  }
};

const checkCodeResolver = async (_, { requestId, code, number }, __, ___) => {
  try {
    const result = await checkCode(code, requestId);

    // if verification is successful, we return a JWT token
    if (result) {
      const [student] = students.filter(
        (student) => student.phoneNumber === number
      );

      // create the token
      const token = jwt.sign(
        {
          phoneNumber: student.phoneNumber,
        },
        accessTokenSecret,
        {
          expiresIn: '15min',
        }
      );

      return {
        token,
      };
    } else {
      return {
        token: null,
      };
    }
  } catch (err) {
    console.error('An error ocurred when trying to check code', err);
    return {
      token: null,
    };
  }
};
...
まず、宿題を作成するためのフォームと、それを一覧表示するための簡単なテーブルを作成しましょう。
の下に Homeworksフォルダを作成し client/src/componentsそして HomeworkForm.tsxその中に HomeworkList.tsxを作成する。最初のファイルに以下のように入力し、フォームを作成する:
// client/src/components/Homeworks/HomeworkForm.tsx
import { useMutation } from '@apollo/client';
import React, { useState } from 'react';
import { Homework } from '../../models';
import { ADD_HOMEWORK } from '../../data/mutations';
import { GET_HOMEWORKS } from '../../data/queries';

const HomeworkForm = () => {
  // declare the state for the controlled form
  const [description, setDescription] = useState('');

  // setup the mutate function that creates the homework
  const [addHomework] = useMutation<
    { saveHomework: Homework },
    { description: string }
  >(ADD_HOMEWORK, {
    // on completion, reset the state
    onCompleted() {
      setDescription('');
    },
    // after creating the homework, add it to the local cache
    update(cache, { data }) {
      const existingHomeworksData = cache.readQuery<{ homeworks: Homework[] }>({
        query: GET_HOMEWORKS,
      });
      cache.writeQuery({
        query: GET_HOMEWORKS,
        data: {
          homeworks: [
            ...(existingHomeworksData?.homeworks as Homework[]),
            data?.saveHomework,
          ],
        },
      });
    },
  });

  return (
    <>
      <form
        className="form-inline"
        onSubmit={(e) => {
          // when submit the form call the mutate function
          e.preventDefault();
          description &&
            addHomework({
              variables: {
                description,
              },
            });
        }}
      >
        <label htmlFor="description">
          Description
        </label>
        <input
          type="text"
          id="description"
          value={description}
          onChange={(e) => setDescription(e.target.value)}
        />

        <button type="submit">
          Submit
        </button>
      </form>
    </>
  );
};

export default HomeworkForm;そして HomeworkList.tsxファイルに以下のように入力し、作成された宿題をリストアップするシンプルなテーブルを作成する。また、"Identifier" "Action "列の下に LinksIdentifier""Action "カラムの下にいくつかのリンクを設定していることに注意してください。これらのリンクにより、教師は与えられた宿題のファイルを確認し、学生は実際のファイルをアップロードすることができます。
これらのリンクが開くページについては、今しばらくお待ちください。
// client/src/components/Homeworks/HomeworkList.tsx
import React from 'react';
import { useQuery } from '@apollo/client';
import { Link } from 'react-router-dom';
import { GET_HOMEWORKS } from '../../data/queries';
import { Homework } from '../../models';

const HomeworkList = () => {
  // query the list of homeworks
  const { data, loading, error } = useQuery(GET_HOMEWORKS);

  // render the component with the retrieved homework
  return (
    <>
      {loading && <p>Loading...</p>}
      {error && <p>Error!</p>}
      {data && (
        <table>
          <thead>
            <tr>
              <th>Identifier</th>
              <th>Description</th>
              <th>Actions</th>
            </tr>
          </thead>
          <tbody>
            {data.homeworks.map((homework: Homework) => {
              return (
                <tr key={homework.uuid}>
                  <td>
                    <Link to={`/homeworks/${homework.uuid}/list`}>
                      {homework.uuid}
                    </Link>
                  </td>
                  <td>{homework.description}</td>
                  <td>
                    <Link to={`/homeworks/${homework.uuid}/upload`}>
                      Upload
                    </Link>
                  </td>
                </tr>
              )
            })}
          </tbody>
        </table>
      )}
    </>
  )
}

export default HomeworkList;では、新しく作成したコンポーネントを公開しよう。 index.tsxファイルを client/src/components/Homeworksを作成する:
// client/src/components/Homeworks/index.tsx
export {default as HomeworkList} from './HomeworkList';
export {default as HomeworkForm} from './HomeworkForm';次に HomeworksPage.tsxその下に client/src/pages/を以下のように作成する:
// client/src/pages/HomeworksPage.tsx
import React from 'react';
import { HomeworkForm, HomeworkList } from '../components/Homeworks';

const HomeworksPage = () => {
  return (
    <>
      <HomeworkForm />
      <HomeworkList />
    </>
  )
}

export default HomeworksPage;同じフォルダ内の index.tsxファイルに追加することも忘れずに:
// client/src/pages/index.tsx
...
import HomeworksPage from './HomeworksPage';

function Pages() {
  return (
    <Router>
      <Navigation />
      <div id="roots" className="p-2">
        ...
        <Route path="/homeworks" exact component={HomeworksPage} />
        <Route path="/" exact component={Home} />
      </div>
    </Router>
  );
}
パスワードなしログインのために、2つの新しいコンポーネントを作成しましょう: 1つはログインページとして機能するもので、もう1つは認証後に学生が見るフォームを持つものです。
作成 PasswordlessLogin.tsxそして HomeworkFileForm.tsx以下 client/src/components/Homeworks.
まず、ログインフォームを作成することに集中しましょう。そのために、このコンポーネントでは、検証リクエストを作成するための変異と、実際の検証を行うための変異を定義します。
ユーザーインターフェースは、電話番号を要求するテキストボックスと、要求を開始するためのボタンで構成されます。サーバーから requestIdがサーバから正常に返された後、コードを入力するための追加のテキストフィールドと、確認のためのボタンを表示したいと思います。
次のように PasswordlessLogin.tsxファイルを次のように入力する:
// client/src/components/Homeworks/PasswordlessLogin.tsx
import { useMutation } from '@apollo/client';
import React, { useState } from 'react';
import { VERIFY_REQUEST, CHECK_CODE } from '../../data/mutations';

// the component receives a custom onLogin function that runs after a student has successfullysuccesfully authenticated
const PasswordlessLogin = ({
  onLogin,
}: {
  onLogin: (token: String) => void;
}) => {
  // setup the state for the controlled form
  const [number, setNumber] = useState('');
  const [code, setCode] = useState('');
  const [requestId, setRequestId] = useState<string | null>(null);

  // setup mutate functions for both request a verification and check the code
  const [verifyRequest] = useMutation<{
    verifyRequest: { requestId: string };
    verifyRequestVars: { number: string };
  }>(VERIFY_REQUEST, {
    // after getting the request id add it to the state
    onCompleted(data: { verifyRequest: { requestId: string } }) {
      setRequestId(data.verifyRequest.requestId);
    },
  });
  const [checkCode] = useMutation<{
    checkCode: { token: string };
    checkCodeVars: { requestId: string; code: string; number: string };
  }>(CHECK_CODE, {
    // after authenticating call the custom onLogin function
    onCompleted(data: { checkCode: { token: string } }) {
      if (data.checkCode.token) {
        onLogin(data.checkCode.token);
      }
    },
  });

  return (
    <>
      <form
        onSubmit={(e) => {
          // on submit check the code
          e.preventDefault();
          number && code && requestId && checkCode({
            variables: {
              requestId,
              code,
              number
            }
          });
        }}
      >
        <div className="form-row">
          <div className="col">
            <label htmlFor="number">Phone Number</label>
            <input
              type="text"
              className="form-control"
              id="number"
              placeholder="Enter phone number"
              value={number}
              onChange={(e) => setNumber(e.target.value)}
            />
          </div>
          <div className="col">
            <button
              onClick={(e) => {
                // when clicking this button initiate the verification
                number &&
                  verifyRequest({
                    variables: {
                      number,
                    },
                  });
              }}
            >
              Request code
            </button>
          </div>
        </div>
        {requestId && ( // only show the elements below if a requestId has been successfullysuccesfully returned by the server
          <>
            <div className="form-group">
              <label htmlFor="code">Code</label>
              <input
                type="text"
                className="form-control"
                id="code"
                placeholder="Enter one time code"
                value={code}
                onChange={(e) => setCode(e.target.value)}
              />
            </div>
            <button type="submit" className="btn btn-primary">
              Submit
            </button>
          </>
        )}
      </form>
    </>
  );
};

export default PasswordlessLogin;次に、ファイルをアップロードするためのフォームを作成します。このフォームは、以前にこのチュートリアルで作成したフォームとは少し異なります。また、mutate関数を呼び出す前に、ファイルをS3にアップロードするための特別な手順が必要です。
を以下のように入力する。 HomeworkFileForm.tsxを以下のように入力する:
// client/src/component/HomeworkFileForm.tsx
import React from 'react';
import { useMutation, useQuery } from '@apollo/client';
import {
  ADD_HOMEWORK_FILE,
  PRESIGN_HOMEWORK_FILE_UPLOAD,
} from '../../data/mutations';
import { GET_HOMEWORK } from '../../data/queries';
import { Homework } from '../../models';

// this components receives the uuid of the homework and the authentication token as properties
const HomeworkFileForm = ({ uuid, token }: { uuid: string; token: string }) => {
  // create a reference of the html element
  let homeworkFileRef: HTMLInputElement;

  // use the uuid to retrieve the information of the homework
  const { data, loading, error } = useQuery<
    { homework: Homework },
    { uuid: string }
  >(GET_HOMEWORK, {
    variables: {
      uuid
    }
  });

  // setup the mutate functions for presiging the file and for adding the reference to the database
  const [presignHomeworkFileUpload] = useMutation(PRESIGN_HOMEWORK_FILE_UPLOAD);
  const [addHomeworkFile] = useMutation(ADD_HOMEWORK_FILE);

  render the component
  return (
    <>
      {loading && <p>Loading...</p>}
      {error && <p>Error!</p>}
      {data && (
        <>
          <p>Description: {data.homework.description}</p>
          <form
            onSubmit={async (e) => {
              e.preventDefault();

              try {
                // get the file from the html element reference
                const file =
                  homeworkFileRef &&
                  homeworkFileRef.files &&
                  homeworkFileRef.files[0];

                // make sure a file was provided
                if (!file) {
                  throw new Error('file is not defined');
                }

                // get the presign informatio from the server
                const { data } = await presignHomeworkFileUpload({
                  variables: {
                    fileName: `homeworks/uuid/${Date.now()}`,
                    isPublic: true,
                    token,
                  },
                });

                // parse the stringified JSON
                const imageData = JSON.parse(data.presignDocument);

                // create a form programatically for sending the file to S3
                const formData = new FormData();

                // add the required headers
                formData.append('Content-Type', file?.type);
                formData.append('acl', 'public-read');

                // add the signing information
                Object.keys(imageData.fields).forEach((key) => {
                  formData.append(key, imageData.fields[key]);
                });

                // and finally add the file
                formData.append('file', file);

                // use fetch to send a POST requests to S3
                const result = await fetch(imageData.url, {
                  method: 'POST',
                  body: formData,
                });

                // if the file was uploaded sucessfully then add the file information to the database
                if (result.status >= 200 && result.status <= 299) {
                  addHomeworkFile({
                    variables: {
                      url: imageData.url + '/' + imageData.fields.Key,
                      uuid,
                      token,
                    },
                  });
                }
              } catch (err) {
                console.error('An error ocurred', err);
              }
            }}
          >
            <input
              id="homeworkFile"
              type="file"
              name="homeworkFile"
              ref={(node: HTMLInputElement) => (homeworkFileRef = node)}
            />
            <button type="submit">Send</button>
          </form>
        </>
      )}
    </>
  );
};

export default HomeworkFileForm;では、学生がログインしているかどうかによって異なるコンポーネントを表示するページを作成しましょう。次のように client/src/pages/AddHomeworkFilePage.tsxファイルを作成し、以下のように入力します:
// client/src/pages/AddHomeworkFilePage.tsx
import React, {useState} from 'react';
import { useParams } from 'react-router-dom';
import { PasswordlessLogin, HomeworkFileForm } from '../components/Homeworks';

const AddHomeworkFilePage = () => {
  // setup the state for storing the token
  const [ token, setToken ] = useState<string | null>(null);
  // get the homework uuid from the url
  const { uuid } = useParams<{ uuid: string }>();

  // if a token exists show the homework form, if not show the login form
  return token ? <HomeworkFileForm token={token as string} uuid={uuid} /> : <PasswordlessLogin onLogin={(token) => setToken(token as string)} />
}

export default AddHomeworkFilePage;繰り返しますが、新しく作成したページを同じフォルダ内の index.tsxに追加することを忘れないでください:
// client/src/pages/index.tsx
...
import AddHomeworkFilePage from './AddHomeworkFilePage';

function Pages() {
  return (
    <Router>
      <Navigation />
      <div id="roots" className="p-2">
        ...
        <Route path="/homeworks/:uuid/upload" exact component={AddHomeworkFilePage} />
       ...
      </div>
    </Router>
  );
}
...
最後に必要なことは、生徒が送った宿題ファイルを教師が実際にチェックできるようにすることです。そのためには、単に HomeworkFileListコンポーネントを作成します。
新しい client/src/components/Homeworks/HomeworkFileList.tsxを作成し、以下のように入力し、宿題ファイルのリストを作成する:
// client/src/components/Homeworks/HomeworkFileList.tsx
import React from 'react';
import { useQuery } from '@apollo/client';
import { GET_HOMEWORK_FILES } from '../../data/queries';
import { HomeworkFile } from '../../models';

// the component get the uuid of the homework as property
const HomeworkFileList = ({ uuid }: { uuid: string }) => {
  // retrieve the submitted files for the given homework
  const { data, loading, error } = useQuery<
    { homeworkFiles: HomeworkFile[] },
    { uuid: string }
  >(GET_HOMEWORK_FILES, {
    variables: {
      uuid,
    },
  });

  // render the html elements
  return (
    <>
      {loading && <p>Loading...</p>}
      {error && <p>Error!</p>}
      {data && (
        <>
          <h1>Homework Files</h1>
          <p>{data.homeworkFiles.length > 0 && data.homeworkFiles[0].homework.description}</p>
          <table>
            <thead>
              <tr>
                <th>Phone Number</th>
                <th>Student Name</th>
                <th>Link</th>
              </tr>
            </thead>
            <tbody>
              {data.homeworkFiles.map((homeworkFile) => {
                return (
                  <tr key={homeworkFile.student.phoneNumber}>
                    <td>{homeworkFile.student.phoneNumber}</td>
                    <td>
                      {homeworkFile.student.firstName}
                      {homeworkFile.student.lastName}
                    </td>
                    <td>
                      <a
                        target="_blank"
                        rel="noopener noreferrer"
                        href={homeworkFile.url}
                      >
                        {homeworkFile.url}
                      </a>
                    </td>
                  </tr>
                );
              })}
            </tbody>
          </table>
        </>
      )}
    </>
  );
};

export default HomeworkFileList;最後に ListHomeworkFilesPage.tsxファイルを作成する。 client/src/pagesにファイルを作成する:
// client/src/pages/ListHomeworkFilesPage.tsx
import React from 'react';
import { useParams } from 'react-router-dom';
import { HomeworkFileList } from '../components/Homeworks';

const ListHomeworkFilesPage = () => {
  const { uuid } = useParams<{uuid: string}>();

  return <HomeworkFileList uuid={uuid} />
}

export default ListHomeworkFilesPage;最後に、ルートを同じフォルダ内の index.tsxファイルに追加することを忘れないでください:
// client/src/pages/index.tsx
...
import ListHomeworkFilesPage from './ListHomeworkFilesPage';

function Pages() {
  return (
    <Router>
      <Navigation />
      <div id="roots" className="p-2">
        ...
        <Route path="/homeworks/:uuid/list" exact component={ListHomeworkFilesPage} />
        ...
      </div>
    </Router>
  );
}
...
以上だ!うまくいけば、この投稿は「新しい普通」に適応するために何ができるか、そしてVonageで開発されているクールなものがそれを達成するためにどのように役立つかについてのアイデアを与えてくれたことでしょう。
シェア:
Héctor is a Computer Systems Engineer based in El Salvador. He works on DevOps, technical writing, and QA. He has plenty of experience with web applications and cloud services. When he is not in front of the computer he loves playing music, videogames and going on adventures with the love of his life: his wife ❤️