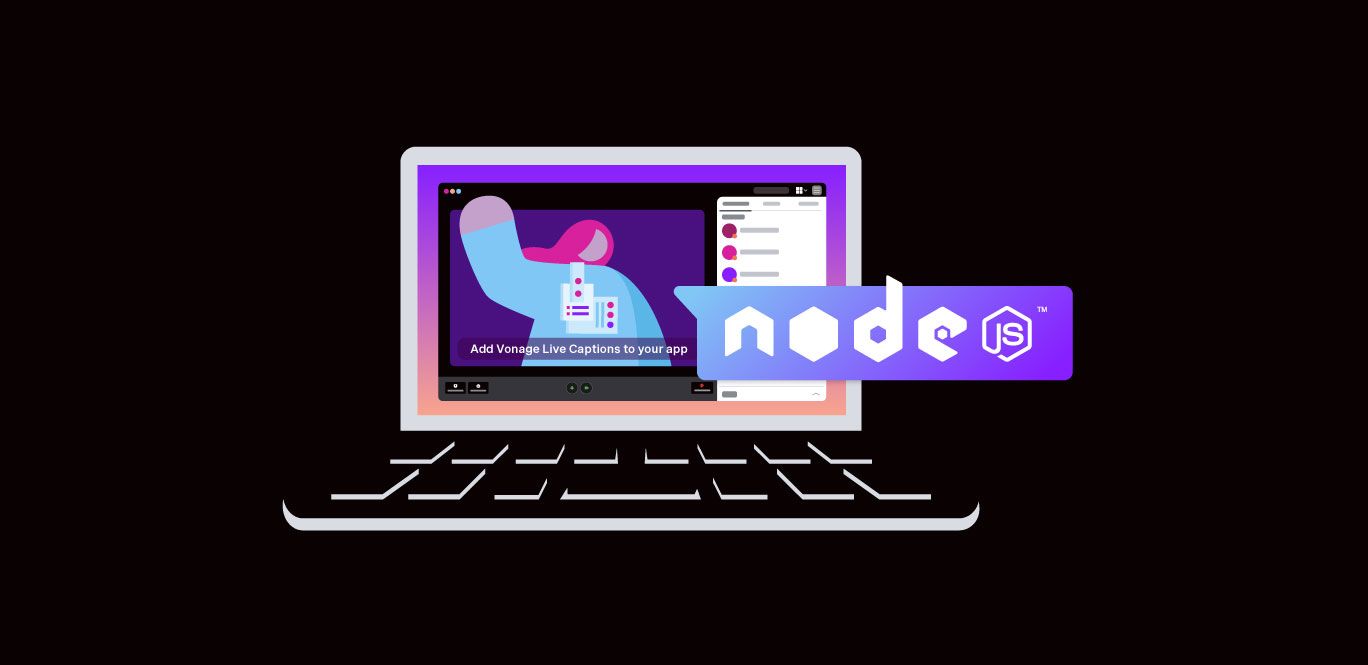
Node.jsでVonage Live Captions APIを始める
所要時間:1 分
想像してみてください。あなたはVonage Videoを使って、地元のコミュニティ・カレッジにライブ・ストリーミング・プラットフォームを追加し、遠隔地の学生が授業に出席できるようにしました。おめでとうございます!次のチケットは、ライブ・キャプション機能を追加することです。アクセシビリティのためかどうか、 学生の集中力向上その他の理由であれ、キャプションは不可欠です。このスタートガイドでは、ライブキャプション機能を追加するために ライブキャプションAPIアプリケーションに 様々な言語をサポート.この GitHub リポジトリにサンプルもあるので、ワンクリックでデプロイして試すことができる。
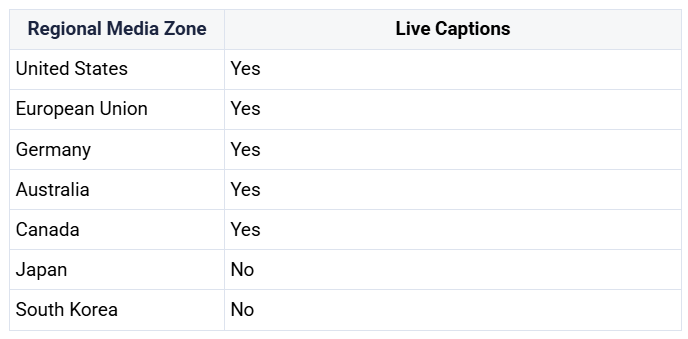
これは言語サポートとは別のものです。すべての地域メディアゾーンは、すべての言語をサポートしています。
キャプションを付ける前に、ビデオ通話で会話する参加者が必要です。ビデオ通話に参加するには、ビデオ通話に参加するための トークンが必要です。このトークンは、アプリケーションのIDとセッションIDを使用してサーバー上で生成されます。セッションIDは、ビデオ通話が行われている部屋の一意の識別子と考えることができます。
このチュートリアルでは、すでにサーバーが稼動していることを前提としている。そうでない場合は、Node.jsで書かれたサンプル・サーバー・アプリケーションをデプロイすることができます。テスト・サーバーを立ち上げたい場合は Vonageのサーバーレス・プラットフォームを使ってデプロイできます。 Vonage Video Learning Server Node.jsプロジェクト.
ビデオ通話でライブキャプションを開始および停止するには、サーバーからのリクエストが必要です。もし Node.js SDKを使用している場合、エンドポイントのコードは次のようになります:
/**
 * POST /captions/start
 */
router.post('/captions/start', async (req, res) => {
  const sessionId = req.body.sessionId;
  const captionsOptions = {
    languageCode: 'en-US',
    partialCaptions: 'true',
  };
  try {
    const captionsResponse = await vonage.video.enableCaptions(sessionId, req.body.token, captionsOptions);
    const captionsId = captionsResponse.captionsId;
    res.send({ id: captionsId });
  } catch (error) {
    console.error("Error starting captions: ",error);
    res.status(500).send(`Error starting captions: ${error}`);
  }
});

/**
 * POST /captions/:captionsId/stop
 */
router.post('/captions/:captionsId/stop', async (req, res) => {
  const captionsId = req.params.captionsId;
  try {
    await vonage.video.disableCaptions(captionsId);
    res.sendStatus(202)
  } catch (error) {
    console.error("Error stopping captions: ",error);
    res.status(500).send(`Error stopping captions: ${error}`);
  }
});
注: Video Node.js Learning Serverサンプル・アプリケーションを見ている場合、このコードは routes/index.js ファイルにあります。.
言語を変更するには languageCodeをサポートされている言語に設定します。
Supported Languages
For the most up-to-date list, please see the documentation."af-ZA"- Afrikaans"ar-AE"- Arabic, Gulf"ar-SA"- Arabic, Modern Standard"eu-ES"- Basque"ca-ES"- Catalan"zh-HK"- Chinese, Simplified"zh-CN"- Chinese, Cantonese"zh-TW"- Chinese, Traditional"hr-HR"- Croatian"cs-CZ"- Czech"da-DK"- Danish"nl-NL"- Dutch"en-AU"- English, Australian"en-GB"- English, British"en-IN"- English, Indian"en-IE"- English, Irish"en-NZ"- English, New Zealand"en-AB"- English, Scottish"en-ZA"- English, South African"en-US"- English, US"en-WL"- English, Welsh"fa-IR"- Farsi"fi-FI"- Finnish"fr-FR"- French"fr-CA"- French, Canadian"gl-ES"- Galician"de-DE"- German"de-CH"- German, Swiss"el-GR"- Greek"he-IL"- Hebrew"hi-IN"- Hindi, Indian"id-ID"- Indonesian"it-IT"- Italian"ja-JP"- Japanese"ko-KR"- Korean"lv-LV"- Latvian"ms-MY"- Malay"no-NO"- Norwegian Bokmål"pl-PL"- Polish"pt-PT"- Portuguese"pt-BR"- Portuguese, Brazilian"ro-RO"- Romanian"ru-RU"- Russian"sr-RS"- Serbian"sk-SK"- Slovak"so-SO"- Somali"es-ES"- Spanish"es-US"- Spanish, US"sv-SE"- Swedish"tl-PH"- Tagalog/Filipino"th-TH"- Thai"uk-UA"- Ukrainian"vi-VN"- Vietnamese"zu-ZA"- Zulu
他のサーバー言語を使用している場合は REST APIを使用してキャプションを開始および停止できます。
サーバーの準備ができたので、フロントエンド・アプリケーションをセットアップして、キャプションの開始、停止、リッスンの呼び出しを行おう。
ベーシック・キャプション・サンプル・アプリケーションのコンテキストで使用されているコードは、次のとおりです。 js/app.jsファイル.
セッションでキャプションを開始するには、サーバにPOSTリクエストをして sessionIdと token.以下は、デモアプリケーションで使用したコードです:
async function startCaptions() {
  console.log('start captions');
  try {
    captions = await postData(SAMPLE_SERVER_BASE_URL +'/captions/start',{sessionId, token});
    captionsStartBtn.style.display = 'none';
    captionsStopBtn.style.display = 'inline';
  }
  catch(error){
    handleError(error);
  }
}キャプションを開始するリクエストから返されたcaptionsオブジェクトの idプロパティを使用して、セッションでキャプションを停止します:
async function stopCaptions() {
  console.log('stop captions');
  try {
    const response = await fetch(
      ${SAMPLE_SERVER_BASE_URL}/captions/${captions.id}/stop,
      {
        method: 'POST',
        headers: {
          'Content-Type': 'application/json',
        },
      }
    );
    if (!response.ok) {
      throw new Error('error getting data!');
    }
    captionsStopBtn.style.display = 'none';
    captionsStartBtn.style.display = 'inline';
  } catch (error) {
    captionsStartBtn.style.display = 'none';
    captionsStopBtn.style.display = 'inline';
    handleError(error);
  }
}次に行うべき変更は、パブリッシャーの初期化時に publishCaptions: true を追加することです。
const publisherOptions = {
  insertMode: 'append',
  width: '100%',
  height: '100%',
  publishCaptions: true,
};これで、ビデオ通話に公開する人は誰でもキャプションを作成できるようになった。つまり、サブスクライブしている誰もが、それらのキャプションを受信して表示できる。サブスクライバーオブジェクトには captionReceivedイベントがあります:
subscriber.on('captionReceived', function(event){
  console.log('captionReceived event: ', event);
  if (!captions) {
    // Client didn't initiate the captions. Remove controls.
    captionsStartBtn.style.display = 'none';
    captionsStopBtn.style.display = 'none';
  }
  captionsBox.style.display = 'flex';
  captionsText.textContent = event.caption;
  // remove the captions after 5 seconds
  const removalTimerDuration = 5 * 1000;
  clearTimeout(captionsRemovalTimer);
  captionsRemovalTimer = setTimeout(() => {
    captionsBox.style.display = 'none';
    captionsText.textContent = '';
  }, removalTimerDuration);
});
以上です!これで、生徒が情報をよりよく保持し、成功を収める手助けができました。ご質問やご意見はございませんか?私たちの盛んな 開発者コミュニティに参加するまたは X(旧 Twitter)でフォロー、または 開発者向けニュースレター.つながりを保ち、進捗を共有し、最新の開発者向けニュース、ヒント、イベントを入手しましょう!