
ReactであなたのTwitterの好感度スコアがわかる
所要時間:10 分
2019年、私は日々の生活の中でポジティブさと優しさを広めることに挑戦した。
しかし、その目標が少し曖昧で漠然としていることにすぐに気づいた。素晴らしい意図ではあったが、その成功や影響を判断するのは難しいと感じた。
そこで数カ月間、目標をどのように測定しようかと思案していたところ、幸運にもMicrosoft Azureの テキスト分析APIを発見する幸運に恵まれた!
Azureのチームは、機械学習アルゴリズムをオープンソース化している。つまり、あらゆるテキストのセンチメントスコアを0から1までの数値スケール(0は否定的、1は肯定的)で分析することができる。
つまり、自分の言葉を採点し、特にソーシャルメディアへの投稿に関して、本当に優しさとポジティブさを広めているかどうかを確認できるのだ!
そこで、以下のようなReactアプリを作ろうと思った。 Twitter APIを使って直近のツイートを取得し、そのセンチメントを分析するアプリを作ろうと思ったんだ。 Nexmoの Messages APIを使って自分にレポートを送る!
このチュートリアルを行うには、Vonageアカウントが必要です。今なら 無料アカウントをお持ちでない場合は、今すぐ無料でサインアップできます。
そのほかにも、必要なものがある:
アプリを作成するために、以下の作業を行うことになる:
Expressでバックエンドサーバーを作成する
Reactでフロントエンドアプリを作る
Twitterのユーザー名を受け取るReactコンポーネントを作成する
Twitter APIで最新のツイートを取得する
Microsoft Azure APIでセンチメントスコアを計算する
NexmoのMessages APIを使って、あなたの携帯電話にレポートを送信します。
このチュートリアルでは、ゼロからのプロセスを説明する。完成したコードを見たい場合は gitリポジトリをクローンしてください。
はじめに、このプロジェクトのルート・ディレクトリで以下を実行する:
これで package.jsonファイルを作成し、いくつかの依存関係のインストールを開始できるようにする。
これを実行するには
サーバーとクライアントを1つのコマンドで実行できるようになります。 npm run devファイルを開き package.jsonファイルを開き、スクリプトを次のように変更してください:
// package.json
  "scripts": {
      "start": "node server.js",
      "server": "nodemon server.js",
      "client": "npm start --prefix client",
      "dev": "concurrently \"npm run server\" \"npm run client\""
},次に、ディレクトリのベースにさらに3つのファイルを作成する:.env, server.jsそして private.key:
あなたの .envファイルにNexmoとTwitterの認証情報を記入する。以下のようになります:
# .env

# Nexmo's credentials
API_KEY=*****
API_SECRET=*********
APPLICATION_ID=**********
NEXMO_NUMBER=***********
# Twitter's credentials
CONSUMER_KEY=*******
CONSUMER_SECRET=*******
ACCESS_TOKEN_KEY=**************
ACCESS_TOKEN_SECRET=*************APIキーとシークレットを入力するには、Nexmoの スタートアップページをご覧ください。また、アプリケーションIDと秘密鍵は アプリケーションの作成ページから取得できます。
アプリを作成する際、アプリをNexmoの電話番号にリンクさせるオプションが与えられます。必ずその電話番号をコピー&ペーストして .envファイルに NEXMO_NUMBER.
公開鍵と秘密鍵のペアも必ず生成してください。キーを直接 private.keyファイルに直接貼り付けました。
消費者とアクセスキーと秘密を埋めるために、 Twitterアプリを作成しを作成し、キーとトークンを生成する。
では server.jsファイルでExpressアプリを初期化し、いくつかの要件を添付しよう:
//  server.js
const dotenv = require('dotenv');
const express = require('express');
const bodyParser = require('body-parser');
const Nexmo = require('nexmo');
const Twitter = require('twitter');

dotenv.config();
const app = express();
app.use(bodyParser.json());

const port = 5000;

app.listen(port, () => console.log(`server started on port ${port}`));
また、NexmoとTwitterのAPIを利用するために必要なさまざまな認証情報も追加する:
//  server.js  continued:

// Nexmo credentials
const nexmo = new Nexmo({
  apiKey: process.env.API_KEY,
  apiSecret: process.env.API_SECRET,
  applicationId: process.env.APPLICATION_ID,
  privateKey: './private.key'
}, {debug: true});

// Twitter credentials
const client = new Twitter({
  consumer_key: process.env.CONSUMER_KEY,
  consumer_secret: process.env.CONSUMER_SECRET,
  access_token_key: process.env.ACCESS_TOKEN_KEY,
  access_token_secret: process.env.ACCESS_TOKEN_SECRET
});この server.jsファイルの一番下に、これから書くエンドポイントの2つのシグネチャを追加する:
//  server.js  continued:
app.post('/userName', function(req, res) {});
app.post('/sendSMS', function(req, res) {});
次に、ディレクトリのルート内でReactアプリを作成する:
アプリの名前は clientという名前にしましたが、好きな名前をつけてください。Reactアプリを作成したら、その中に移動して起動し、インストール・プロセスですべてが正しく機能したことを確認する:
両方のポートを同時に実行できるように、以下のように client/package.jsonファイルに
// package.json
"proxy": "http://localhost:5000",を実行する create-react-appを実行すると、たくさんの定型文が表示される。その中に src/フォルダーの中に App.jsファイルがある。そのファイルの中に <TwitterName />コンポーネントへの呼び出しを追加しました。
私の App.jsファイルは次のようになっている:
// client/src/App.js
import React from 'react';
import TwitterName from './components/twitterName';

class App extends React.Component {
  render() {
    return (
      <div>
        <TwitterName />
      </div>
    );
  }
}

export default App;次に componentsフォルダを作成しよう。 src/:
そのフォルダ内に3つのファイルを作成する:
の中に twitterName.jsボイラープレートと一緒に、2つの関数 senduserName()と getTweet():
// client/src/components/twitterName.js

import React from 'react';
import SentimentCalculate from './sentimentCalculate';

class TwitterName extends React.Component {
  constructor(props) {
    super(props);
    this.state = {
      userName: '',
      tweetContent: '',
    };
  }
  senduserName();
  getTweet();
  render();
}

export default TwitterName;の中に render()を追加します。 <input />を追加して、Twitterのユーザー名をユーザーから受け取り、状態として保存します。
// client/src/components/twitterName.js

 render() {
    return (
      <div>
      <label>
        Enter a Twitter Handle and find the most recent tweet:
        <input
          placeholder="twitter name"
          type="text"
          value={this.state.userName}
          onChange={(e) => this.setState({ userName: e.target.value})}
        />
      </label>
        <button onClick={this.senduserName}>
          find most recent tweet
        </button>
      </div>
    )
  }
が呼び出される。 senduserName()は、ユーザーがユーザー名を入力して find most recent tweetボタンを押すと呼び出されます。この関数は server.jsバックエンドに情報を送信します:
//client/src/components/ twitterName.js

senduserName = (event) => {
    event.preventDefault();
    fetch('/userName', {
      method: 'post',
      headers: {
        'Content-Type': 'application/json'
      },
      body: JSON.stringify({userName: this.state.userName})
    })
    this.getTweet()
  }
その関数は次に getTweet()関数を呼び出す:
// client/src/components/twitterName.js

  getTweet = (event) => {
    fetch('/twitter')
    .then(res => res.json())
    .then(tweetContent => this.setState({tweetContent}, () => console.log('tweet fetched: ', tweetContent)))
  }
この関数はサーバーからデータを受け取り、最新のツイートをReactページに表示します。
このページでやるべきことは、次のコンポーネントを呼び出すことだけだ、 <SentimentCalculate />そこで render()を追加し、状態 (tweetContentと userName)をそのコンポーネントに渡す:
// client/src/components/twitterName.js
  render() {
    return (
      <div>
        <input
          placeholder="twitter name"
          type="text"
          value={this.state.userName}
          onChange={(e) => this.setState({ userName: e.target.value})}
        />
        <button onClick={this.senduserName}>
          find most recent tweet
        </button>

        <SentimentCalculate tweetContent={this.state.tweetContent} userName={this.state.userName} />
      </div>
    )
  }
プロジェクトのルートにある server.jsファイルに戻り app.post('/userName');関数を埋めてみましょう:
//server.js

// Receive input and call Twitter API
app.post('/userName', function(req, res) {
  userName = req.body.userName;
  app.get('/twitter', (req, res) => {
    // read most recent tweet
    var username = {screen_name: userName };
    client.get('statuses/user_timeline', username, function(error, tweets, response) {
      if (!error) {
        console.log(`most recent tweet: `, tweets[0].text);
        res.json(tweets[0].text)
      }
    });
  });
});
ここで userNameはクライアントから渡され、Twitter APIに送信される。そして最新のツイートがクライアントに送り返され、Reactのコードに表示される。
それでは sentimentCalculate.jsファイルに2つの異なる関数 calculateSentiment()そして showTweet():
//client/src/components/sentimentCalculate.js

import React from 'react';
import unirest from 'unirest';
import PhoneNumber from './phoneNumber';
require('dotenv').config()

class SentimentCalculate extends React.Component {
  constructor(props) {
    super(props);
    this.state = {
      tweetContent: props.tweetContent,
      userName: props.userName,
      score: ''
    };
  }
  calculateSentiment();
  showTweet();
  render();
}
export default SentimentCalculate;ステートの初期化とロードを tweetContentそして userNameを <TwitterName />コンポーネントから
この showTweet()関数は非常にシンプルで、ツイートがあればそれを表示する。また calculateSentiment()関数を呼び出すボタンも表示されます:
//client/src/components/sentimentCalculate.js
  showTweet() {
    if (this.props.tweetContent) {
      return (
        <div>
          {this.props.tweetContent}
          <button onClick={this.calculateSentiment}>
            Calculate sentiment score
          </button>
        </div>
      )
    }
  }
その calculateSentiment()関数は次のようになる:
//client/src/components/sentimentCalculate.js

  calculateSentiment = (event) => {
    console.log("calculating sentiment for: ", this.props.tweetContent)
    event.preventDefault();
    unirest.post("https://microsoft-azure-text-analytics-v1.p.rapidapi.com/sentiment")
    .header("X-RapidAPI-Host", "microsoft-azure-text-analytics-v1.p.rapidapi.com")
    .header("X-RapidAPI-Key", process.env.REACT_APP_RAPIDAPI_KEY)
    .header("Content-Type", "application/json")
    .send({"documents":[{"language":"en","id":"string","text":this.props.tweetContent}]})
    .end((result) => {
      const newScore = result.body.documents[0].score
      console.log("The score is:", newScore)
      this.setState({ score: newScore })
    });
  }
この関数は、Microsoft AzureのText Analytics via ラピッドAPI.Rapid APIを使うと、1回のログインでたくさんの異なるAPIに接続できるので気に入っている。
私はキーを .envファイルを clientフォルダに保存しています。ですから、認証情報を保護するために .envファイルを作成してください:
この calculateSentiment()関数は tweetContentをAPIに送り、スコアを返す。
関数に render()関数に、その新しい状態を表示する場所を追加する:
//client/src/components/sentimentCalculate.js

  render() {
    return (
      <div>
        {this.showTweet()}
        {this.state.score && `Tweet's sentiment score: ${this.state.score}`}
        <PhoneNumber score={this.state.score} tweetContent={this.props.tweetContent} userName={this.props.userName} />
      </div>
    )
}スコアの下に、最後のコンポーネントがあることに注目してほしい: <PhoneNumber />.このコンポーネントにもpropsでステートを渡してください。
最終的な phoneNumber.jsファイルを作りましょう。 sendSMS(), renderPhoneInput()そして renderSendButton()を使って、Nexmo Messages API経由でSMSメッセージを送信する機能を構築しましょう:
//client/src/components/phoneNumber.js

import React from 'react';

class PhoneNumber extends React.Component {
  constructor(props) {
    super(props);
    this.state = {
      score: props.score,
      tweetContent: props.tweetContent,
      userName: props.userName,
      number: ''
    };
    this.sendSMS = this.sendSMS.bind(this);
  }
  sendSMS();
  renderPhoneInput();
  renderSendButton();
  render() {
    return (
      <div>
        {this.renderPhoneInput()}
        {this.renderSendButton()}
      </div>
    )
  }

}
export default PhoneNumber;最初に呼び出されるメソッドは renderPhoneInput().では、それをビルドしてみよう:
//client/src/components/phoneNumber.js

  renderPhoneInput() {
    if (this.props.score) {
      return (
        <div>
          Phone number:
          <input
            placeholder="18005554444"
            type="tel"
            value={this.state.number}
            onChange={(e) => this.setState({ number: e.target.value})}
          />
        </div>
      );
    }
  }
コンポーネントが最後のコンポーネントからスコアを受け取った場合、この関数は、センチメント分析 レポートを送信するためにユーザーが電話番号を入力するための入力を表示します。ユーザーが有効な電話番号を入力すると renderSendButton()関数が有効になります:
//client/src/components/phoneNumber.js

  renderSendButton() {
    if (this.state.number && this.state.number.match(/\d/g).length===11) {
        return (
          <div>
            <button onClick={this.sendSMS}>
            Send the tweet’s score to my phone
            </button>
          </div>
        );
      }
  }
このボタンは最終関数を呼び出す、 sendSMS()これは次のようになる:
//client/src/components/phoneNumber.js

  sendSMS() {
    fetch('/sendSMS', {
      method: 'post',
      headers: {
        'Content-Type': 'application/json'
      },
      body: JSON.stringify({
        number: this.state.number,
        score: this.props.score,
        tweetContent: this.props.tweetContent,
        userName: this.props.userName
      })
    })
   .then(res => {
      alert('Your text was successfully sent!')
    })
    .catch(function(error){ console.log(error)});
  }
この関数は、ユーザーから収集したすべての状態をサーバーに送信する。そして最後に、その関数が正常に完了したら、ユーザーに警告を発します。
最後のステップは server.jsに戻って app.post('/sendSMS')関数を書くことである:
//server.js

// send SMS via Nexmo
app.post('/sendSMS', (req, res) => {
  res.send(req.body);
  let score = req.body.score;
  let scoreSign = '';

  // analyze the sentiment and assign emoji
  if (score > '.5') {
    scoreSign = '✅'
  } else if (score == '.5') {
    scoreSign = '😐'
  } else {
    scoreSign = '👿'
  }

  //  Nexmo Messages API
  nexmo.channel.send(
    { type: 'sms', number: req.body.number }, // To
    { type: 'sms', number: process.env.NEXMO_NUMBER }, // From
    {
      content: {
        type: 'text',
        text: `${req.body.userName}'s most recent tweet was: \"\ ${req.body.tweetContent}\"\ and the sentiment score is: ${scoreSign}`,
      }
    },
    (err, data) => {
      if (err) {
        console.log(err);
      } else {
        console.log(data);
      }
    }
  );
});
スコアに基づいて感情分析を行うためのロジックが上部に少しあります。絵文字ではなく正確な番号を送りたい場合は、このロジックを削除してください。
その後、あなたのNexmo番号からユーザーが指定した番号にSMSとしてレポートを送信します。
私の最終的なアプリの構造はこんな感じだ:
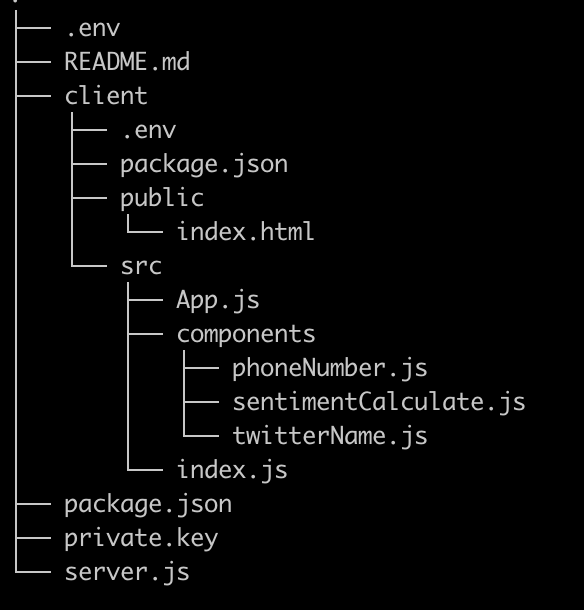 Structure of folders and files
最後のステップは、このコードを試してみて、どのように動作するかを確認することである!ルート・ディレクトリに戻り、サーバーとクライアントを同時に起動するコマンドを実行する:
訪問 localhost:3000にアクセスすると、Twitterのハンドルネームを入力するようユーザーに促すReactコンポーネントが表示されます。
そのユーザーの最新のツイートが取得され、ページに表示されます。
ボタンをクリックすると calculate the sentimentボタンをクリックすると、Microsoft Azure Text Analytics APIが呼び出され、ツイートのスコアが表示されます。
個人の電話番号を入力すると、NexmoのMessages API経由でSMSレポートが送信されます。
どうですか!🎉あなたはTwitterのセンチメントを分析するためのReactアプリを作成することに成功しました!
メッセージとセンチメント分析をもっとやってみたいと思われたなら、次にやってみたいことをいくつか挙げてみましょう:
NexmoのDispatch APIでは、メッセージの配信状況に応じてリダイレクトすることができます。ViberやWhatsAppにも送信してみてください!
ツイッターの
/streaming機能を使って、ユーザー名がツイートするたびにレポートを送信することを検討してください。