シェア:
エンリコはVonageの元チームメンバーです。ソリューション・エンジニアとして、技術的な専門知識で営業チームをサポートした。 クラウド、スタートアップ、新技術に情熱を注ぐ。イタリアのWebRTCスタートアップの共同設立者。仕事以外では、旅行とできるだけ多くの奇妙な食べ物を味わうのが好き。
新しいVonage Video Expressでマルチパーティビデオアプリを作成する
所要時間:1 分
この記事は、ハビエル・モリーナ・サンスとの共同執筆によるものである。 ハビエル・モリーナ・サンス
このブログ記事では、ReactJSと新しいVonage Video Expressをベースにしたマルチパーティビデオアプリケーションを開発する方法を紹介します。Video Expressは、デフォルトで以下の機能を提供します:
ルーム&パーティシパント・マネージャーパブリッシング、サブスクライブ、ストリーム管理ロジックの簡素化
レイアウト管理カスタマイズ可能なコンポーネントを備えた、レスポンシブUIとレイアウトマネージャ。
ビデオ品質の最適化(参加者数、レンダリングサイズ、CPU、ネットワーク状況に応じて、フレームレートと解像度を最適化。
ネットワークの最適化:参加者のビデオや音声を自動的に削除し、帯域幅リソースを最適化します。
使いやすさ:パブリッシング、サブスクライブ、ストリームをルームと参加者に置き換えることで、より自然なインタラクションを提供します。
最後まで読み飛ばしたいですか?このチュートリアルのソースコードはすべて GitHub.
アプリは、サーバーサイドとクライアントサイドの2つの主要セクションに分かれている:サーバーサイド:クレデンシャル生成とアーカイブ管理を担当するシンプルなNodeJSサーバー クライアントサイド:React Hooksを使用したReact SPA(シングル・ページ・アプリケーション)。
クライアントサイドは、実際に動作する場所です。Video Express を使用することで、応答性と拡張性に優れたマルチパーティ ビデオ会議アプリを実装することができました。
Reactアプリケーションは vonage/video-expressモジュールを利用している。Video Expressは、HTMLスクリプトタグでも使用できます。 Video Express ドキュメントをご覧ください。
このアプリは、React 16.8に付属するReact Hooksをベースにしている。次に、このアプリケーションの主なフックを詳しく見てみよう。
利用室 UseRoomフックは、Video Room のライフサイクルを処理するものです。Video Express のおかげで、Session、Publisher、Subscriber のライフサイクルを管理する必要はありません。代わりに ルームオブジェクトをインスタンス化し room.join()メソッドを使用するだけです。
まず、Roomオブジェクトを初期化し、呼び出しに参加する関数を作成する必要があります。認証 (apiKey, sessionIdと tokenなど) と、パブリッシャー設定として使用するオプションのパラメータを指定します。 userNameまた、Room を表示するコンテナや、オプションのパブリッシャー設定も必要です。
Video Expressが提供するデフォルトのレイアウトマネージャを使用するため、いくつかのレイアウトパラメータを渡します。 ここで.
const createCall = useCallback(
    (
      { apikey, sessionId, token },
      roomContainer,
      userName,
      publisherOptions
    ) => {
      if (!apikey || !sessionId || !token) {
        throw new Error('Check your credentials');
      }

      roomRef.current = new MP.Room({
        apiKey: apikey,
        sessionId: sessionId,
        token: token,
        roomContainer: 'roomContainer',
        participantName: userName,
        managedLayoutOptions: {
          layoutMode: 'grid',
          screenPublisherContainer: 'screenSharingContainer'
        }
      })
       startRoomListeners();

       roomRef.current
        .join({ publisherProperties: finalPublisherOptions })
        .then(() => {
          setConnected(true);
          setCamera(roomRef.current.camera);
          setScreen(roomRef.current.screen);
          addLocalParticipant({ room: roomRef.current });
        })
        .catch(e => console.log(e));
    },
    [ ]
  );
オブジェクトが初期化されると Roomオブジェクトが初期化されたら startRoomListeners関数を呼び出して Room関数を呼び出します。次に room.join()メソッドを呼び出します。 publisherSettingsメソッドを呼び出します。新しい参加者の参加、新しい画面共有ストリームの作成、ユーザーが通話に再接続するなどのイベントを通知するために、イベントリスナーが必要です。
const startRoomListeners = () => {
    if (roomRef.current) {
      roomRef.current.on('connected', () => {
        console.log('Room: connected');
      });
      roomRef.current.on('disconnected', () => {
        setNetworkStatus('disconnected');
        console.log('Room: disconnected');
      });
      roomRef.current.camera.on('created', () => {
        setCameraPublishing(true);
        console.log('camera publishing now');
      });
      roomRef.current.on('reconnected', () => {
        setNetworkStatus('reconnected');
        console.log('Room: reconnected');
      });
      roomRef.current.on('reconnecting', () => {
        setNetworkStatus('reconnecting');
        console.log('Room: reconnecting');
      });
      roomRef.current.on('participantJoined', participant => {
        console.log(participant);
        addParticipants({ participant: participant });
        console.log('Room: participant joined: ', participant);
      });
      roomRef.current.on('participantLeft', (participant, reason) => {
        removeParticipants({ participant: participant });
        console.log('Room: participant left', participant, reason);
      });
    }
  };
参加者のリストを表示できるように、セッションの参加者も記録していることに注意してください。参加者が入室または退室すると更新されるステート変数を作成します。
もうひとつの便利な機能は ネットワーク・ステータス・コンポーネント.この機能は、ユーザーの切断/再接続時にUIを更新し、ユーザーにネットワークの問題を知らせるのに役立つだろう。
現在では、複数のオーディオ/ビデオ・デバイスを利用できるのが一般的です。イヤホンを使いたがるユーザーもいれば、外付けのウェブカメラをコンピュータに接続したがるユーザーもいます。Videoアプリケーションでは、ユーザーが様々なデバイスから選択できるようにすることが不可欠です。そのため useDevicesフックは、利用可能なデバイスのリストを取得する方法を説明します。
  useEffect(() => {
    navigator.mediaDevices.addEventListener('devicechange', getDevices);
    getDevices();

    return () => {
      navigator.mediaDevices.removeEventListener('devicechange', getDevices);
    };
  }, [getDevices]);
メディア・デバイスの変化を検知するイベント・リスナーをセットアップしました。 getDevices()関数をトリガーします。
const getDevices = useCallback(async () => {
    if (!navigator.mediaDevices || !navigator.mediaDevices.enumerateDevices) {
      console.log('enumerateDevices() not supported.');
      return;
    }
    try {
      const devices = await MP.getDevices();
      const audioInputDevices = devices.filter(
        (d) => d.kind.toLowerCase() === 'audioinput'
      );
      const audioOutputDevices = devices.filter(
        (d) => d.kind.toLowerCase() === 'audiooutput'
      );
      const videoInputDevices = devices.filter(
        (d) => d.kind.toLowerCase() === 'videoinput'
      );
      setDeviceInfo({
        audioInputDevices,
        videoInputDevices,
        audioOutputDevices
      });
      // });
    } catch (err) {
      console.log('[loadDevices] - ', err);
    }
  }, []);
私たちの getDevices()関数は MP.geDevices()メソッドを呼び出します。このメソッドは、ユーザがデバイスへのアクセスを許可すると、使用可能なデバイスのリストを返します。そして、デバイスをフィルタリングし、利用可能なさまざまなデバイスをステートに入力します。
const [deviceInfo, setDeviceInfo] = useState({
    audioInputDevices: [],
    videoInputDevices: [],
    audioOutputDevices: []
  });
Video Expressは、通話前のユーザー体験の実装にも役立ちます。実際、Video Expressは プレビュー発行者クラスを実装しています。この PreviewPublisherクラスのアイデアは、開発者が簡単にメディアをプレビューできるようにすることです。 Roomオブジェクトを作成する必要がありません。
ユーザーが正しいデバイスを選択できるようにプレビューを作成し(複数ある場合)、マイクが音声を拾い、カメラが問題なく動作することを確認します。完全な実装は GitHub.
まず、UseDevicesフックから利用可能なデバイスを取得する。
const { deviceInfo, getDevices } = useDevices();プレビューパブリッシャーをターゲット要素で初期化したら previewMediaメソッドを呼び出してメディアを可視化します。また、デバイスのアクセスやイベントを処理するためにイベントリスナーを設定します。 audioLevelイベントリスナーを設定します。見ての通り getDevices()関数を呼び出すことはありません。 accessAllowedイベント)
const createPreview = useCallback(
    async (targetEl, publisherOptions) => {
      try {
        const publisherProperties = Object.assign({}, publisherOptions);
        console.log('[createPreview]', publisherProperties);
        previewPublisher.current = new MP.PreviewPublisher(targetEl);
        previewPublisher.current.on('audioLevelUpdated', (audioLevel) => {
          calculateAudioLevel(audioLevel);
        });
        previewPublisher.current.on('accessAllowed', (audioLevel) => {
          console.log('[createPreview] - accessAllowed');
          setAccessAllowed(DEVICE_ACCESS_STATUS.ACCEPTED);
          getDevices();
        });
        previewPublisher.current.on('accessDenied', (audioLevel) => {
          console.log('[createPreview] - accessDenied');
          setAccessAllowed(DEVICE_ACCESS_STATUS.REJECTED);
        });
        await previewPublisher.current.previewMedia({
          targetElement: targetEl,
          publisherProperties
        });

        setPreviewMediaCreated(true);
        console.log(
          '[Preview Created] - ',
          previewPublisher.current.getVideoDevice()
        );
      } catch (err) {
        console.log('[createPreview]', err);
      }
    },
    [calculateAudioLevel, getDevices]
  );
ユーザーがデバイスへのアクセスを許可したかどうかを知るためにSDKからいくつかのイベントをサブスクライブし、UIを更新してマイクが音声を拾っていることをユーザーに知らせるためにオーディオ・レベル・イベントをサブスクライブしています。また、オーディオ/ビデオ・デバイスへのアクセスが拒否された場合は、ユーザーにアラートを表示します ( 実装).
このアプリケーションの最も重要なコンポーネントのひとつが WaitingRoomコンポーネントです。 useDevicesと usePreviewPublisherフックを使用するからです。WaitingRoomは電話をかける前のページで、ユーザーは正しいオーディオとビデオのデバイスを選び、マイクとカメラが動作するかどうかを確認し、名前を選ぶことができます。
待合室はこんな感じ:
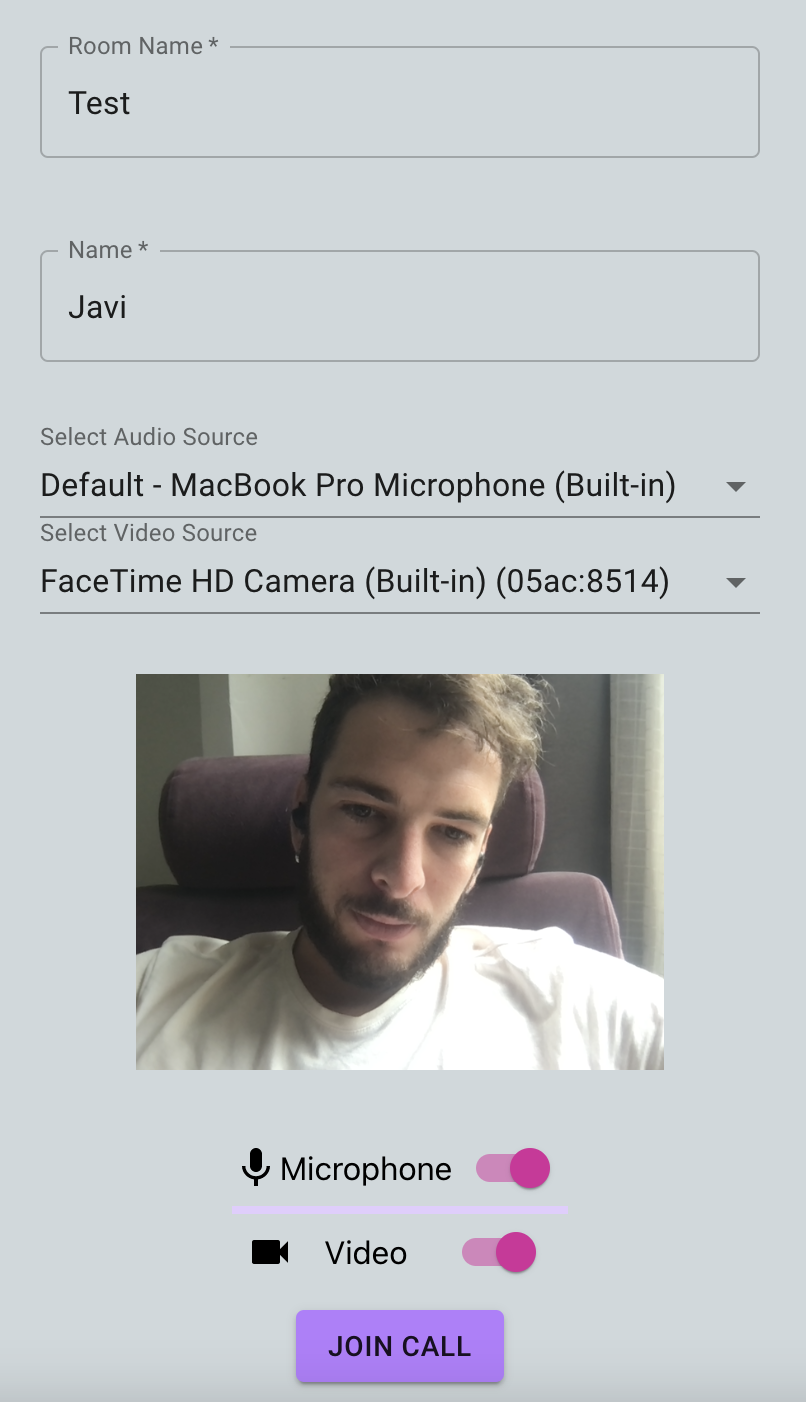 Screenshot of waiting room on mobile device
ユーザーの選択を保持するいくつかのステート変数があります。これは、ユーザーがオーディオまたはビデオをオフにした状態でルームに参加したり、名前を設定したり、オーディオデバイスを変更したりできるようにするために行われます:
const roomToJoin = location?.state?.room || '';
const [roomName, setRoomName] = useState(roomToJoin);
const [userName, setUserName] = useState('');
const [isRoomNameInvalid, setIsRoomNameInvalid] = useState(false);
const [isUserNameInvalid, setIsUserNameInvalid] = useState(false);
const [localAudio, setLocalAudio] = useState(
    user.defaultSettings.publishAudio
  );
const [localVideo, setLocalVideo] = useState(
    user.defaultSettings.publishVideo
);
const [localVideoSource, setLocalVideoSource] = useState(undefined); const [localAudioSource, setLocalAudioSource] = useState(undefined);
let [audioDevice, setAudioDevice] = useState('');
let [videoDevice, setVideoDevice] = useState('');私たちは UserContextを作成しました。この usePreviewPublisherフックを使って待合室のパブリッシャープレビューを作成したり破棄したりします。
const {
    createPreview,
    destroyPreview,
    previewPublisher,
    logLevel,
    previewMediaCreated,
    deviceInfo,
    accessAllowed
} = usePreviewPublisher();コンポーネントがマウントされ、待合室のコンテナが用意されたら、ロジックを開始します。パブリッシャープレビューを作成します。
useEffect(() => {
    if (waitingRoomVideoContainer.current) {
      createPreview(waitingRoomVideoContainer.current);
    }

    return () => {
      destroyPreview();
    };
  }, [createPreview, destroyPreview]);
プレビューが作成されると useEffectフックがあり、プレビューが作成されると実行され、現在使用中のデバイスでデバイスのリストを初期化します。への呼び出しに注意してください。 getAudioDevice()と getVideoDevice()の呼び出しに注目してください。前者はプロミスで、後者は同期メソッドです。
useEffect(() => {
    if (previewPublisher && previewMediaCreated && deviceInfo) {
      console.log('useEffect - preview', deviceInfo);
      previewPublisher.getAudioDevice().then(currentAudioDevice => {
        setAudioDevice(currentAudioDevice.deviceId);
      });
      const currentVideoDevice = previewPublisher.getVideoDevice();
      console.log('currentVideoDevice', currentVideoDevice);
      setVideoDevice(currentVideoDevice.deviceId);
    }
  }, [
    deviceInfo,
    previewPublisher,
    setAudioDevice,
    setVideoDevice,
    previewMediaCreated
  ]);
デバイスを変更するロジックは、VideoでもAudioでもほとんど同じです。ここではオーディオについて説明しますが、オーディオの場合は WaitingRoomコンポーネントの実装を確認してください。
useEffect(() => {
    if (previewPublisher) {
      if (localVideo && !previewPublisher.isVideoEnabled()) {
        previewPublisher.enableVideo();
      } else if (!localVideo && previewPublisher.isVideoEnabled()) {
        previewPublisher.disableVideo();
      }
    }
  }, [localVideo, previewPublisher]);
ユーザーが使用中のVideoデバイスを変更したときに発火するイベントリスナーがあります:
const handleVideoSource = React.useCallback(
    e => {
      const videoDeviceId = e.target.value;
      setVideoDevice(e.target.value);
      previewPublisher.setVideoDevice(videoDeviceId);
      setLocalVideoSource(videoDeviceId);
    },
    [previewPublisher, setVideoDevice, setLocalVideoSource]
  );
この投稿では、まったく新しい Video Express を React Applications と統合する方法を紹介します。このアプリケーションは、待合室、デバイスの選択、ネットワーク状態の検出、画面共有、チャットなど、ビデオアプリケーションに関連する主な機能を実装しています。
をクローンしてください。 Githubレポをクローンして、あなたのアプリケーションで使い始めてください。