シェア:
Vonageの元デベロッパー・アドボケイトで、ロンドンの地元テック・コミュニティをサポートする役割を担っていた。彼は経験豊富なイベントオーガナイザーであり、ボードゲーマーであり、ムーというかわいい犬のパパでもある。また、You Got This(幸せで健康的な仕事生活に必要なコア・スキルに関するイベント・ネットワーク)のリード・オーガナイザーでもある。
Node.jsで行動規範のインシデントラインを作成する
所要時間:1 分
コミュニティ・オーガナイザーとして行動規範を持つことは、物語のほんの一部に過ぎない。参加者はその電話番号に電話するか、テキストで送信することができ、その電話番号に転送された複数のオーガナイザーが責任を持って問題に対処する。
本日は、Vonageを使用したオリジナル・ボイスの作り方をご紹介しよう。 Voiceと メッセージAPIを使い、通話録音をダウンロードし、着信メッセージを記録するためのシンプルなダッシュボードを備えた独自のAPIを構築する方法を紹介します。
最終的なプロジェクトのコードは、以下のサイトでご覧いただけます。 https://github.com/nexmo-community/node-code-of-conduct-conference-call
Node.jsマシンにインストールされている
node-cliを実行することでインストールできる。npm install nexmo-cli@beta -g
新しいディレクトリを作成し、ターミナルで開く。を実行する。 npm init -yを実行して package.jsonファイルを作成し npm install express body-parser nunjucks uuid nedb-promises nexmo@beta.
ファイルを作成し index.jsファイルを作成し、依存関係を設定する:
インデックス.js
const uuid = require('uuid')
const app = require('express')()
const bodyParser = require('body-parser')
const nedb = require('nedb-promises')
const Nexmo = require('nexmo')
const nunjucks = require('nunjucks')

app.use(bodyParser.json())
app.use(bodyParser.urlencoded({ extended: false }))

// Future code goes here

app.listen(3000)これを実行したら、新しいターミナルで npx ngrok http 3000を新しいターミナルで実行し、一時的なngrok URLに注意してください。これは localhost:3000を公開するために使用されます。
プロジェクト・ディレクトリで別のターミナルを開き、コマンドライン・インターフェイス(CLI)で新しいアプリケーションを作成する:
nexmo app:create
  -> Select Capabilities: voice, messages
  -> Use the default HTTP methods? Y
  -> Voice Answer URL: https://NGROK_URL/answer
  -> Voice Event URL: https://NGROK_URL/event
  -> Messages Inbound URL: https://NGROK_URL/inbound
  -> Messages Status URL: https://NGROK_URL/event
  -> Private Key path: private.key
端末に表示されたアプリケーションIDをメモし、番号を検索します(GBは国番号に置き換えることができます):
nexmo number:search GB --sms --voiceNumbersの1つをクリップボードにコピーし、それを購入してアプリケーションにリンクする:
nexmo number:buy NUMBER
nexmo link:app NUMBER APP_ID
nexmo numbers:update NUMBER --mo_http_url https://NGROK_URL/smsで index.jsで、Nexmoクライアントを初期化します:
const nexmo = new Nexmo({
  apiKey: 'API_KEY',
  apiSecret: 'API_SECRET',
  applicationId: 'APPLICATION_ID',
  privateKey: './private.key'
})
エンドポイントを作成し GET /answerエンドポイントを作成し Nexmoコール制御オブジェクト(NCCO)を返します。 talkアクションで返します:
app.get('/answer', async (req, res) => {
  res.json([
    { action: 'talk', voiceName: 'Amy', text: 'This is the Code of Conduct Incident Response Line' }
  ])
})

app.post('/event', (req, res) => {
  res.status(200).end()
})
この POST /eventエンドポイントには後でコールデータが送られることになるが、今は単に HTTP 200 OKステータスを返します。
チェックポイントを実行してサーバーを起動します。 node index.jsメッセージが読み上げられ、通話が切れるはずです。メッセージが読み上げられ、電話が切れるはずです。 ダッシュボード.
メッセージを読み上げるだけでなく、発信者をまったく新しい会話に追加します。複数の参加者を通話に追加するなど、コードを使って会話をコントロールすることができます。そのために必要なのは会話名だけです。 /answerエンドポイントの内容を
const conferenceId = uuid.v4()

res.json([
  { action: 'talk', voiceName: 'Amy', text: 'This is the Code of Conduct Incident Response Line' },
  { action: 'conversation', name: conferenceId, record: true }
])このコードは、新しいユニークなIDを生成し、発信者を、名前を識別子として使用する会話に追加する(会話とは、この文脈では、1人以上の参加者がいる通話のことである)。ただし、一人だけの電話会議は悲しい。その前に res.json()電話会議の前に、各オーガナイザーに電話をかけ、電話会議に追加する:
for(let organizerNumber of ['NUMBER ONE', 'NUMBER TWO']) {
  nexmo.calls.create({
    to: [{ type: 'phone', number: organizerNumber }],
    from: { type: 'phone', number: 'NEXMO NUMBER' },
    ncco: [
      { action: 'conversation', name: conferenceId }
    ]
  })
}各番号は以下の形式でなければならない。 E.164形式でなければなりません。でなければなりません。 NEXMO NUMBERに置き換えてください。テスト中に、配列の中の番号が、あなたが電話をかけるときに使う番号と同じでないことを確認してください。
チェックポイントサーバーを再起動し、Nexmo番号に電話をかける。アプリケーションは、for()ループの配列で指定された番号を呼び出すはずです。
電話会議に発信者を追加する際に record: trueがオプションとして渡され、その結果、通話全体が録音された。通話が完了すると POST /eventエンドポイントには、会話IDと録音URLを含むペイロードが送信される。
既存のエンドポイントの前に、新しい nedb データベースを作成する:
const recordingsDb = nedb.create({ filename: 'data/recordings.db', autoload: true })サーバーを再起動すると、ファイルが dataディレクトリ内にファイルが作成されます。イベント・エンドポイントを次のように更新します:
app.post('/event', async (req, res) => {
  if(req.body.recording_url) {
    await recordingsDb.insert(req.body)
  }
  res.status(200).end()
})
チェックポイントサーバーを再起動し、Nexmo番号に電話をかけます。参加者全員が電話を切ったら、次のように data/recordings.dbファイルに
これで録画データがデータベースに保存されたので、いよいよダッシュボードを作成しよう。最初のエンドポイントの前にnunjucksを設定する:
nunjucks.configure('views', { express: app })これは、nunjucksが以下のディレクトリにあるすべてのファイルをレンダリングするように設定します。 viewsディレクトリにあるすべてのファイルをレンダリングし、変数 app変数に格納されているexpressアプリケーションへのリンクをレンダリングするように設定します。ディレクトリと viewsディレクトリを作成し index.htmlファイルを作成します:
<h1>Recordings</h1>

{% for recording in recordings %}
  <p>
    <a href="/details/{{recording.conversation_uuid}}">{{recording.start_time}}</a>
  </p>
{% endfor %}また details.htmlファイルを viewsディレクトリに
<ul>
  <li>{{caller}}</li>
  <li>{{recording.timestamp}}</li>
  <li><a href="/details/{{recording.conversation_uuid}}/download">Download</a></li>
</ul>で3つのエンドポイントが必要です。 index.jsに3つのエンドポイントが必要です。最初のものは、データベースからすべての録画をロードし、インデックスページをレンダリングします:
app.get('/', async (req, res) => {
  const recordings = await recordingsDb.find().sort({ timestamp: -1 })
  res.render('index.html', { recordings })
})
ページはこのようになり、最新のレコーディングが最初に表示される:
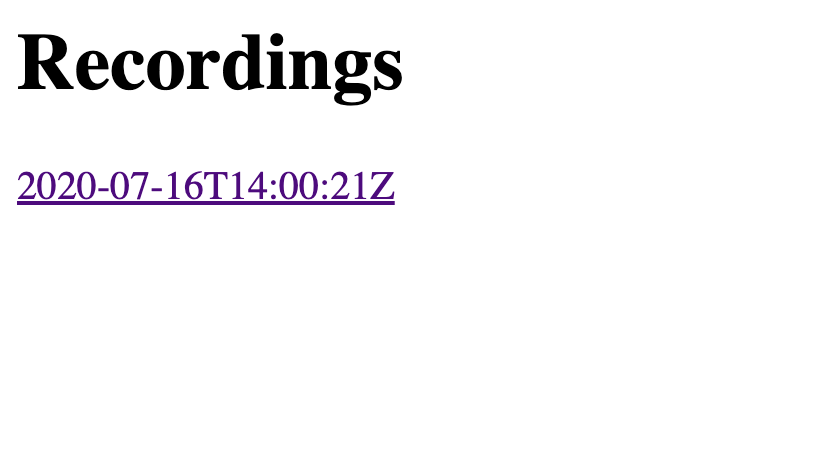 Web page showing one recording timestamp with a blue underline
次のエンドポイントは、Conversations APIから発信者の電話番号を含む詳細を取得した後、詳細ページをロードする:
app.get('/details/:conversation', (req, res) => {
  nexmo.conversations.get(req.params.conversation, async (error, result) => {
    const caller = result.members.find(member => member.channel.from != process.env.NEXMO_NUMBER)
    const number = caller.channel.from.number
    const recording = await recordingsDb.findOne({ conversation_uuid: req.params.conversation })
    res.render('detail.html', { caller: number, recording })
  })
})
最後に、生のオーディオファイルをAPIから取得し、ダウンロード可能なMP3として送信するエンドポイント:
app.get('/details/:conversation/download', async (req, res) => {
  const recording = await recordingsDb.findOne({ conversation_uuid: req.params.conversation })
  nexmo.files.get(recording.recording_url, (error, result) => {
    res.writeHead(200, {
      'Content-Disposition': 'attachment; filename="recording.mp3"',
      'Content-Type': 'audio/mpeg',
    })
    res.end(Buffer.from(result, 'base64'))
  })
})
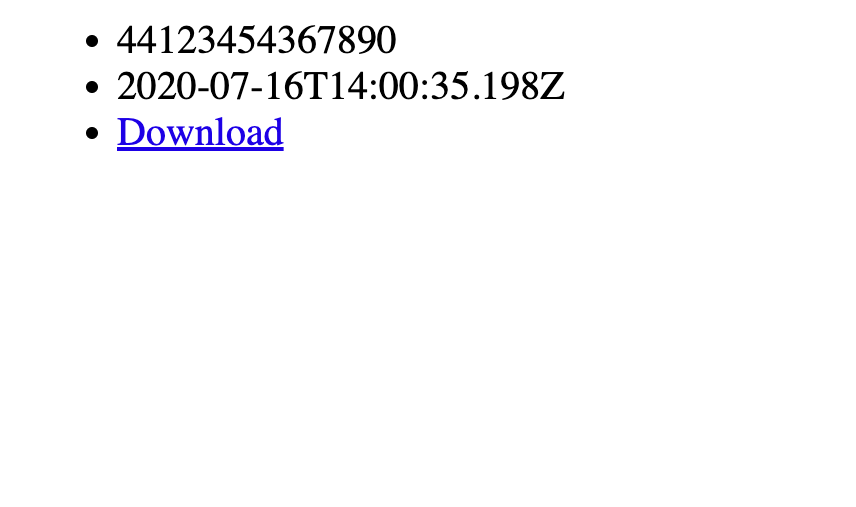 A page showing a phone number, timestamp, and download link
チェックポイントサーバーを再起動し、Nexmo番号に電話してください。通話が完了すると、ダッシュボードに新しいエントリーが表示されます。詳細ページに行き、ダウンロードしてください。
電話番号であるため、このサービスを利用する人の中にはSMSメッセージを送る人もいるかもしれない。同じようなパターンで、これらのメッセージは保存され、ダッシュボードに表示されます。既存のデータベース作成の下に、メッセージ用の新しいデータベースを追加する:
const messagesDb = nedb.create({ filename: 'data/messages.db', autoload: true })バーチャル・ナンバーを設定する際に指定したエンドポイントを作成することで、受信した新しいメッセージを保存する:
app.post('/sms', async (req, res) => {
  await messagesDb.insert(req.body)
  res.status(200).end()
})
ダッシュボードのエンドポイントを更新し、メッセージの取得と表示も行う:
app.get('/', async (req, res) => {
  const recordings = await recordingsDb.find().sort({ timestamp: -1 })
  const messages = await messagesDb.find().sort({ 'message-timestamp': -1 })
  res.render('index.html', { recordings, messages })
})
このセクションを index.html:
{% for message in messages %}
  <p>{{message.msisdn}} ({{message['message-timestamp']}}): {{message.text}}</p>
{% endfor %}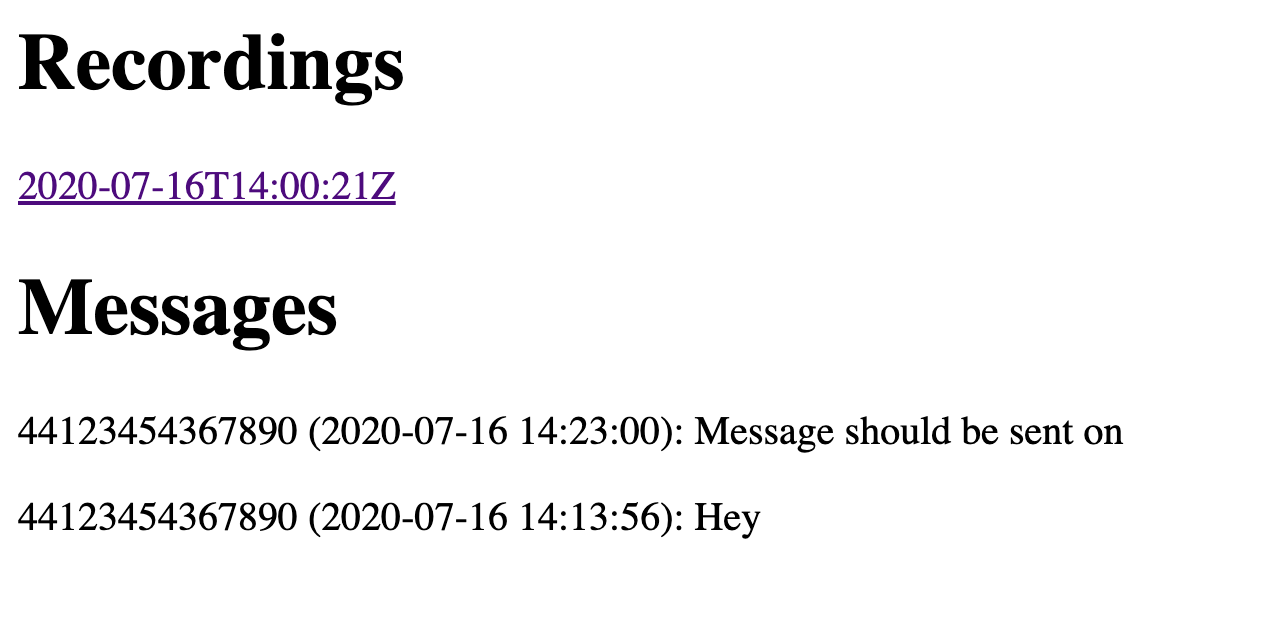 Web page showing both recordings and two example messages
チェックポイントサーバーを再起動し、Nexmo番号にSMSを送信してください。ダッシュボードに表示されるはずです。
最後に、SMSエンドポイントを更新して、オーガナイザーにメッセージを転送し、送信者に応答する:
app.post('/sms', async (req, res) => {
  await messagesDb.insert(req.body)

  for(let organizerNumber of ['NUMBER ONE', 'NUMBER TWO']) {
    nexmo.channel.send(
      { type: 'sms', number: organizerNumber },
      { type: 'sms', number: 'NEXMO NUMBER' },
      { content: { type: 'text', text: `From ${req.body.msisdn}\n\n${req.body.text}` } }
    )
  }

  nexmo.channel.send(
    { type: 'sms', number: req.body.msisdn },
    { type: 'sms', number: 'NEXMO NUMBER' },
    { content: { type: 'text', text: 'Thank you for sending us a message. Organizers have been made aware and may be in touch for more information.' } }
  )

  res.status(200).end()
})
チェックポイントサーバーを再起動し、Nexmo番号にSMSを送信してください。応答があり、リストアップされたすべてのオーガナイザーにもメッセージが届くはずです。
おめでとうございます!これで、電話でもSMSメッセージでも機能する行動規範インシデント・レスポンス・ラインの完成です。さらに時間があれば、次のことを試してみてください:
最終的なプロジェクトのコードは、以下のサイトでご覧いただけます。 https://github.com/nexmo-community/node-code-of-conduct-conference-call
これまで通り、サポートが必要な場合はお気軽に Vonage開発者コミュニティSlack.そこでお会いできることを楽しみにしています。