シェア:
元Vonage開発者エデュケーター。PHPのバックグラウンドを持つが、一つの言語に縛られることはない。熱心なゲーマーでRaspberry pi愛好家。屋内クライミング施設でボルダリングをしていることが多い。
SymfonyとVonageを使った友達作りサービス
所要時間:39 分
現在の世界情勢では、ほとんどの国が何らかの形で封鎖されている。Covid-19の影響を軽減するためには、社会的距離を置くことが重要だ。仮想のたまり場がカレンダーにぎっしり詰まっている人もいるだろうが、時間をつぶすために電話したり、つながったりする人がそれほど多くない人もいるだろう。例えば、私の祖母はあまり技術的なことはできないので、電話に頼っている。幸運にも13人の孫がいますが、誰からも連絡がない日があり、毎日誰かと話したいとよく言っています。Vonageでは、学習のために何かを作る機会が定期的にあります。この機会で私は、傷つきやすかったり、孤独だったり、毎日違う人と話したかったりするユーザーを紹介するビフレンディング・サービスを作ることにした。このアイデアは、監禁されている間でも、いつでも新しい友人を作ることができるようにすることです。
このチュートリアルでは を使って新しいPHPプロジェクトを構築します。.このチュートリアルでは Verify, Vonage Voiceおよび マップクエストAPI。このプロジェクトが完了すれば、ユーザーが電話番号、名前、町、郡/州を登録できるサービスを提供する。登録すると、ユーザーは認証コードを受け取り、それをウェブサイトに入力する必要がある。一度Verifyされると、ユーザーは毎日、他のユーザーと会話するための電話がかかってくる相手のリストに追加される。最後に、一日の終わりに、各ユーザーは再び、その日に受けた電話に関するフィードバックを求める自動電話を受ける。
このプロジェクトでは ドッカーコンテナ Nginx, MySQL, PHPそして Ngrokコンテナを使用し、サーバー構成の変更を最小限に抑えます。
このチュートリアルは、既存のリポジトリをクローンすることから始めます。クローンを作成するには、以下のコマンドをターミナルにコピーし、プロジェクトディレクトリに移動します:
ターミナルには2つのディレクトリが出力されます:
dockerDockerコンフィギュレーションがある場所(異なるデータベース認証情報を設定しない限り、何も変更する必要はありません。)projectこれは、新鮮な プロジェクトが保存されます。プロジェクトが保存されます
ターミナルで、ディレクトリを docker/ディレクトリに移動し、以下のコマンドを実行してドッカー・コンテナをビルドして起動する:
上記のコマンドは、すべての事前設定された Dockerディレクトリ内にあるファイルに定義されたカスタムの変更を追加します。 docker/ディレクトリ内にあるファイルに定義されたカスタム変更を追加します。その後、Buildがこれらのコンテナをコンパイルし、Webアプリケーションを実行するためのサービスとして実行します。
コマンドが完了すると、以下の例のように Dockerが表示される:

これでDockerコンテナとサーバーは開発開始の準備が整った!
ディレクトリを見ると projectディレクトリを見ると、空のsymfonyインストールのファイル構造は次のようになっています:

docker/ディレクトリ内で以下のコマンドを実行し、composer.jsonファイルに記述されているPHHライブラリをすべてインストールする:
このsymfonyプロジェクトのデータベースの設定はどこかに保存する必要があります。ですので、IDEにおいて project/ディレクトリの下に .env.local.作成したら、この新しいファイルに次の行を追加します:
上記路線の内訳は以下の通り:
データベース名
befriendingデータベースユーザー:
userデータベースパスワード:
passwordデータベースのホストとポート
mysql:3306
これらは docker/docker-compose.ymlファイルにあらかじめ設定されている値です。現在のユーザー名とパスワードはセキュリティ上安全ではありません。 project/.env.localと docker/docker-compose.ymlの両方で変更してください:
A Userエンティティが必要である。 userデータベーステーブルの構造を正しく定義するクラスです。このテーブルは新しいユーザ登録が保存されるテーブルです。
このために symfony は makeライブラリをリリースしました。これはユーザーがコマンドラインインターフェイス (CLI) を使って特定のクラスを作ることを可能にします。
以下のコマンドを実行し、記載されている指示に従って、エンティティのプロパティを作成します。 Userエンティティのプロパティを作成します:
作成または更新するエンティティのクラス名 (例 DeliciousGnome):
User
物件1
名前
phoneNumberタイプ
stringフィールドの長さ:
255Nullになり得るか?
no
物件2
名前
nameタイプ
stringフィールドの長さ:
255Nullになり得るか?
no
物件3
名前
townタイプ
stringフィールドの長さ:
255Nullになり得るか?
no
物件4
名前
countyタイプ
stringフィールドの長さ:
255Nullになり得るか?
no
物件5
名前
countryCodeタイプ
stringフィールドの長さ:
2Nullになり得るか?
no
物件6
名前
verificationRequestIdタイプ
stringフィールドの長さ:
255Nullになり得るか?
yes
物件7
名前
verifiedタイプ
booleanNullになり得るか?
no
物件8
名前
activeタイプ
booleanNullになり得るか?
no
このコマンドが完了すると、2つの新しいファイルが作成される:
project/src/Entity/User.phpproject/src/Repository/UserRepository.php
このクラスは UserRepositoryはリポジトリクラスで、開発者はここで Userエンティティのカスタムクエリを見つける場所です。今のところ、このクラスは無視してください。
作成されたエンティティは、現在データベースに反映されていません。で定義した内容をデータベースに反映させるには、以下のコマンドを実行して新しいマイグレーションファイルを生成します。 Userエンティティで定義したものをデータベースに反映させるには、以下のコマンドを実行して新しいマイグレーションファイルを生成してください:
今後のデータベースの変更を確認したい場合は、生成されたマイグレーションファイルを project/src/Migrations/.
これらの変更に満足したなら、データベースに永続化するために以下のコマンドを実行する:
この Userエンティティは、CLIでは実現できないさらなる変更を必要としている。 makerエンティティには、CLIでは実現できないさらなる変更が必要です。これらの変更を行うには、このクラスを開いてください。 project/src/Entity/User.php.
まず、クラス UniqueEntityは、Userクラスのプロパティの1つがUniqueである(つまり、その値を持つエントリは1つだけである)ことを保証するためのアノテーションとして使用されます。このクラスを一番上に追加します:
use Doctrine\ORM\Mapping as ORM;
+ use Symfony\Bridge\Doctrine\Validator\Constraints\UniqueEntity;次の2行を追加する:
/**
 * @ORM\Entity(repositoryClass="App\Repository\UserRepository")
 + * @ORM\Table(name="`user`")
 + * @UniqueEntity("phoneNumber")
*/あなたが行った最初の変更は、テーブル名にハードコードされた注釈を追加することです。その理由は userは MySQL のキーワードです。そのため userテーブル名を引用符で囲む必要があります。
2つ目の変更は phoneNumberを UniqueEntity.を使用することです。 UniqueEntityを使用することで、複数のユーザーが同じ電話番号を持つ可能性がなくなります。
ここで phoneNumberプロパティの定義を更新します:
/**
-  * @ORM\Column(type="string", length=255)
+  * @ORM\Column(type="string", length=255, unique=true)
 */
private $phoneNumber;最後の変更は Userエンティティの最後の変更は activeと verifiedフィールドがデフォルトでfalseになるようにすることです。 __construct()関数を作成します:
public function __construct()
{
    $this->setActive(false);
    $this->setVerified(false);
}
これで新しいUserエンティティが作成されました。このエンティティは、システムが新しいユーザを作成したり、ユーザをデータベースに保存したり編集したりするためのものです。
このチュートリアルでは、ページのデザインをよりよくデザインしレイアウトするために Bootstrap を使います。Symfony は最近 Webpack Encore をリリースしました。これは Webpack を Symfony または PHP アプリケーションに統合する、よりシンプルな方法です。Webpack Encore をインストールするには、以下のコマンドを実行します:
この yarn installコマンドを実行すると、プロジェクトがJavascriptファイルも扱えるように設定される。このコマンドは assetsディレクトリが作成され、その中に js/app.jsファイルと css/app.cssファイルが作成されます。
これでBootstrapが以下のコマンドでインストールされた:
symfonyアプリケーションはまだBootstrapの存在を知りません。これをプロジェクトにインクルードするには project/assets/css/app.scssファイルを開き、次の行を追加します:
@import "../../node_modules/bootstrap";Bootstrap JSにはjQueryとPopperJsが必要なので、以下のコマンドでインストールしてください:
繰り返しますが、symfonyアプリケーションはjQueryとPopperJsが何か知りません。ですので project/assets/js/app.jsファイルを開き、次の更新を追加することでプロジェクトにこれらをインクルードします:
import '../css/app.css';
+ import $ from 'jquery';

+ require('bootstrap');テンプレートにアクセスするには、これらのCSSファイルとJSファイルをコンパイルする必要があります。これを行うには、以下のコマンドを実行してください:
必要なフロントエンド部分がインストールされ、設定される!
このチュートリアルでは、さらに2つのPHPライブラリを必要とします:
Vonage SDK、
検証リクエストを送信する、
ベリファイユーザー
電話をかける
DTMF電話の入力を処理する。
Giggseyのlibphonenumber-for-phpは、電話番号を国際化または国内化されたフォーマットに操作する。
Vonage PHP SDKをインストールするには、以下を実行してください:
次のステップで作成するファイルから環境変数を使うには、symfony の DotEnvコンポーネントが必要です。このコンポーネントをインストールするには、ターミナルから次のコマンドを実行します:
Vonage開発者ダッシュボードの Vonage開発者ダッシュボードに "Your API credentials "がありますので、これをメモしておいてください。
その project/ディレクトリ内の .env.localファイルを追加する(api_keyとapi_secretをあなたのkeyとsecretに置き換える):
は VONAGE_BRAND_NAMEは、あなたが検証のために代表している会社名/ブランド名です:
VONAGE_API_KEY=<api_key>
VONAGE_API_SECRET=<api_secret>
VONAGE_BRAND_NAME=Befriending検証チェックを行う前に、電話番号が有効であることを確認する方法が必要である。また、Verify APIが電話番号がどの地域(国コード)に属するものかを知るために、電話番号が正しい形式であることも確認する必要があります)。使用するのは GiggseyのGoogle libphonenumberのPHP移植版の PHP 移植版を使って電話番号が正しくフォーマットされていることを確認します。
以下のコマンドを実行してインストールする。 libphonenumber-for-php:
これで、必要な2つの主要ライブラリが揃ったことになる:
電話番号のフォーマット、
電話番号が有効であることを確認する、
Vonage Verify APIを使った検証
電話をかける
の中に新しいディレクトリを作成する。 project/src/という新しいディレクトリを作成する。 Utilという名前の新しいディレクトリを作成し、この新しいディレクトリ内に VonageVerifyUtil.php.この新しいファイルはユーティリティ・クラスで、登録時にユーザーを Verify する機能を含んでいます。この新しいファイルの中に、以下のコードをコピーしてください:
<?php

namespace App\Util;

use App\Entity\User;
use Nexmo\Client as VonageClient;
use Nexmo\Client\Credentials\Basic;
use Nexmo\Verify\Verification;

class VonageVerifyUtil
{
    /** @var VonageClient */
    protected $client;

    public function __construct()
    {
        $this->client = new VonageClient(
            new Basic(
                $_ENV['VONAGE_API_KEY'],
                $_ENV['VONAGE_API_SECRET']
            )
        );
    }
}このクラスに2つの新しいメソッドを追加する。この2つのメソッドの目的は
電話番号を国際化フォーマットに変換します。
電話番号を全国共通番号形式に変換する。
public function getInternationalizedNumber(User $user): ?string
{
    $phoneNumberUtil = \libphonenumber\PhoneNumberUtil::getInstance();

    $phoneNumberObject = $phoneNumberUtil->parse(
        $user->getPhoneNumber(),
        $user->getCountryCode()
    );

    if (!$phoneNumberUtil->isValidNumberForRegion(
        $phoneNumberObject,
        $user->getCountryCode())
    ) {
        return null;
    }

    return $phoneNumberUtil->format(
        $phoneNumberObject,
        \libphonenumber\PhoneNumberFormat::INTERNATIONAL
    );
}

public function getNationalizedNumber(string $phoneNumber)
{
    $phoneNumberUtil = \libphonenumber\PhoneNumberUtil::getInstance();
    $phoneNumberObject = $phoneNumberUtil->parse($phoneNumber);

    return '0' . $phoneNumberObject->getNationalNumber();
}システムが必要とする次の機能は、新規登録のための検証リクエストを作成することである。検証リクエストの作成処理を行うために、以下のメソッドを追加します:
public function sendVerification(User $user)
{
    $internationalizedNumber = $this->getInternationalizedNumber($user);

    if (!$internationalizedNumber) {
        return null;
    }

    $verification = new Verification(
        $internationalizedNumber,
        $_ENV['VONAGE_BRAND_NAME'],
        ['workflow_id' => 2]
    );

    return $this->client->verify()->start($verification);
}注検証プロセスの別のワークフローにご興味がある場合は、以下をご覧ください。 Vonageドキュメント.
Verifyの次のステップは、ユーザーから検証コードの入力を受け、検証コードによる検証リクエストを送信することである:
public function verify(string $requestId, string $verificationCode)
{
    $verification = new Verification($requestId);

    return $this->client->verify()->check($verification, $verificationCode);
}
最後の関数はこのユーティリティ・クラスでは使われないが、プロジェクトのいくつかの場所で使われる。この関数は requestIdを取り出します。以下を追加してください:
public function getRequestId(Verification $verification): ?string
{
    $responseData = $verification->getResponseData();

    if (empty($responseData)) {
        return null;
    }

    return $responseData['request_id'];
}
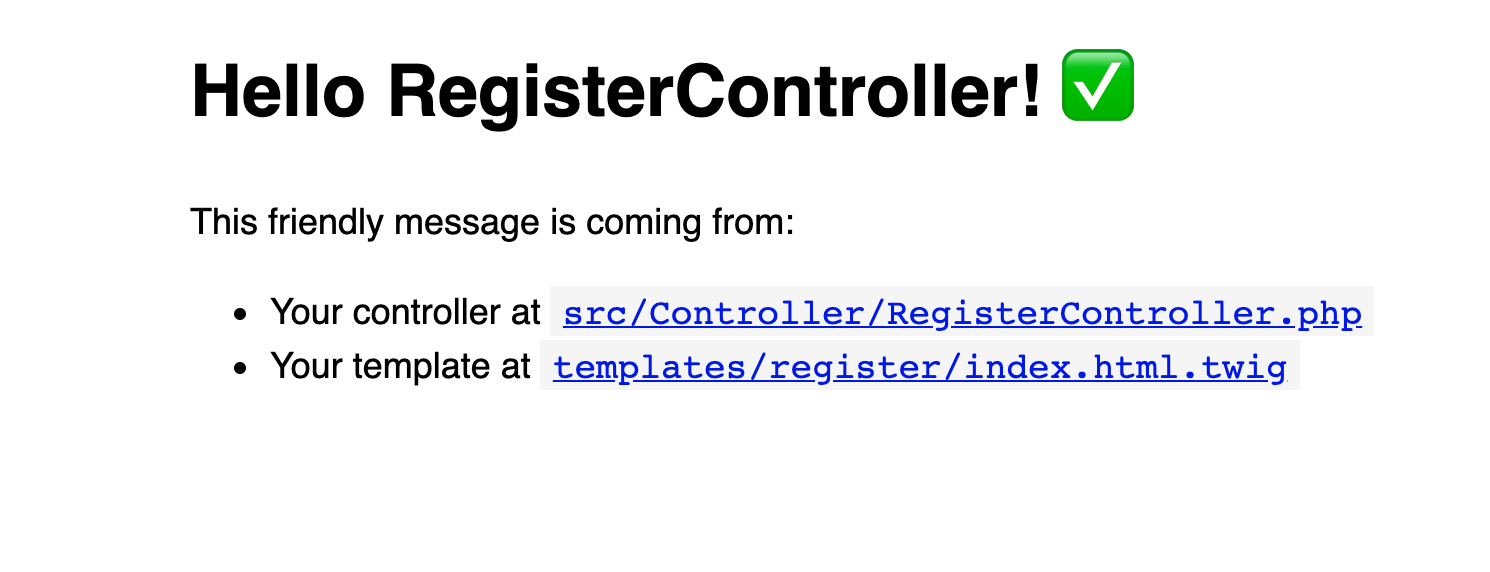
新しい Registerコントローラを作成するには makeライブラリを使用して新しいコントローラを作成するには、次のコマンドを実行します:
と書いてあるところ: Choose a name for your controller class (e.g. AgreeableGnomeController):と入力し RegisterControllerと入力してエンターキーを押す。
ターミナルに、新しく生成された2つのファイルの出力が表示されます:
created: src/Controller/RegisterController.php
created: templates/registration/index.html.twigそのため VonageVerifyUtilにサービスとして注入する必要がある。 RegisterControllerにサービスとして注入する必要がある。 src/Controller/RegisterController.phpを開き __construct()関数に注入します。
+ use App\Util\VonageVerifyUtil;

class RegisterController extends AbstractController
{
+     /** @var VonageVerifyUtil */
+     protected $vonageVerifyUtil;

+     public function __construct(VonageVerifyUtil $vonageVerifyUtil)
+     {
+         $this->vonageVerifyUtil = $vonageVerifyUtil;
+     }
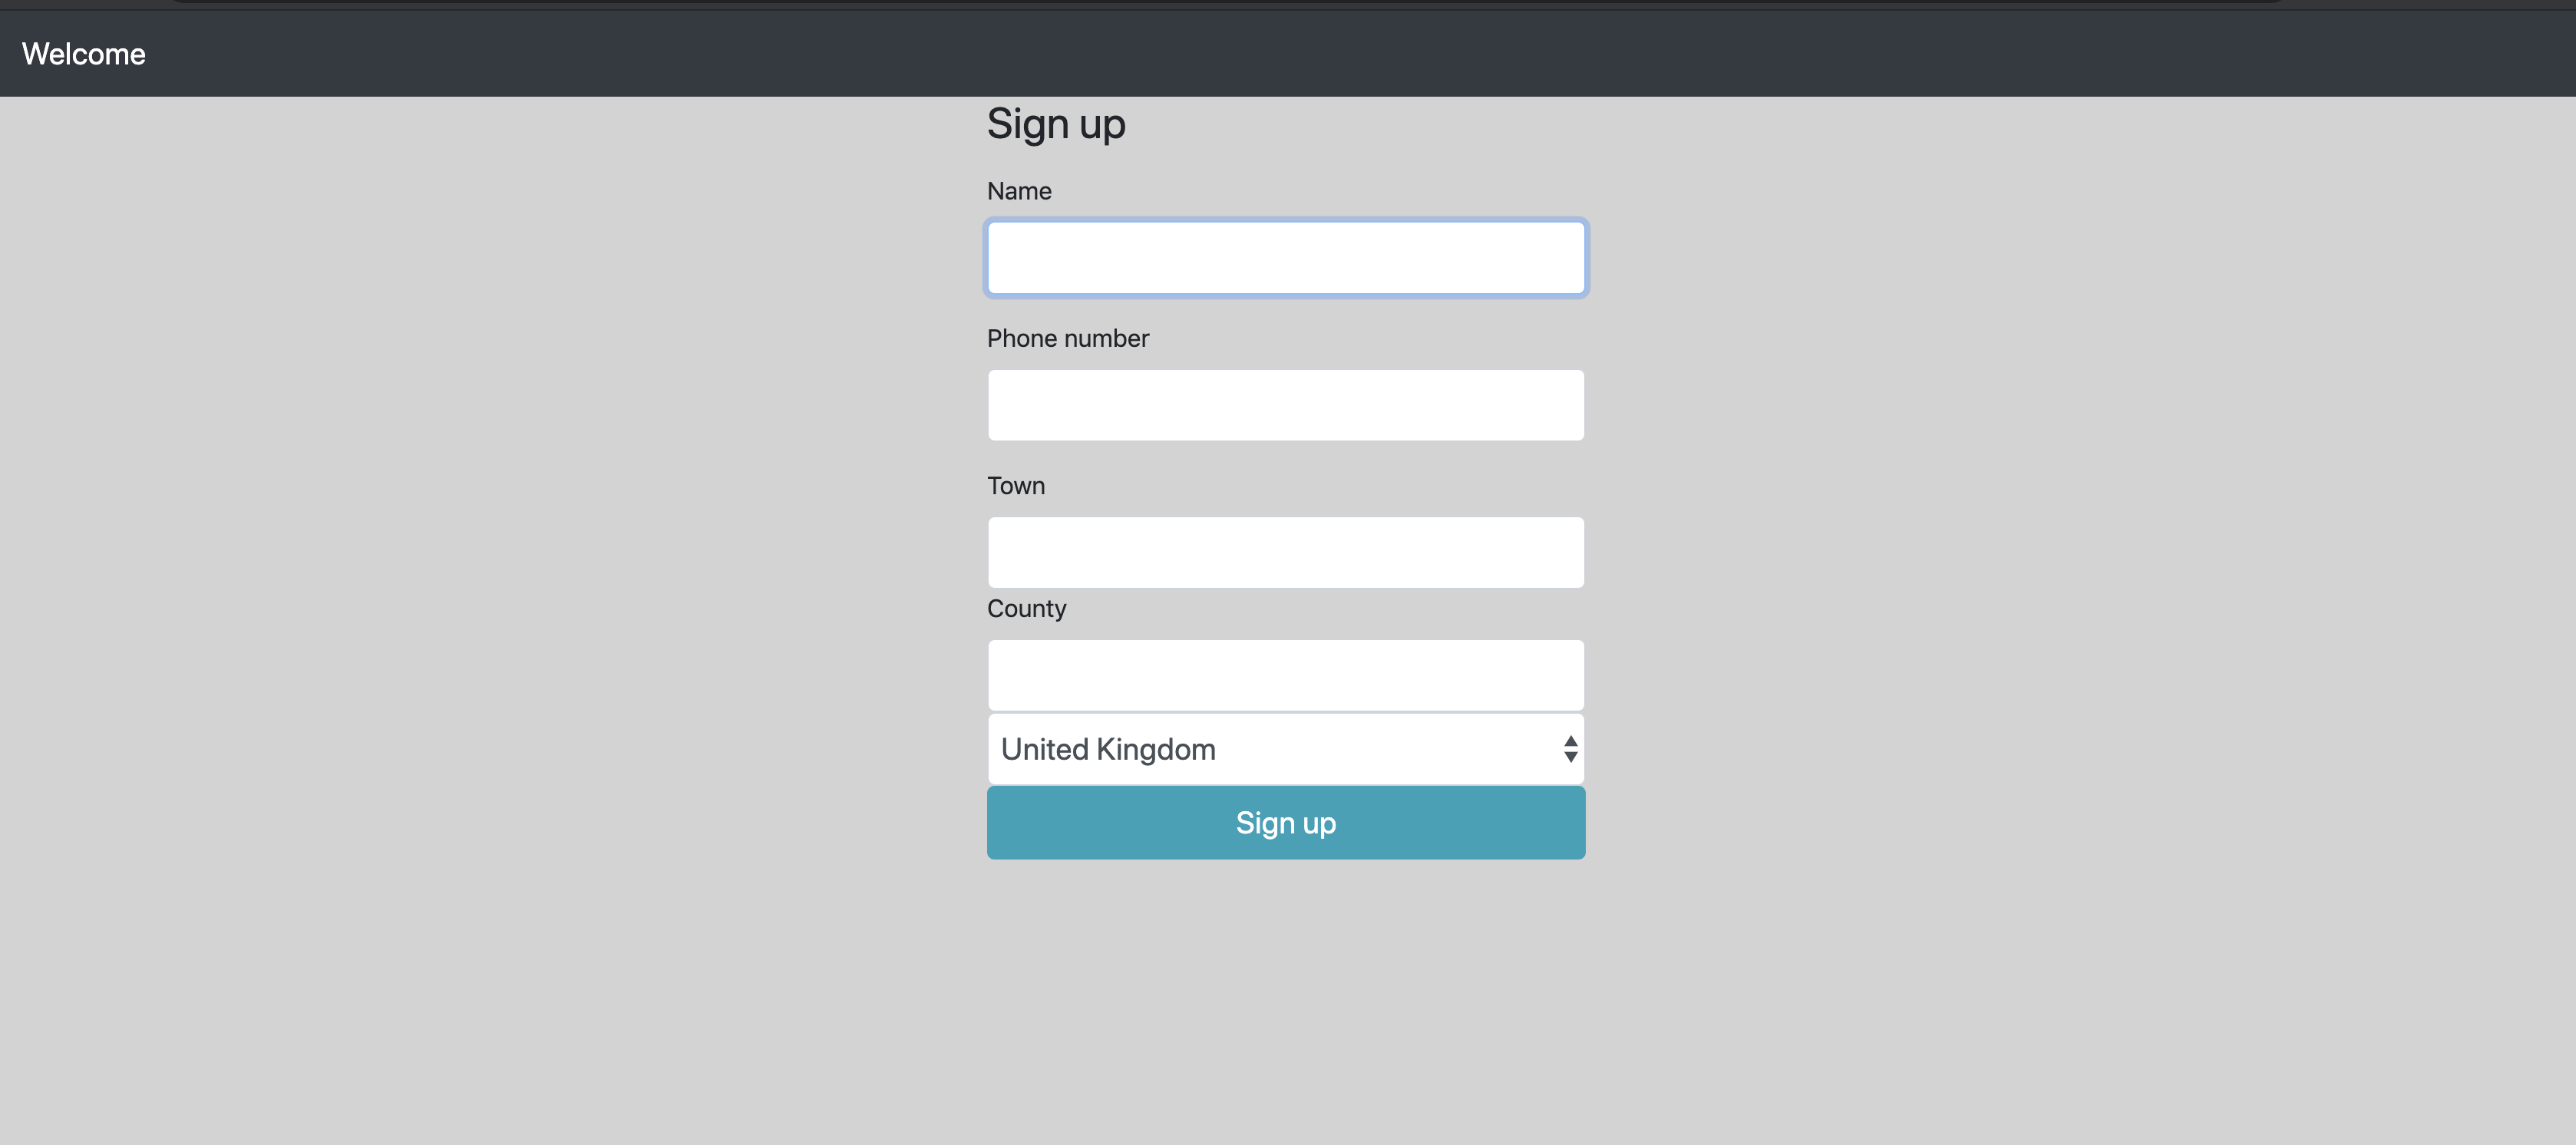
ブラウザで registerページを開いてください。 http://localhost:8081/register.と表示される:
登録ページの作成です!
symfonyの makeライブラリはとても便利であることがわかっています。 Entity, a Controllerを作成しました。 Form.フォームを作成するには UserTypeフォームを作成するには、次のコマンドを実行する:
docker-compose exec php bin/console make:form名前を聞かれたら UserTypeと入力し Entityを入力する: User.
新しく作成された UserTypeで project/src/Form/UserType.php.それを開いて buildForm()関数を見つけ、その内容を
$builder
    ->add('phoneNumber', TelType::class, [
        'attr' => [
            'class' => 'form-control form-control-lg'
        ]
    ])
    ->add('name', TextType::class, [
        'constraints' => [
            new NotBlank(),
            new Length(['min' => 3]),
        ],
        'attr' => [
            'class' => 'form-control form-control-lg'
        ],
    ])
    ->add('town', TextType::class, [
        'constraints' => [
            new NotBlank(),
            new Length(['min' => 3]),
        ],
        'attr' => [
            'class' => 'form-control form-control-lg'
        ],
    ])
    ->add('county', TextType::class, [
        'constraints' => [
            new NotBlank(),
            new Length(['min' => 3]),
        ],
        'attr' => [
            'class' => 'form-control form-control-lg'
        ],
    ])
    ->add('countryCode', ChoiceType::class, [
        'label' => false,
        'attr' => [
            'class' => 'form-control form-control-lg'
        ],
        'choices' => [
            "United Kingdom" => "GB",
            "United States" => "US"
        ]
    ])
    ->add('submit', SubmitType::class, [
        'label' => 'Sign up',
        'attr' => [
            'class' => 'btn btn-info btn-lg btn-block'
        ],
    ])
;
クラスのトップには、いくつかの新しいクラスを入れる必要がある、 ChoiceType, SubmitType, Length, NotBlank, TelType, TextType.これらを以下のようにファイルの先頭に追加する:
use App\Entity\User;
use Symfony\Component\Form\AbstractType;
+use Symfony\Component\Form\Extension\Core\Type\ChoiceType;
+use Symfony\Component\Form\Extension\Core\Type\SubmitType;
+use Symfony\Component\Form\Extension\Core\Type\TelType;
+use Symfony\Component\Form\Extension\Core\Type\TextType;
use Symfony\Component\Form\FormBuilderInterface;
use Symfony\Component\OptionsResolver\OptionsResolver;
+use Symfony\Component\Validator\Constraints\Length;
+use Symfony\Component\Validator\Constraints\NotBlank;
BootstrapのCSSクラスが認識され表示されるためには、ベーステンプレートにBootstrapが含まれている必要があります。
開く project/templates/base.html.twigプロジェクト内の他のすべてのテンプレートに含まれるベース・テンプレートを開き、内容を以下のように置き換える:
<!DOCTYPE html>
<html>
    <head>
        <meta charset="UTF-8">
        <title>{% block title %}Welcome!{% endblock %}</title>
        {% block stylesheets %}
            {{ encore_entry_link_tags('app') }}
        {% endblock %}
    </head>
    <body>
        <nav class="navbar navbar-dark bg-dark navbar-expand-lg">
            <a class="navbar-brand" href="#">Welcome</a>
            <button class="navbar-toggler" type="button" data-toggle="collapse" data-target="#navbarSupportedContent" aria-controls="navbarSupportedContent" aria-expanded="false" aria-label="Toggle navigation">
                <span class="navbar-toggler-icon"></span>
            </button>
        </nav>
        <div class="container-fluid h-100">
            {% block body %}{% endblock %}
        </div>
        {% block javascripts %}
            {{ encore_entry_script_tags('app') }}
        {% endblock %}
    </body>
</html>
テンプレートにBootstrapが含まれるようになったので、フォームとあらゆる情報を表示するために index.html.twigテンプレートを更新しましょう。開く project/templates/register/index.html.twigを開き {% block body %}と {% endblock %}で置き換えてください:
<div class="row justify-content-center align-items-center h-100">
    <div class="col col-sm-6 col-md-6 col-lg-4 col-xl-3">
        {{ form_start(form) }}
            <h1 class="h3 mb-3 font-weight-normal">Sign up</h1>
        {{ form_end(form) }}
    </div>
</div>
これでテンプレートとフォームクラスが作成されましたが、現在プロジェクトではこれらのファイルはどちらも使われていません。これらのファイルを RegisterControllerメソッドにインクルードする必要があります。 index().に戻って project/src/Controller/RegisterController.php.
メソッドの内容を更新する。 index()の内容を更新する:
/**
 * @Route("/register", name="register")
 */
-public function index()
+public function index(Request $request)
{
+ $user = new User();
+
+ $form = $this->createForm(
+     UserType::class,
+     $user
+ );
+ $form->handleRequest($request);
+
+ if ($form->isSubmitted() && $form->isValid()) {
+    $entityManager = $this->getDoctrine()->getManager();
+    $entityManager->persist($user);
+    $entityManager->flush();
+
+    $verification = $this->vonageVerifyUtil->sendVerification($user);
+    $requestId = $this->vonageVerifyUtil->getRequestId($verification);
+
+    if ($requestId) {
+        $user->setVerificationRequestId($requestId);
+        $entityManager->flush();
+    }
+ }
+
  return $this->render('register/index.html.twig', [
+    'controller_name' => 'RegisterController',
+    'form' => $form->createView(),
  ]);
}
上の例の変更点は以下の通り:
新しい空の
Userオブジェクトを作成する、フォーム・クラスの新しいインスタンスを作成します。
UserTypeフォーム・クラスの新しいインスタンスを作成します、フォームのリクエストを処理し、そのフォームがフォームであるかどうかを判断します:
が提出された、
フォームの内容が有効かどうか(たとえば
phoneNumberが空であるか、一意でないか)
フォームが送信され、有効であれば、関数
新しいユーザーをデータベースに永続化する
これらの変更を洗い流す
に新しいリクエストを送る。
VerifyAPIに新しいリクエストを送る、検証リクエストIDをデータベースのユーザーレコードに保存する。
フォームが送信されていないか、有効でない場合、この関数はテンプレートにフォームを含めてユーザーにテンプレートをレンダリングします。
いくつかのクラスは現在のクラスにインポートする必要がある。 Userそして UserTypeなどのように、現在のクラスにインポートする必要があるクラスがいくつかあります:
+use App\Entity\User;
+use App\Form\UserType;
use App\Util\VonageVerifyUtil;
use Symfony\Bundle\FrameworkBundle\Controller\AbstractController;
+use Symfony\Component\HttpFoundation\Request;
use Symfony\Component\Routing\Annotation\Route;要約すると、あなたは新しい RegisterController, a Userエンティティと UserTypeフォームを作成しました。のテンプレートを更新しました。 index()メソッドのテンプレートを更新しました。 RegisterControllerメソッドのテンプレートを更新して、ユーザーが表示するフォームフィールドを表示するようにしました。
これらの変更は http://localhost:8081/registerまたは以下の例のように:
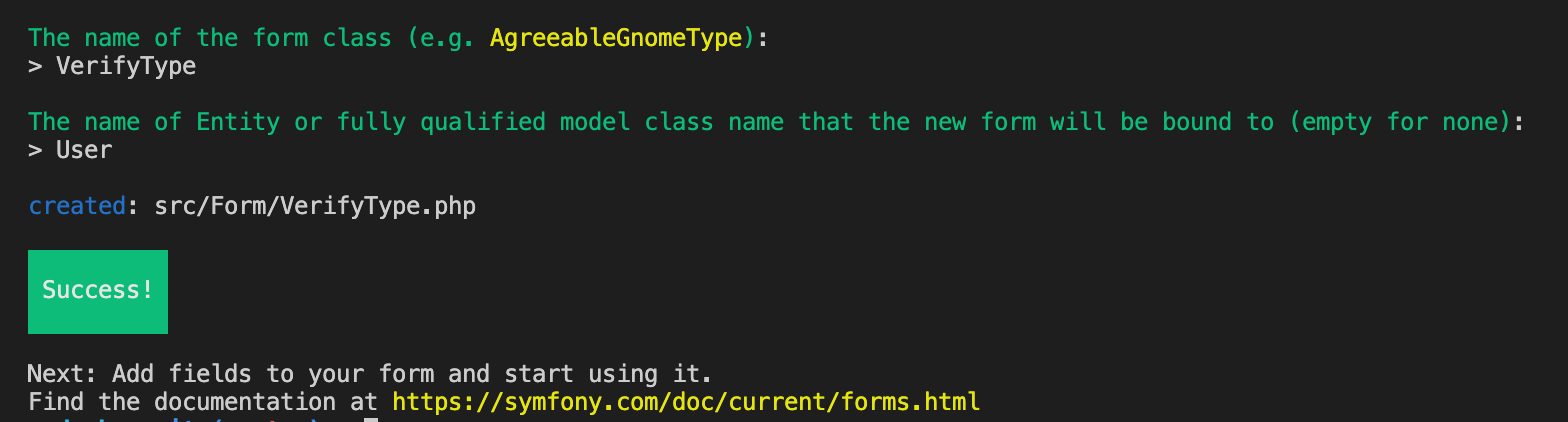
次のコマンドで VerifyTypeフォームを以下のコマンドで作成する:
名前の入力: VerifyTypeどのエンティティを使用するかは User
送信すると、下の画像のようなものが表示されます:
この方法で VerifyTypeフォームをこのように作成することは、システムが自動的にすべての Userエンティティ・プロパティが自動的に挿入されます。これらのフィールドはどれも必須ではありませんので、コードを以下のように更新してください:
$builder
-    ->add('phoneNumber')
-    ->add('name')
-    ->add('town')
-    ->add('county')
-    ->add('countryCode')
-    ->add('verificationRequestId')
-    ->add('verified')
-    ->add('active')
+->add('verificationCode', TextType::class, [
+    'mapped' => false,
+    'attr' => [
+        'class' => 'form-control form-control-lg'
+    ],
+    'constraints' => [
+        new NotBlank([
+            'message' => 'Please enter a verification code',
+        ]),
+        new Length([
+            'min' => 4,
+            'max' => 4,
+            'minMessage' => 'The verification code is a 4 digit number.',
+        ]),
+    ],
+])
+->add('submit', SubmitType::class, [
+    'label' => 'Verify',
+    'attr' => [
+        'class' => 'btn btn-info btn-lg btn-block'
+    ],
+])
;
上記のコードでは、検証コードを送信するためのフォームを定義しています。このフォームには2つのフィールドがあります。 verificationCodeと submit.それぞれのフィールドは、フォーム上での検証や表示、あるいはフォームの送信のために、固有の属性を持ちます。
クラスの先頭には、いくつかのクラスのインポートが必要です。そこで、以下のようにクラスの一番上にあるコードをコピーします:
use Symfony\Component\Form\FormBuilderInterface;
use Symfony\Component\OptionsResolver\OptionsResolver;
+use Symfony\Component\Form\Extension\Core\Type\SubmitType;
+use Symfony\Component\Form\Extension\Core\Type\TextType;
+use Symfony\Component\Validator\Constraints\Length;
+use Symfony\Component\Validator\Constraints\NotBlank;
さて、登録ページを作りましたが、次はどうしますか?APIから受け取った認証コードをユーザーが入力するためのページを作成する必要があります。 VerifyAPIから受け取った認証コードを入力するページを作る必要があります。ページ内の RegisterControllerの下に新しいメソッドを作成します。 index()の下に verify().下の例は、このメソッドとその中身を示している:
/**
 * @Route("/register/verify/{user}", name="app_register_verify")
 * @ParamConverter("user", class="App:User")
 */
public function verify(Request $request, User $user): Response
{
    $form = $this->createForm(VerifyType::class, $user);
    $form->handleRequest($request);

    if ($form->isSubmitted() && $form->isValid()) {
        $verify = $this->vonageVerifyUtil->verify(
            $user->getVerificationRequestId(),
            $form->get('verificationCode')->getData()
        );

        if ($verify instanceof Verification) {
            $user->setVerificationRequestId(null);
            $user->setVerified(true);
            $user->setActive(true);

            $entityManager = $this->getDoctrine()->getManager();
            $entityManager->flush();
        }
    }

    return $this->render('register/verify.html.twig', [
        'form' => $form->createView(),
    ]);
}
クラスの先頭に Response, VerifyType, ParamConverterおよび Verificationクラスを含める:
use App\Entity\User;
use App\Form\UserType;
use App\Util\VonageVerifyUtil;
use Symfony\Bundle\FrameworkBundle\Controller\AbstractController;
use Symfony\Component\HttpFoundation\Request;
use Symfony\Component\Routing\Annotation\Route;
+use Nexmo\Verify\Verification;
+use Symfony\Component\HttpFoundation\Response;
+use Sensio\Bundle\FrameworkExtraBundle\Configuration\ParamConverter;
+use App\Form\VerifyType;このフォームを表示するためのテンプレートが必要です。新しいファイルを project/templates/register/という名前の verify.htmlという名前の新しいファイルを作成し、以下のコード・ブロックの内容をこのファイルにコピーします:
{% extends 'base.html.twig' %}

{% block title %}Verify{% endblock %}

{% block body %}
    <div class="row justify-content-center align-items-center h-100">
        <div class="col col-sm-6 col-md-6 col-lg-4 col-xl-3">
            <h1 class="h3 mb-3 font-weight-normal">Verify</h1>

            {{ form_start(form) }}
                <div class="form-group">
                    {{ form_row(form.verificationCode) }}
                </div>

            {{ form_end(form) }}
        </div>
    <div>
{% endblock %}
プロジェクトの中で RegisterControllerの中に、ユーザーが認証に成功したときのための成功ページが必要です。新しい registerSucess()メソッドを作成し、登録が成功したというメッセージを出力したテンプレートを表示します:
/**
 * @Route("/register/success", name="app_register_success")
 */
public function registerSuccess(): Response
{
    return $this->render('register/success.html.twig');
}
次に project/templates/register/という名前の success.html.twigという名前の新しいファイルを作成し、次のように出力する:
{% extends 'base.html.twig' %}

{% block title %}Registration Successful!{% endblock %}

{% block body %}
    <div class="row justify-content-center align-items-center h-100">
        <div class="col col-sm-6 col-md-6 col-lg-4 col-xl-3">
            <h1 class="h3 mb-3 font-weight-normal">Sign up Successful!</h1>

            <p>Thank you for verifying your phone number.</p>

            <p>Your details have been added to the database to participate in the Befriending Service.</p>

            <p>You will be automatically contacted at 2pm every day and connected with another user in the system.</p>
        </div>
    </div>
{% endblock %}検証部分を完成させるために必要な小さな変更がいくつかあります。リダイレクトは、各フォームの送信が成功し、ユーザーが次のページに移動するときに必要です。そこで RegisterControllerの下にある public function index()の下にある
if ($requestId) {
    $user->setVerificationRequestId($requestId);
    $entityManager->flush();

+    return $this->redirectToRoute('app_register_verify', ['user' => $user->getId()]);
}
そしてメソッド public function verify(Request $request, User $user)の中で、以下の部分を見つけて追加する:
if ($verify instanceof Verification) {
    $user->setVerificationRequestId(null);
    $user->setVerified(true);

    $entityManager = $this->getDoctrine()->getManager();
    $entityManager->flush();

+    return $this->redirectToRoute('app_register_success');
}
地理的に近い登録ユーザーを見つけるために、システムは登録時に各ユーザーの緯度と経度を知る必要がある。このプロジェクトでは MapQuestこのサービスは、ユーザーの町と郡/州を受け取り、必要な緯度と経度に変換する。
アカウント登録 マップクエスト.
開く .env.localを開き、以下の新しいエントリを追加する(<api_key>をMapQuest APIキーに置き換える):
MAP_QUEST_API_KEY=<api_key>
MAP_QUEST_API_URL=https://www.mapquestapi.com/geocoding/v1/この Userエンティティは緯度と経度を保存するために2つのプロパティを必要とします。このエンティティを更新するには、symfonyの makeコマンドを実行し、指示に従ってください:
作成または更新するエンティティのクラス名 (例 DeliciousGnome):
User
物件1
名前
latitudeタイプ
decimal精度:20
スケール:16
Nullになり得るか?
yes
物件2
名前
longtitudeタイプ
decimal精度:20
スケール:16
Nullになり得るか?
yes
以下のコマンドを実行すると、データベースを変更した新しいマイグレーションファイルが生成されます:
今後のデータベースの変更を確認したい場合は、生成されたマイグレーションファイルを project/src/Migrations/.
これらの変更に満足したなら、データベースに永続化するために以下のコマンドを実行する:
Guzzle は PHP HTTP クライアントで、API への POST や GET リクエストなど、他のウェブサービスへのリクエストをプロジェクトで行うことができます。Guzzleを使うと、Map QuestのAPIエンドポイントにGETリクエストをして、ユーザの位置の緯度と経度を簡単に受け取ることができます。
次のステップは MapQuestUtilを作成してこのGETリクエストを行い、レスポンスを処理して必要なフィールドのみを取得することです。新しいファイルを project/src/Util/という名前の MapQuestUtil.phpという名前の新しいファイルを作成し、新しく作成したファイルに以下のコードをコピーします:
<?php

namespace App\Util;

use App\Entity\User;
use App\Util\MapQuestUtil;
use GuzzleHttp\Client as GuzzleClient;

class MapQuestUtil
{
    public function getLatLongByAddress(User $user): ?array
    {
        $client = new GuzzleClient(
          ['base_uri' => $_ENV['MAP_QUEST_API_URL']]
        );

        $response = $client->request(
            'GET',
            'address', [
                'query' => [
                    'key' => $_ENV['MAP_QUEST_API_KEY'],
                    'inFormat' => 'kvp',
                    'outFormat' => 'json',
                    'location' => $user->getTown() . ',' . $user->getCounty(),
                    'thumbMaps' => 'false'
                ]
            ]
        );

        if ($response->getStatusCode() !== 200) {
            return null;
        }

        $body = json_decode($response->getBody()->getContents(), true);

        if (!is_array($body) || empty($body)) {
            return null;
        }

        if (!array_key_exists('results', $body) || empty($body['results'])) {
            return null;
        }

        return $body['results'][0]['locations'][0]['latLng'];
    }
}上のコードは、新しいメソッドで Userオブジェクトを受け取り、MapQuestのAPIにリクエストします。 locationである Townとその County.このリクエストの後には、位置情報が返されること、そして緯度と経度のフィールドがレスポンスに含まれることを確認するためのいくつかのステップがあります。
この MapQuestUtilクラスと getLatLongByAddress()メソッドを呼び出します。このクラスとメソッドを呼び出す時が来た。 RegisterController.
新しいユーティリティ・クラスは、サービスとしてインジェクションする必要がある。メソッドで __construct()メソッドで以下のように更新します:
use App\Form\VerifyType;
+use App\Util\MapQuestUtil;

class RegisterController extends AbstractController
{
    /** @var VonageVerifyUtil */
    protected $vonageVerifyUtil;

+    /** @var MapQuestUtil */
+    protected $mapQuestUtil;

-    public function __construct(VonageVerifyUtil $vonageVerifyUtil)
-    {
+    public function __construct(
+        VonageVerifyUtil $vonageVerifyUtil,
+        MapQuestUtil $mapQuestUtil
+    ) {
        $this->vonageVerifyUtil = $vonageVerifyUtil;
+        $this->mapQuestUtil = $mapQuestUtil;
    }
これで MapQuestUtil関数が注入されたので、その関数を呼び出して、返された詳細を User.関数の中で index()関数の中で if ($form->isSubmitted() && $form->isValid()) {を見つけ、その下に新しい行を追加する。以下を追加する:
if ($form->isSubmitted() && $form->isValid()) {
+    $latLng = $this->mapQuestUtil->getLatLongByAddress($user);
+
+    if (null !== $latLng) {
+        $user
+          ->setLatitude($latLng['lat'])
+          ->setLongitude($latLng['lng']);
+    }
チュートリアルのこの時点で、あなたは新しいsymfonyプロジェクトを作成し、このプロジェクトをデータベースで設定しました。また、新しい Userエンティティを作成しました。 userエンティティも作成しました。2つの新しいフォーム UserTypeと VerifyTypeという 2 つのフォームを作成しました。また、ユーザがアクセスするためのいくつかのページを作成しました。 /register, /verifyそして /success.
あなたは今、このチュートリアルの中間地点にいます!これでプロジェクトの登録プロセスをテストすることができます。
登録ページへ 登録ページ次の2ページの指示に従ってください。有効な電話番号を入力してください。そうしないと、アカウントのVerifyができません。
2人のユーザーを接続し、そのフィードバックを収集し、接続された ユーザーのレコードを格納するために、新しいエンティティが必要である。この新しいエンティティは、マッチしたオブジェクトの2人の発信者のリレーションシップと、電話会議の名前(両方のユーザーの名前を'-'で連結したもの)を格納する。これを行うには makeライブラリを使用し、その指示に従って3つの新しいプロパティを作成する:
名前試合
1 - callerOne - ManyToOne - User - null不可 - その他のデフォルト
2 - callerTwo - ManyToOne - User - null不可 - その他はデフォルト
3 - conferenceName - 文字列 - 255 - null不可
マイグレーションを行う前に、もうひとつ必要なものがある。の拡張機能バンドルがあります。 Doctrineのような Doctrine の拡張機能を利用できるようにするバンドルがあります。 Timestampableエンティティの2行を createdAtと updatedAtフィールドを持つためにエンティティに2行使うことができます。これを行うには stof/doctrine-extensions-bundle:
コンフィグはこの新しいエクステンションバンドルに必要です。開く stof_doctrine_extensions.yamlにある project/config/packages/を開き、ミラーに更新する:
stof_doctrine_extensions:
    default_locale: en_GB
    orm:
        default:
timestampable: false新しく作成された Matchエンティティにさらに変更を加える必要があります。このクラスを開いてください。 project/src/Entity/Match.php.
まず TimestampableEntityをプロジェクトに追加する:
use Doctrine\ORM\Mapping as ORM;
+use Gedmo\Timestampable\Traits\TimestampableEntity;では TimestampableTraitクラスで Matchクラスで使用する:
class Match
 {
+ use TimestampableEntity;以下のコマンドを実行すると、データベースを変更した新しいマイグレーションファイルが生成されます:
今後のデータベースの変更を確認したい場合は、生成されたマイグレーションファイルを project/src/Migrations/.
これらの変更に満足したなら、データベースに永続化するために以下のコマンドを実行する:
Ngrok はクロスプラットフォームのアプリケーションで、ユーザーはルーターを設定することなく、開発サーバーをインターネットに公開することができます。Ngrok は、サーバーと Ngrok サブドメインの間にトンネルを作成することでこれを実現します。
次のステップで作成される)Vonage アプリケーションが、Webhook リクエストを行うために Ngrok サブドメインを持つことができるように Ngrok を設定する時間です。
ディレクトリ内の docker/ngrok/ファイル名を ngrok.conf.localを ngrok.confにリネームし <auth_token>に置き換えてください:
備考あなたの auth tokenは ダッシュボード
authtoken: <auth_token>正しい Ngrok サブドメイン URL で Docker コンテナを更新するには、Docker を再起動する必要があります。以下のコマンドでDockerを再起動できます:
Dockerを再起動したら、次のサイトにアクセスします。 https://0.0.0.0:4040にアクセスし、ステータスページに表示されているNgrokサブドメインをコピーする。
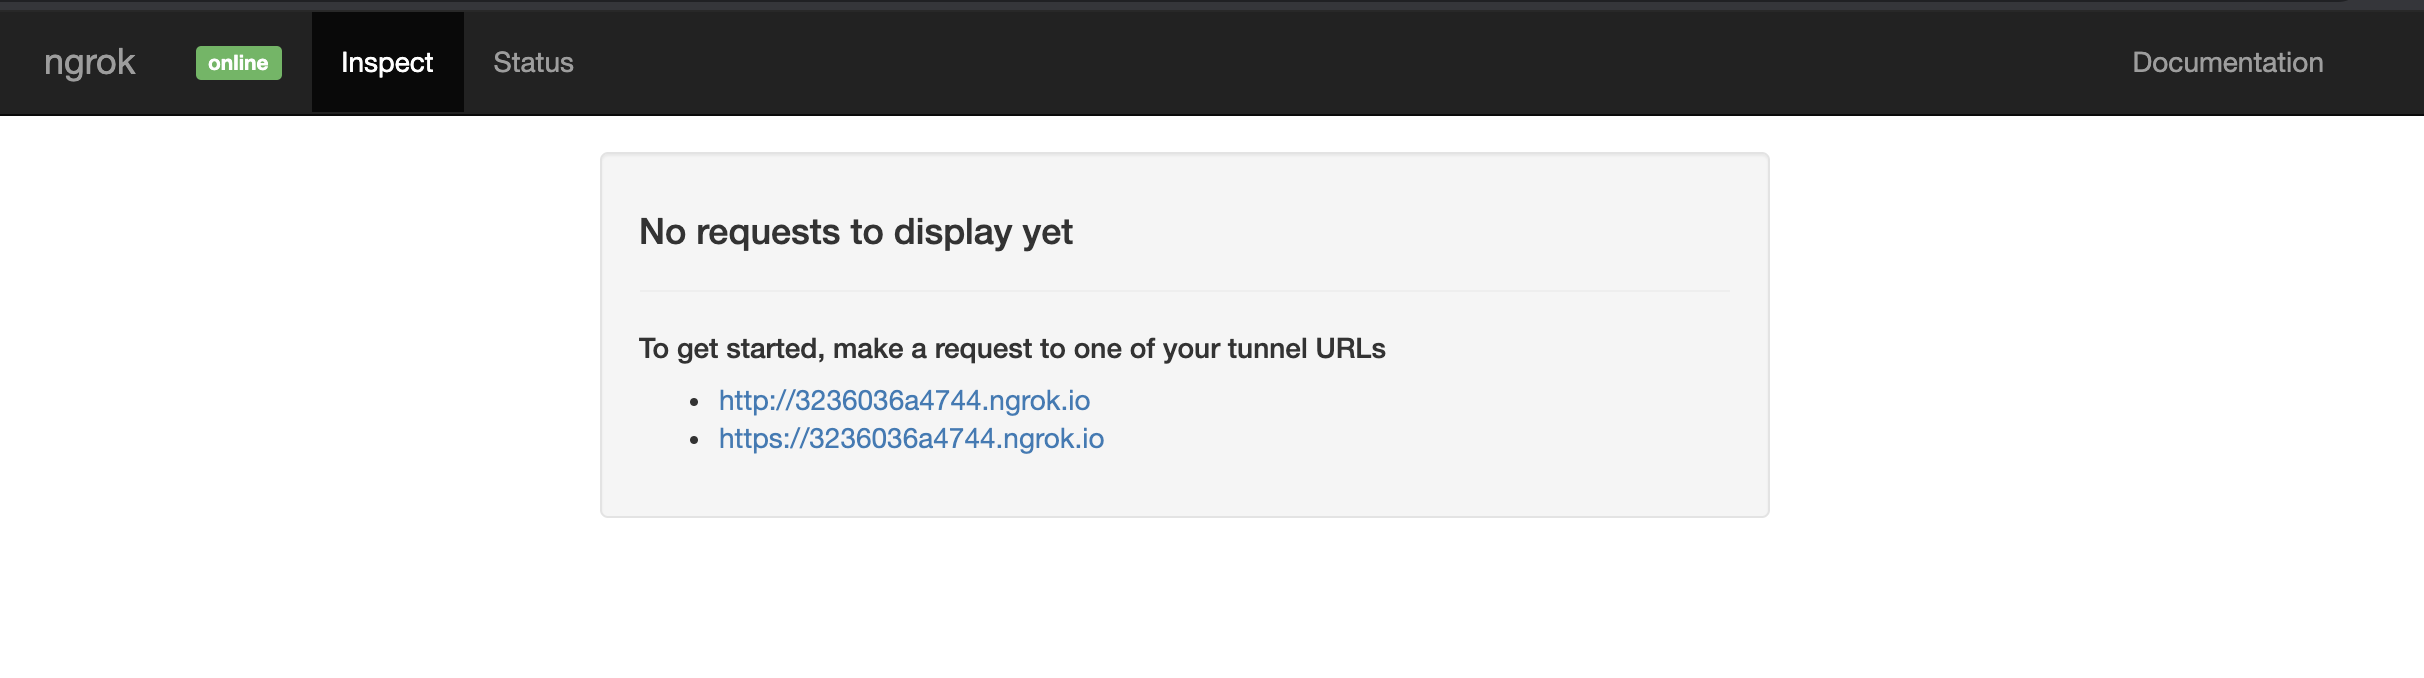
そのNgrokのサブドメインにアクセスする: ngroksubdomain/registerを ngroksubdomainを自分のNgrokサブドメインに置き換えてアクセスすると、登録ページが表示されます。私の例では https://a551f0297ed8.ngrok.io/register.
このNgrokサブドメインは、次にVonageアプリケーションを設定するために必要になるので、注意してください。
ログイン Vonageダッシュボード.ページの左側に Your Applicationsがあり、これをクリックします。ロードされたら Create a new Applicationボタンをクリックします。
を設定する。 Application Nameチュートリアルでは、名前を Befriending Serviceに設定しましたが、好きな名前にしてください。
ボタンをクリックして Generate public and private key.ブラウザに private.keyファイルがダウンロードされます。これをあなたの project/ディレクトリに保存してください。
アンダー Capabilitiesに切り替える。 Voice.
現在表示されている3つの入力ボックスすべてを、Vonageが電話中にコールバックを行うために必要なWebhook URLで更新します。例えば、eventsテキストボックスです: https://a551f0297ed8.ngrok.io/webhooks/eventsに置き換えてください。 a551f0297ed8を上記のステップで作成したサブドメインに置き換えてください。これを3つの入力ボックスすべてで行ってください:
イベント
https://<ngrok url>/webhooks/event答え
https://<ngrok url>/webhooks/answerフォールバック
https://<ngrok url>/webhooks/fallback
最後に Generate new application.
これでロードされたページには Application ID.これをメモしておいてください!
あなたの project/ディレクトリで .env.localを開き、次の2行を追加する。 <application id>をアプリケーションIDに、そして <ngrok_url>をあなたの Ngrok URL に置き換えてください:
VONAGE_APPLICATION_ID=<application id>
VONAGE_APPLICATION_PRIVATE_KEY_PATH=/var/www/symfony/private.key
VONAGE_NUMBER=<your virtual Vonage number>

NGROK_URL=<ngrok_url>これで Vonage アプリケーションが作成され、プロジェクト内に認証情報が保存されました。これらの認証情報を保存することで、プロジェクトは電話をかけたり受けたりできるようになります。
に新しいファイルを作成する。 project/src/Util/と呼ばれる VonageCallUtil.php.
<?php

namespace App\Util;

use App\Util\VonageVerifyUtil;
use Nexmo\Client as VonageClient;
use Nexmo\Client\Credentials\Keypair;

class VonageCallUtil
{
    /** @var VonageClient */
    protected $client;

    /** @var VonageVerifyUtil */
    protected $vonageVerifyUtil;

    public function __construct(VonageVerifyUtil $vonageVerifyUtil)
    {
        $keypair = new Keypair(
            file_get_contents($_ENV['VONAGE_APPLICATION_PRIVATE_KEY_PATH']),
            $_ENV['VONAGE_APPLICATION_ID']
        );

        $this->client = new VonageClient($keypair);
        $this->vonageVerifyUtil = $vonageVerifyUtil;
    }
}このユーティリティ・クラスは現在、作成時に2つの新しいサービスを注入する以外には何もしません。これらのサービスは VonageClientで、これは Vonage Voice API を使って電話をかけたり受けたりする部分です。注入されるもうひとつのサービスは VonageVerifyUtilで、プロジェクトがこの Util 内の特定のメソッドを必要とするときに呼び出されます。
ユーティリティ・クラスは、2人のユーザー間で通話を開始するために使われる。そのため、最初に必要となるメソッドは createConferenceBetween()
public function createConferenceBetween(User $callerOne, User $callerTwo): Match
{
    $conferenceName = $callerOne->getName() . '_' . $callerTwo->getName();

    // Save conference name to the database, along with the callerOne and callerTwo.
    $match = (new Match())
        ->setCallerOne($callerOne)
        ->setCallerTwo($callerTwo)
        ->setConferenceName($conferenceName)
        ->setCreatedAt((new \DateTime()))
        ->setUpdatedAt((new \DateTime()));

    $ncco = [
        [
            'action' => 'talk',
            'voiceName' => 'Amy',
            'text' => 'You are on a Befriending service call, I will connect you to someone random from my database that shouldn\'t be far from your town. Please enjoy your call. If you would like to join now, enter 1 for yes, or 2 for no.'
        ],
        [
            'action' => 'input',
            'maxDigits' => 1,
            'eventUrl' => [
                $_ENV['NGROK_URL'] . '/webhooks/joinConference'
            ],
            'timeOut' => 10
        ]
    ];

    $this->makeCall($callerOne, $ncco);
    $this->makeCall($callerTwo, $ncco);

    return $match;
}上のコードは、2人のユーザーを引数にとるメソッドである。このメソッドは Matchエンティティを生成します。Nexmo Call Control Object (NCCO)配列が生成されます。これは、Vonage Voiceが通話を行うために期待される内容や手順を知るための一連の命令です。
この配列には、さらに2つの配列要素が含まれている。1つ目は、ペルソナ Amyを使用してユーザーを紹介し、電話の内容を説明します。 Amyは、電話会議に参加するかどうかをユーザーに尋ね、「はい」の場合は「1」、「いいえ」の場合は「2」を入力するように要求します。2番目の配列は、ユーザーを次のWebhookエンドポイントに誘導することです。
メソッドへの呼び出しが2つあることにお気づきだろうか。 makeCall()メソッドへの呼び出しが2つあることにお気づきでしょう。次のコードをあなたの VonageCallUtil:
public function makeCall(User $caller, array $ncco)
{
    try {
        $number = $this->vonageVerifyUtil->getInternationalizedNumber($caller);

        $call = $this->client->calls()->create([
            'to' => [[
                'type' => 'phone',
                'number' => preg_replace('/\s+/', '', $number)
            ]],
            'from' => [
                'type' => 'phone',
                'number' => $_ENV['VONAGE_NUMBER']
            ],
            'ncco' => $ncco
        ]);
    } catch (\Exception $e) {

    }
}
このメソッドは、まず別のメソッドを呼び出す、 getInternationalizedNumber()メソッドを呼び出します。 vonageVerifyUtil.のインスタンスである $callerのインスタンスである Userのインスタンスで、国番号と電話番号を Internationalizedに変換します。
上記のメソッドの次のステップは、aをセットしてコールを初期化することである。 to, fromを設定し nccoオブジェクトを挿入します。
最後に、この VonageCallUtilの中で、いくつかのクラスをインクルードする必要がある。下の例に示されている追加部分をファイルにコピーしてください:
namespace App\Util;

+use App\Entity\Match;
+use App\Entity\User;
use App\Util\VonageVerifyUtil;
use Nexmo\Client as VonageClient;
use Nexmo\Client\Credentials\Keypair;要約すると、上記の機能はまだ呼び出されていないが、新しいMatchオブジェクトを作成し、そこに2人のユーザーを保存し、それぞれのユーザーに対して2つの通話を行う。会議が行われたり、2つの通話をリンクする方法はまだない。次に電話会議が行われる!
プロジェクトは毎日呼び出されるので、cronjobとして実行されるコマンドが必要だ。ターミナルで docker/ディレクトリの中で makeライブラリを使用して新しいコマンドを作成する:
ライブラリが新しいコマンドの名前を要求したら、次のように入力します。 app:match-users.
このコマンドを実行すると MatchUsersCommand.phpという新しいファイルが作成されます: project/src/Command/MatchUsersCommand.php.
新しく作成した MatchUsersCommand.phpファイルを開く。
生成されたコマンドにはいくつかのデフォルト設定があるが、そのほとんどはこのプロジェクトには必要ないものだ。以下の関数を見つけ protected function configure()を探し、この関数の内容を
$this
    ->setDescription('Match users together for a phone call')
;
メソッドを使ってクラスに注入する必要がある。 __construct()メソッドを通してクラスに注入する必要があります。必要な2つのサービスとは EntityManagerInterfaceこれは、コードからデータベースへの問い合わせや、エンティティのリポジトリメソッドへのアクセスを可能にします。番目に必要なサービスは VonageCallUtilで、2人のユーザーを呼び出して接続する、以前に作成した機能を呼び出します。
以下のコードを MatchUsersCommand.phpファイル内の以下のコードを更新する:
+use App\Entity\Match;
+use App\Entity\User;
+use App\Util\VonageCallUtil;
+use Doctrine\ORM\EntityManagerInterface;
use Symfony\Component\Console\Command\Command;
use Symfony\Component\Console\Input\InputInterface;
use Symfony\Component\Console\Output\OutputInterface;

class MatchUsersCommand extends Command
{
    protected static $defaultName = 'app:match-users';

+    /** @var VonageCallUtil */
+    protected $vonageCallUtil;
+
+    /** @var EntityManagerInterface */
+    protected $entityManager;
+
+    public function __construct(
+        VonageCallUtil $vonageCallUtil,
+        EntityManagerInterface $entityManager
+    ) {
+        $this->vonageCallUtil = $vonageCallUtil;
+        $this->entityManager = $entityManager;
+
+        parent::__construct();
+    }
さて、いよいよコマンド機能の構築に取りかかる!
クエリを動作させるために、プロジェクトには次のステップで書く Doctrine エクステンションが必要です。これらのエクステンションは Benjamin Eberlei.このライブラリをインストールするには、ターミナルで次のコマンドを実行します:
次に、必要な拡張機能を有効にします。開く project/config/packages/doctrine.yamlと同じインデントで auto_generate_proxy_classes, naming_strategy, auto_mappingと mappingsを追加する:
注意してください:正しいYAMLフォーマットであることを確認するために、インデントの仕方に注意してください。
dql:
    numeric_functions:
        acos: DoctrineExtensions\Query\Mysql\Acos
        cos: DoctrineExtensions\Query\Mysql\Cos
        radians: DoctrineExtensions\Query\Mysql\Radians
sin: DoctrineExtensions\Query\Mysql\Sinあなたの中に戻って MatchUsersCommandの中に戻って execute()関数を見つける。この関数は、コマンドのすべての作業が行われる場所である。
手始めに、このメソッドの内容をすべて削除する。
このメソッドで最初に必要なのは Matchそして Userリポジトリを変数に入れ、アクティブとマークされたすべてのユーザーを取得することです:
$matchRepository = $this->entityManager->getRepository(Match::class);
$userRepository = $this->entityManager->getRepository(User::class);
$activeUsers = $userRepository->findByActive(true);
続いて、各アクティブユーザーをループさせ、通話を開始し、別のユーザーに接続する。以下のループを追加する:
foreach ($activeUsers as $key => $callerOne) {

}
今、システムは地理的に近いユーザーを見つける必要がある。 $callerOneを見つける必要がある。このクエリーはかなり長いものであり UserRepository.ファイルを開く project/src/Repository/UserRepository.php
メソッドの下に __constructメソッドの下に、次の新しいメソッドを追加する:
public function findPossibleMatchesByDistance(User $user, array $activeUsers, int $distance)
{
    $queryBuilder = $this->createQueryBuilder('u');

    return $this->createQueryBuilder('u')
        ->addSelect(
            '( 3959 * acos(cos(radians(:latitude))' .
                '* cos(radians(u.latitude))' .
                '* cos(radians(u.longitude)' .
                '- radians(:longitude))' .
                '+ sin(radians(:latitude))' .
                '* sin(radians(u.latitude)))) as distance'
        )
        ->andWhere($queryBuilder->expr()->eq('u.active', ':isActive'))
        ->andWhere($queryBuilder->expr()->eq('u.verified', ':isVerified'))
        ->andWhere($queryBuilder->expr()->neq('u', ':user'))
        ->having($queryBuilder->expr()->lt('distance', ':distance'))
        ->setParameters([
            'latitude' => $user->getLatitude(),
            'longitude' => $user->getLongitude(),
            'user' => $user,
            'distance' => $distance,
            'isActive' => true,
            'isVerified' => true
        ])
        ->getQuery()
        ->getResult();
}
上記のコードブロックのメソッドは、ユーザーオブジェクト、現在のアクティブユーザーの配列、および所定の距離の整数変数を取る。
このメソッドは新しいクエリを作成し、指定されたユーザからのすべてのユーザの距離を計算し、それらがすべてアクティブであり、検証されていることを確認します。最後のチェックは、返されたユーザが渡されたユーザから指定された距離内にいることを確認することです。
の内側に戻る。 MatchUsersCommand行を見つける: foreach ($activeUsers as $activeUser) {という行を探し、以下を追加する:
// Retrieve all active users within a 30 mile radius of current callerOne
$matches = $userRepository->findPossibleMatchesByDistance($callerOne, $activeUsers, 30);

// If there are less than 5 users returned, increase the search to 100 mile radius.
if (count($matches) < 5) {
    $matches = $userRepository->findPossibleMatchesByDistance($callerOne, $activeUsers, 100);
}

// If there are no users within a 100 mile radius return 0
if (count($matches) === 0) {
    unset($activeUsers[$key]);

    continue;
}

// Shuffle returned matches.
shuffle($matches);
// Remove callerOne from list of active users
unset($activeUsers[$key]);

$callerTwo = $matches[0][0];

// Remove callerTwo from list of active users
$matchKey = array_search($callerTwo, $activeUsers);
unset($activeUsers[$matchKey]);

// Make a call to createConferenceBetween() inside VonageCallUtil to connect the two users via phone call.
$match = $this->vonageCallUtil->createConferenceBetween($callerOne, $callerTwo);

// If successful, save the Match to the database.
if ($match instanceof Match) {
    $this->entityManager->persist($match);
    $this->entityManager->flush();
}
コマンドは、一緒にマッチするユーザーを見つけ、通話を開始するために作成される。しかし、WebhookのURLは、自動導入から電話会議にユーザーを接続するまで、通話を進行させるために必要である。
が必要です。 WebhooksControllerが必要なので、ターミナルで makeライブラリを使用して、次のコマンドを実行する:
と書いてあるところ: Choose a name for your controller class (e.g. AgreeableGnomeController):と入力し WebhooksControllerと入力してエンターキーを押す。
これで2つの新しいファイルができた:
created: src/Controller/WebhooksController.php
created: templates/webhooks/index.html.twig新しく作成した WebhooksController.phpの中にある project/src/Controller/
このコントローラーは、3つのサービスを利用する必要がある、 VonageVerifyUtil, VonageCallUtilそして EntityManagerInterface.そこで、以下のようにControllerのコンストラクトにこれらのサービスを注入することから始めます:
+
+ use App\Util\VonageVerifyUtil;
+ use App\Util\VonageCallUtil;
+ use Doctrine\ORM\EntityManagerInterface;

class WebhooksController extends AbstractController
{
+    /** @var VonageVerifyUtil */
+    protected $vonageVerifyUtil;
+
+    /** @var VonageCallUtil */
+    protected $vonageCallUtil;
+
+    /** @var EntityManagerInterface */
+    protected $entityManager;
+
+    public function __construct(
+        VonageCallUtil $vonageCallUtil,
+        VonageVerifyUtil $vonageVerifyUtil,
+        EntityManagerInterface $entityManager
+    ) {
+        $this->vonageCallUtil = $vonageCallUtil;
+        $this->vonageVerifyUtil = $vonageVerifyUtil;
+        $this->entityManager = $entityManager;
+    }
}
以下の2つのメソッドは、その名前が示すとおりの働きをする。最初のメソッドは電話番号からユーザーを見つけるもので、2番目のメソッドは Matchインスタンスを見つけます。 Userでインスタンスを見つけるものです。これらを WebhooksController.
private function findUserByNumber(string $phoneNumber)
{
    return $this->entityManager->getRepository(User::class)->findOneByPhoneNumber(
        $this->vonageVerifyUtil->getNationalizedNumber('+' . $phoneNumber)
    );
}

private function findMatchByUser(User $user)
{
    return $this->entityManager
        ->getRepository(Match::class)
        ->findByDateUser($user, (new \DateTime()));
}
このメソッドは、ユーザーと現在の日付からマッチを検索するものである。開く project/src/Repository/MatchRepository.phpを開き、このクラスの中に以下のメソッドを追加します:
public function findByDateUser(User $user, DateTime $date)
{
    $queryBuilder = $this->createQueryBuilder('m');

    return $this->createQueryBuilder('m')
        ->andWhere(
            $queryBuilder->expr()->orX(
                $queryBuilder->expr()->eq('m.callerOne', ':user'),
                $queryBuilder->expr()->eq('m.callerTwo', ':user')
            )
        )
        ->andWhere(
            $queryBuilder->expr()->like('Date(m.createdAt)', ':date')
        )
        ->setParameters([
            'user' => $user,
            'date' => $date->format('Y-m-d') . '%'
        ])
        ->getQuery()
        ->getResult();
}
ファイルの先頭に、エンティティのインポートを追加する。 User:
use App\Entity\Match;
+use App\Entity\User;上記のクエリは Matchユーザが callerOneまたは callerTwoで Matchが今日作成されたエントリを見つけます。Doctrineが知らないクエリ関数がここにあります。 Date(m.createdAt).人と人との距離を計算するときに beberlei/doctrineextensions.このライブラリは Date拡張機能があります。そこで project/config/packages/doctrine.yamlを開き、以下の2行を追加する:
dql:
    numeric_functions:
        acos: DoctrineExtensions\Query\Mysql\Acos
        cos: DoctrineExtensions\Query\Mysql\Cos
        radians: DoctrineExtensions\Query\Mysql\Radians
        sin: DoctrineExtensions\Query\Mysql\Sin
+    datetime_functions:
+ Date: DoctrineExtensions\Query\Mysql\Dateというメソッドを作成した。 createConferenceBetween()というメソッドを作成した。 NCCOのURLを参照する配列でした。 /webhooks/joinConference今この例を実行しても、URLは存在しないので何も起こりません。新しい joinConference()メソッドを作成します。 WebhooksControllerの中に新しいメソッドを作成します。
このメソッドには2つの目的がある。ひとつは、ユーザーの入力を検証し、有効な選択肢だけを入力してから先に進むようにすることです。これらの入力は、1が「はい」、2が「いいえ」です。
このメソッドの2つ目の目的は、ユーザーの入力を尊重することである。ユーザーが通話に進むことを選択した場合、次のアクションにリダイレクトし て、電話会議に接続する。ユーザーが「2」を選択し、通話に参加しない場合、システムは、通話に参加しな い要求を確認する応答をし、通話を終了する。
/**
 * @Route("/webhooks/joinConference", name="match_join")
 */
public function joinConference(Request $request)
{
    $content = json_decode($request->getContent(), true);

    if (!in_array($content['dtmf'], ['1', '2'])) {
        $ncco = [
            [
                'action' => 'talk',
                'text' => 'Please only enter 1 or 2. Would you like to join a call with someone?',
                'voiceName' => 'Amy',
            ],
            [
                'action' => 'input',
                'maxDigits' => 1,
                'eventUrl' => [
                    $_ENV['NGROK_URL'] . '/webhooks/joinConference'
                ],
                'timeOut' => 10
            ]
        ];
    } elseif ($content['dtmf'] === '1') {
        // Find user by number.
        $user = $this->findUserByNumber($content['to']);
        // Find match by user and today.
        $match = $this->findMatchByUser($user)[0];

        // Make next request.
        $ncco = [
            [
                'action' => 'talk',
                'text' => 'Thank you. I will now connect you.',
                'voiceName' => 'Amy',
            ],
            [
                'action' => 'conversation',
                'name' => $match->getConferenceName()
            ]
        ];
    } else {
        $ncco = [
            [
                'action' => 'talk',
                'text' => 'Ok, we will not put you in a call with someone at this time. Goodbye.',
                'voiceName' => 'Amy',
            ]
        ];
    }

    return new JsonResponse($ncco);
}
ここでは、ファイルに含めていない4つのクラスが使われている、 Request, Match, Userそして JsonResponse.これらをクラスの上に含める:
+use App\Entity\Match;
+use App\Entity\User;
use App\Util\VonageCallUtil;
use App\Util\VonageVerifyUtil;
use Symfony\Bundle\FrameworkBundle\Controller\AbstractController;
+use Symfony\Component\HttpFoundation\Request;
+use Symfony\Component\HttpFoundation\JsonResponse;
use Symfony\Component\Routing\Annotation\Route;
use Doctrine\ORM\EntityManagerInterface;この時点で、ユーザー登録フォームがあり、認証プロセスを経てユーザーが登録されます。また、このコマンドを実行すると、すべての有効な認証済みユーザーをループさせ、半径100マイル以内にいる他の有効な認証済みユーザーに接続します。
これでテストできます!2つの電話番号が利用可能な場合は、先に進み、登録ページで登録します。 登録ページ.確認プロセスに従い、両方のユーザーの入力した所在地が互いに30マイル以内であることを確認してください。
ユーザーを登録したら、ターミナルで docker/ディレクトリの中で、以下のコマンドを実行してください:
どちらの電話番号にも電話がかかってきて、別の人との通話につなぐかどうか尋ねられる!
各ユーザーからのフィードバックを取得するには、2番目のコマンドが必要である。このコマンドは、各ユーザーから、その日の通話からフィードバックを収集する。このコマンドは、マッチする通話が終了した数時間後に実行されるようにスケジュールされたcronjobでもある。
しかし、この新しいコマンドを作る前に Matchエンティティを更新する必要がある。 Matchエンティティを makeライブラリでエンティティを作成したときに、新しいプロパティで更新することもできます。ターミナルで以下のコマンドを実行し、以下の各ステップの指示に従ってください:
作成または更新するエンティティのクラス名 (例 DeliciousGnome):
Match
物件1
名前
callerOneFeedbackAcceptedタイプ
booleanNullになり得るか?
yes
物件2
名前
callerTwoFeedbackAcceptedタイプ
booleanNullになり得るか?
yes
物件3
名前
callerOneCallSuccessfulタイプ
booleanNullになり得るか?
yes
物件4
名前
callerTwoCallSuccessfulタイプ
booleanNullになり得るか?
yes
更新されたエンティティは、現在データベースに反映されていません。で定義した内容をデータベースに反映させるには、以下のコマンドを実行して新しいマイグレーションファイルを生成します。 Matchエンティティで定義した内容をデータベースに反映させるには、以下のコマンドを実行して新しいマイグレーションファイルを生成します:
今後のデータベースの変更を確認したい場合は、生成されたマイグレーションファイルを project/src/Migrations/.
これらの変更に満足したなら、データベースに永続化するために以下のコマンドを実行する:
まず、今日の試合のリストを入手する必要がある。そこで MatchRepositoryに新しい関数を追加します。このクエリは callerOneCallSuccessfulフラグが空であるマッチしたユーザのみを見つけます:
public function getTodaysMatches()
{
    $queryBuilder = $this->createQueryBuilder('m');

    return $this->createQueryBuilder('m')
        ->andWhere(
            $queryBuilder->expr()->isNull('m.callerOneCallSuccessful'),
            $queryBuilder->expr()->like('Date(m.createdAt)', ':date')
        )
        ->setParameter('date', (new \DateTime())->format('Y-m-d') . '%')
        ->getQuery()
        ->getResult();
}
さて、新しい変更を利用する新しいコマンドをターミナルタイプで作成する番だ:
コマンド名を聞かれるので、入力する: app:get-feedback.このコマンドは project/src/command/と呼ばれる GetFeedbackCommand.php新しく作成されたファイルを開く。
このコントローラには __construct()メソッドを通して注入する必要があります。同じ2つのサービスを MatchUsersCommand.以下に示す調整を GetFeedbackCommand:
+use App\Entity\Match;
+use App\Util\VonageCallUtil;
+use Doctrine\ORM\EntityManagerInterface;
use Symfony\Component\Console\Command\Command;
use Symfony\Component\Console\Input\InputInterface;
use Symfony\Component\Console\Output\OutputInterface;

class GetFeedbackCommand extends Command
{
    protected static $defaultName = 'app:get-feedback';

+    /** @var VonageCallUtil */
+    protected $vonageCallUtil;
+
+    /** @var EntityManagerInterface */
+    protected $entityManager;
+
+    public function __construct(
+        VonageCallUtil $vonageCallUtil,
+        EntityManagerInterface $entityManager
+    ) {
+        $this->vonageCallUtil = $vonageCallUtil;
+        $this->entityManager = $entityManager;
+
+        parent::__construct();
+    }
上記の変更により、コマンドは VonageCallUtilそして EntityManagerInterface.
の内容を configure()の内容を更新する。この例では、コマンドの説明を設定しています:
$this
    ->setDescription('Contact all previous matches to get their feedback.');
マッチしたユーザーからのフィードバックを収集する機能を実装する時が来た。メソッドの内容を execute()を
$matchRepository = $this->entityManager->getRepository(Match::class);

// Get matches that haven't had any feedback.
$matches = $matchRepository->getTodaysMatches();

if (empty($matches)) {
    return 0;
}

// Loop through all retrieved matches
foreach ($matches as $match) {
    if (null === $match->getCallerOneCallSuccessful()) {
        // Call callerOne as we do not have feedback from them.
        $this->vonageCallUtil->makeFeedbackCall(
            $match->getCallerOne()
        );
    }

    if (null === $match->getCallerTwoCallSuccessful()) {
        // Call callerTwo as we do not have feedback from them.
        $this->vonageCallUtil->makeFeedbackCall(
            $match->getCallerTwo()
        );
    }

    // Save changes to the database.
    $this->entityManager->flush();
    $this->entityManager->clear();
}

return 0;
上記の機能は、その日のマッチを収集し、各マッチをループし、発信者1と発信者2との通話を開始し、それぞれの前回の通話に関するフィードバックを要求する。
を呼び出したことがわかるだろう。 makeFeedbackCall()を呼び出している。 VonageCallUtilを呼び出していますが、メソッドはまだ存在していません。そこで VonageCallUtilの中に project/src/util/VonageCallUtil.phpを開き、新しいメソッドを追加します:
public function makeFeedbackCall(User $user)
{
    $ncco = [
        [
            'action' => 'talk',
            'text' => 'Thank you for using the Befriending service. Could you please provide feedback for your call today? Enter 1 for yes, or two for no.',
            'voiceName' => 'Amy',
        ],
        [
            'action' => 'input',
            'maxDigits' => 1,
            'eventUrl' => [
                $_ENV['NGROK_URL'] . '/webhooks/userFeedback'
            ],
            'timeOut' => 10
        ]
    ];

    $this->makeCall($user, $ncco);
}
上記の例では eventUrlを参照しています。 /webhooks/userFeedback.このエンドポイントは WebhooksControllerには存在しません。
このメソッドには2つの目的がある。ひとつは、ユーザーの入力を検証し、有効な選択肢だけを入力してから先に進むようにすることです。これらの入力は、1が「はい」、2が「いいえ」です。
この方法の2つ目の目的は、ユーザーの入力を尊重することです。もしユーザーがフィードバックをすることを選択した場合、最初のフィードバックの質問をする次のアクションにリダイレクトする。ユーザーが「2」、フィードバックを提供しないを選択した場合、システムはフィードバックを提供しないという要求を確認する応答をし、通話を終了する。
そこで WebhooksControllerという新しいメソッドを作成します。 getUserFeedback()を作成する:
/**
 * @Route("/webhooks/userFeedback", name="match_feedback")
 */
public function getUserFeedback(Request $request)
{
    $content = json_decode($request->getContent(), true);

    if (!in_array($content['dtmf'], ['1', '2'])) {
        $ncco = [
            [
                'action' => 'talk',
                'text' => 'Please only enter 1 or 2. Would you like to provide feedback for the service?',
                'voiceName' => 'Amy',
            ],
            [
                'action' => 'input',
                'maxDigits' => 1,
                'eventUrl' => [
                    $request->getScheme().'://'.$request->getHost().'/webhooks/userFeedback'
                ],
                'timeOut' => 10
            ]
        ];
    } else {
        // Find user by number.
        $user = $this->findUserByNumber($content['to']);
        // Find match by user and today.
        $match = $this->findMatchByUser($user)[0];
        // Determine if user is first or second caller.
        $isFirstOrSecond = $this->isFirstOrSecondCaller($match, $user);

        // Save entry to database.
        if ($isFirstOrSecond === 1) {
            $method = 'setCallerOneFeedbackAccepted';
        } elseif ($isFirstOrSecond === 2) {
            $method = 'setCallerTwoFeedbackAccepted';
        } else {
            return new JsonResponse([]);
        }

        $mapResponse = [
            '1' => true,
            '2' => false
        ];

        $match->$method($mapResponse[$content['dtmf']]);
        $this->entityManager->flush();

        // Make next request.
        $ncco = [
            [
                'action' => 'talk',
                'text' => 'Thank you. Was the call successful? Please enter 1 for yes, or 2 for no.',
                'voiceName' => 'Amy',
            ],
            [
                'action' => 'input',
                'maxDigits' => 1,
                'eventUrl' => [
                    $_ENV['NGROK_URL'] . '/webhooks/userFeedbackCallSuccess'
                ],
                'timeOut' => 10
            ]
        ];
    }

    return new JsonResponse($ncco);
}
上記の例では eventUrlを参照しています。 /webhooks/userFeedbackCallSuccess.このエンドポイントは WebhooksControllerには存在しません。
このメソッドには2つの目的がある。ひとつは、ユーザーの入力を検証し、有効な選択肢だけを入力してから先に進むようにすることです。これらの入力は、1が「はい」、2が「いいえ」です。
このメソッドの第二の目的は、ユーザーの入力を尊重することである。もしユーザーが'1'か'2'のどちらかを選択したら、ユーザーの入力をプロパティ setCallerOneCallSuccessfulまたはプロパティ setCallerTwoCallSuccessfulをtrueまたはfalseとして保存します(彼らが呼び出しを楽しんだかどうかにかかわらず)。
オプションの入力に成功すると、コードはユーザーを次のアクションにリダイレクトする。 /webhooks/userFeedbackContinue
そこで WebhooksControllerという新しいメソッドを作成します。 getUserFeedbackCallSuccess()を作成する:
/**
 * @Route("/webhooks/userFeedbackCallSuccess", name="match_call_success")
 */
public function getUserFeedbackCallSuccess(Request $request)
{
    $content = json_decode($request->getContent(), true);

    if (!in_array($content['dtmf'], ["1", "2"])) {
        $ncco = [
            [
                'action' => 'talk',
                'text' => 'Please only enter 1 or 2. Was the call successful? Please enter 1 for yes or 2 for no.',
                'voiceName' => 'Amy',
            ],
            [
                'action' => 'input',
                'maxDigits' => 1,
                'eventUrl' => [
                    $request->getScheme().'://'.$request->getHost().'/webhooks/userFeedbackCallSuccess'
                ],
                'timeOut' => 10
            ]
        ];
    } else {
        // Find user by number.
        $user = $this->findUserByNumber($content['to']);
        // Find match by user and today.
        $match = $this->findMatchByUser($user)[0];
        // Determine if user is first or second caller.
        $isFirstOrSecond = $this->isFirstOrSecondCaller($match, $user);

        // Save entry to database.
        if ($isFirstOrSecond === 1) {
            $method = 'setCallerOneCallSuccessful';
        } elseif ($isFirstOrSecond === 2) {
            $method = 'setCallerTwoCallSuccessful';
        } else {
            return new JsonResponse([]);
        }

        $mapResponse = [
            '1' => true,
            '2' => false
        ];

        $match->$method($mapResponse[$content['dtmf']]);
        $this->entityManager->flush();

        $ncco = [
            [
                'action' => 'talk',
                'text' => 'Would you like to have another call tomorrow? Please enter 1 for yes or 2 for no.',
                'voiceName' => 'Amy',
            ],
            [
                'action' => 'input',
                'maxDigits' => 1,
                'eventUrl' => [
                    $_ENV['NGROK_URL'] . '/webhooks/userFeedbackContinue'
                ],
                'timeOut' => 10
            ]
        ];
    }

    return new JsonResponse($ncco);
}
上記の例では eventUrlを参照しています。 webhooks/userFeedbackContinue.このエンドポイントは WebhooksControllerには存在しません。
このメソッドには2つの目的がある。ひとつは、ユーザーの入力を検証し、有効な選択肢だけを入力してから先に進むようにすることです。これらの入力は、1が「はい」、2が「いいえ」です。
この方法の第二の目的は、ユーザーの入力を尊重することである。もしユーザーが'1'を選択した場合、翌日の電話のために、引き続きサービスに加入する。
もしユーザーが'2'を選んだ場合、それらは非アクティブに設定され、もはやコールされない。
オプションの入力に成功すると、通話は終了する。
そこで WebhooksControllerという新しいメソッドを作成します。 getUserFeedbackContinue()を作成する:
/**
 * @Route("/webhooks/userFeedbackContinue", name="match_user_continue")
 */
public function getUserFeedbackContinue(Request $request)
{
    $content = json_decode($request->getContent(), true);

    if (!in_array($content['dtmf'], ["1", "2"])) {
        $ncco = [
            [
                'action' => 'talk',
                'text' => 'Please only enter 1 or 2. Would you like to have another call tomorrow? Please enter 1 for yes or 2 for no.',
                'voiceName' => 'Amy',
            ],
            [
                'action' => 'input',
                'maxDigits' => 1,
                'eventUrl' => [
                    $_ENV['NGROK_URL'] . '/webhooks/userFeedbackContinue'
                ],
                'timeOut' => 10
            ]
        ];
    } else {
        // Find user by number.
        $user = $this->findUserByNumber($content['to']);
        // Find match by user and today.
        $match = $this->findMatchByUser($user);

        if (!$match) {
            return new JsonResponse([]);
        }

        $mapResponse = [
            '1' => true,
            '2' => false
        ];

        if ($content['dtmf'] === "2") {
            $user->setActive(false);
            $this->entityManager->flush();

            $ncco = [
                [
                    'action' => 'talk',
                    'text' => 'Thank you for your feedback. Your number has been removed from the list.',
                    'voiceName' => 'Amy',
                ]
            ];
        } else {
            $ncco = [
                [
                    'action' => 'talk',
                    'text' => 'Thank you for your feedback. Goodbye.',
                    'voiceName' => 'Amy'
                ],
            ];
        }
    }

    return new JsonResponse($ncco);
}
プロジェクトに追加しなければならない最後の関数は、次のように呼ばれていることにお気づきかもしれないが、作成する必要がある。 isFirstOrSecondCaller()であるが、作成する必要がある。このメソッドは Matchのインスタンスと Userオブジェクトのインスタンスを受け取ります。 callerOneまたは callerTwoの Match.これをクラスの一番下に追加します:
private function isFirstOrSecondCaller(Match $match, User $user): ?int
{
    if ($match->getCallerOne() === $user) {
        return 1;
    }

    if ($match->getCallerTwo() === $user) {
        return 2;
    }

    return null;
}
このチュートリアルに最初から最後まで従った場合、新しいsymfonyのインストールからプロジェクトを作成しました。
この新しいプロジェクトには登録ページがあり、登録するとVonage Verifyに検証リクエストが送信される。このリクエストがトリガーとなり、登録時の電話番号の所有者にSMSが送信される。SMSに記載されている検証コードを、ユーザーが次に見るページに入力する必要があります。認証に成功すると、ユーザーは成功ページにリダイレクトされ、何時に電話がかかってくるかを知ることができます。
このプロジェクトの第2部は、Vonage Voice機能である。コマンドを使うことで、ユーザーはマッチングされ、電話され、電話会議に参加する。その日のうちに、2番目のコマンドが実行され、その日にマッチングした各人からのフィードバックが要求される。
このチュートリアルの完成したコードは、この GitHub リポジトリ.
以下は、Vonage VerifyまたはVoiceをプロジェクトに実装するために私たちが書いた他のいくつかのチュートリアルです:
コミュニティで共有したい質問、アドバイス、アイデアなどがありましたら、お気軽に私たちの コミュニティSlackワークスペース.このチュートリアルを実施した方、あなたのプロジェクトがどのように機能しているか、ぜひお返事ください。