Partager:
Diana est défenseur des développeurs chez Vonage. Elle aime manger des huîtres fraîches.
Comment créer un jeu de rôle avec Vonage AI Studio et Notion
Temps de lecture : 8 minutes
Lorsque j'étais plus jeune, une partie de mon temps de jeu était consacrée à des jeux vidéo que l'on m'avait donnés - des joyaux absolus en soi, mais avec lesquels je passais, il est vrai, un peu trop de temps, ce qui m'a souvent valu une ou deux réprimandes. J'aimais une grande variété de jeux, des simulations sociales aux jeux de plateforme, en passant par les jeux de tir à la première personne et mon préféré, les jeux de rôle (RPG). À l'insu de mon jeune moi, chaque heure passée dans ces mondes fantastiques me permettait d'améliorer subtilement mes compétences en matière de résolution de problèmes et ma créativité. Ces mêmes aventures de jeu ont jeté les bases de ce blog.
L'année dernière, Larian Studios a publié Baldur's Gate 3un jeu de rôle basé sur le jeu de table Dungeon & Dragons. Un jeu de rôle, c'est comme plonger dans un livre où, au lieu de simplement lire l'histoire, vous incarnez le personnage principal. Vous vivrez des aventures, prendrez des décisions, interagirez avec d'autres personnages et influencerez l'issue de l'histoire en fonction de vos choix. C'est l'occasion de faire l'expérience d'un récit d'une manière concrète, où le monde réagit à ce que vous décidez.
J'ai moi-même joué à ce jeu et j'ai été très impressionné par le caractère unique et engageant de l'expérience de chaque joueur, puisqu'il s'agit d'un jeu de type "choisissez votre propre aventure". Je me suis alors senti obligé de recréer une version plus simple d'un RPG en utilisant AI Studio de Vonage et Messages API - Vonage's Gate !
Voici comment nous allons créer une expérience narrative où les joueurs décident du destin de leur personnage. Maintenant, canalisez l'énergie de votre personnage principal et commençons à construire !
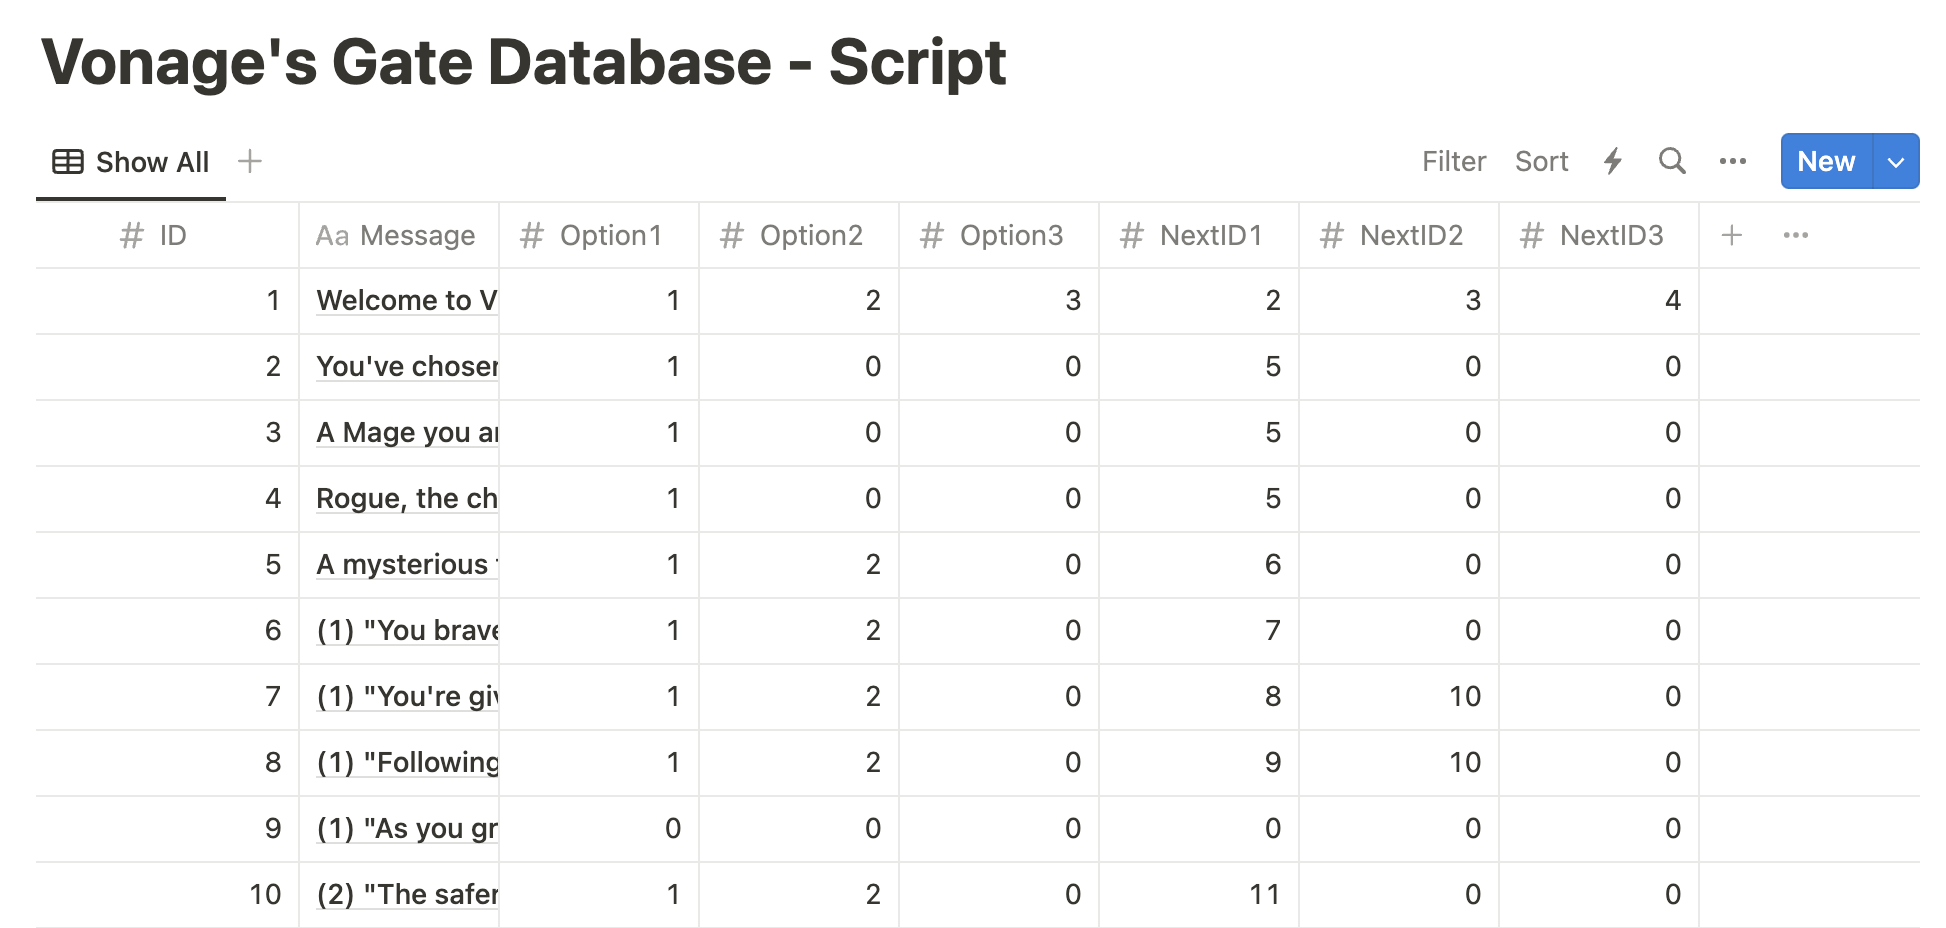
Comme meilleure pratique, nous stockerons toutes les valeurs utilisées dans le gameplay dans une base de données - pour cet exemple, nous utiliserons Notion !
Il s'agit d'un choix convivial, qui ne nécessite pas de connaissances avancées en matière de bases de données, et qui est très pratique car les changements apparaissent instantanément - ce qui est parfait pour garder notre contenu frais et réactif. Bien qu'il soit moins évolutif que les bases de données traditionnelles, il peut gérer tout ce dont nous avons besoin pour cette application. Le plus beau, c'est qu'elle s'intègre facilement à Vonage AI Studio et à d'autres plateformes à code bas, ce qui nous facilite grandement la vie !
Créez votre feuille de calcul
Aller à Notion. Cliquez sur le bouton (+) pour ajouter une page. Sur la nouvelle page, sous DATABASE, cliquez sur "Table". Créez les colonnes suivantes :
ID (type : nombre) - l'ID du message est envoyé par MMS
Message (type : titre) - le texte envoyé
Option1 (type : nombre) - la réponse qu'un joueur envoie lorsqu'il choisit l'option 1
Option2 (type : nombre) - la réponse qu'un joueur envoie lorsqu'il choisit l'option 2
Option3 (type : nombre) - la réponse qu'un joueur envoie lorsqu'il choisit l'option 3
NextID1 (type : nombre) - l'ID du prochain message que le joueur reçoit après avoir choisi l'option 1
NextID2 (type : nombre) - l'ID du prochain message que le joueur reçoit après avoir choisi l'option 2
NextID3 (type : nombre) - l'ID du prochain message que le joueur reçoit après avoir choisi l'option 3
Vous pouvez personnaliser l'histoire comme vous le souhaitez. Dans mon histoire, le joueur se retrouve avec l'artefact. Les textes envoyés au joueur sont déclenchés par ses réponses au message précédent.
Création de personnages
Message initial : Envoyez une brève présentation et un choix simple pour la création de votre personnage.
Dans ma base de données, vous pouvez voir que l'ID 1 affiche le message initial : "Bienvenue à Vonage's Gate ! Choisissez une classe : (1) Guerrier, (2) Mage, ou (3) Voleur."
Confirmation du personnage : Une fois qu'il a fait son choix, envoyez-lui une confirmation accompagnée d'une brève description de son personnage.
Progression du jeu
Immédiatement après la confirmation du personnage, présentez le premier scénario simple qui nécessite une décision. Lorsque le joueur fait un choix, répondez par un bref résultat et un autre point de décision. Poursuivez avec une série de points de décision simples qui font avancer l'histoire sans nécessiter d'interactions complexes. Pour cette démo, nous demanderons aux joueurs de répondre par des messages à un seul personnage. Après quelques séries de décisions, nous pouvons conclure la démo avec une fin simple.
 Database Setup
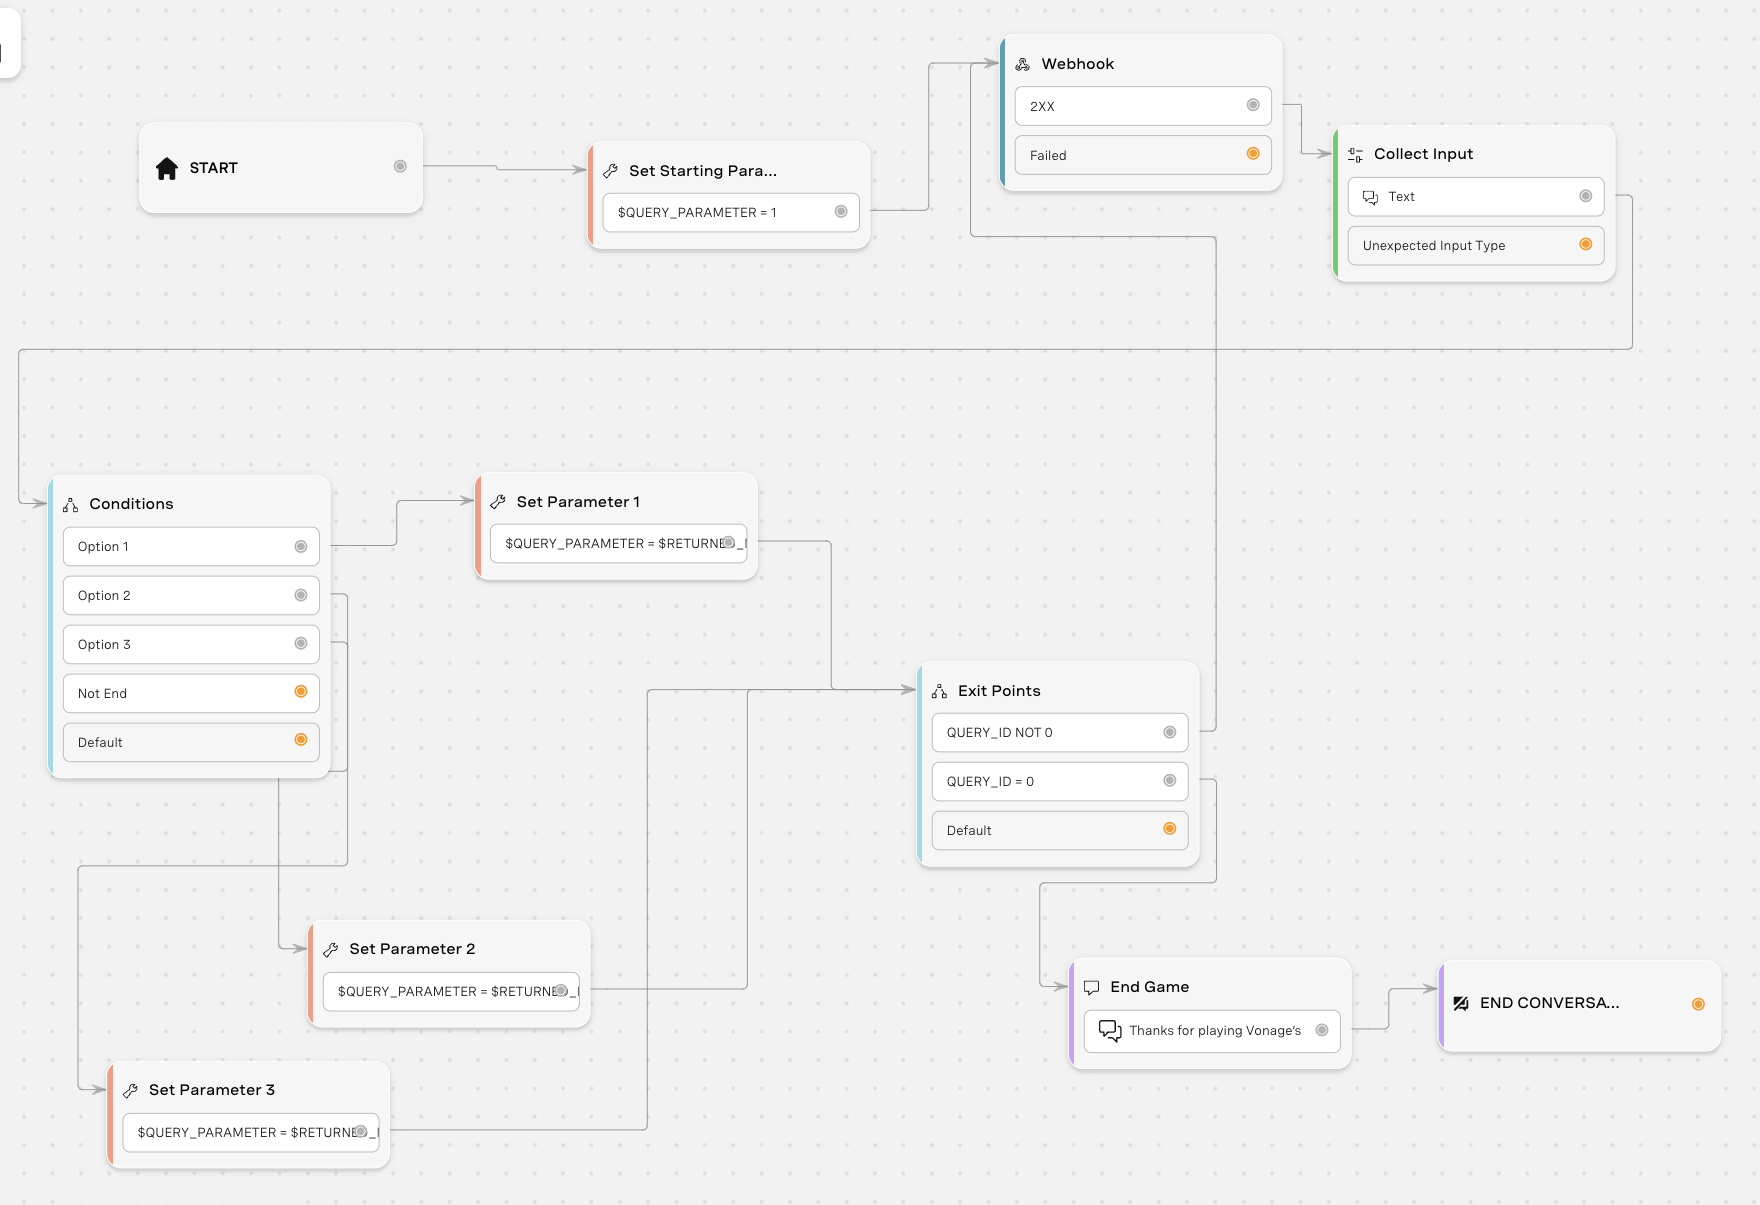
Voici maintenant la partie amusante ! Grâce à l'interface conviviale de Vonage AI Studio, vous pouvez concevoir le flux conversationnel de votre chatbot. Il s'agit d'une configuration par glisser-déposer, ce qui signifie que vous n'avez pas besoin de compétences en codage pour commencer. Vous pouvez ajouter différents nœuds de dialogue et définir des réponses.
Notre flux devrait ressembler à ceci :
 Conversation Flow
Premièrement, installez AI Studio de Vonage.
Ensuite, nous allons créer des nœuds et des propriétés à connecter les uns aux autres pour le flux de conversation. Vous pouvez également télécharger le fichier zip de cet exemple et importer l'agent sur Vonage AI Studio. Si vous souhaitez créer cet exemple à partir de zéro, voici les nœuds que nous devrons créer et les nœuds et propriétés auxquels nous devrons les connecter :
Propriétés > Paramètres
Nom de la propriété : Set Start Parameter
Créez un paramètre appelé QUERY_PARAMETER et fixez-le à 1 puisque notre premier ID commence à 1.
Connexion(s) : START (gauche) et $QUERY_PARAMATER = 1 vers Webhook
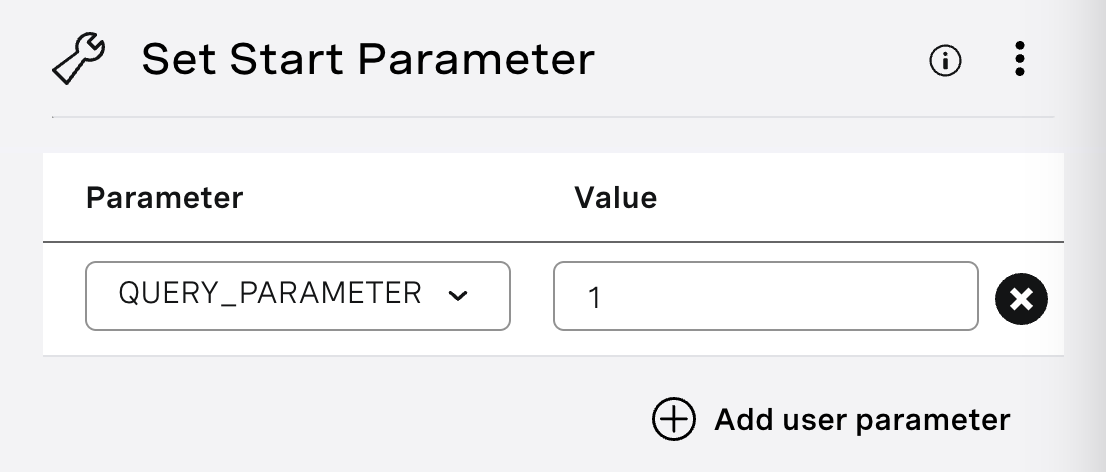 Set Start Parameter
NODES > Intégrations > Webhook
Nom du nœud : Webhook
Méthode : POST URL de la requête : https://api.notion.com/v1/databases/<databaseid>/query
Pour trouver l'ID d'une base de donnéesPour trouver l'ID d'une base de données, naviguez jusqu'à l'URL de la base de données dans votre espace de travail Notion. L'ID est la chaîne de caractères de l'URL qui se trouve entre la barre oblique qui suit le nom de l'espace de travail (le cas échéant) et le point d'interrogation. L'ID est une chaîne alphanumérique de 32 caractères.
En-têtes (En-tête HTTP : Valeur)
Autorisation : Bearer $NOTION_ACCESS_TOKEN
Notion-Version : 2022-06-28
Pour trouver votre $NOTION_ACCESS_TOKEN, passez par le processus d'autorisation pour une demande d'autorisation interne interne sur Notion.
Corps
Placez le texte suivant dans le corps du texte :
{
 "filter": {
  "property": "ID",
  "unique_id": {
   "equals": $QUERY_PARAMETER
  }
 }
}Cartographie des réponses
Type de réponse : JSON Chemin d'accès à l'objet
Après avoir rempli les informations ci-dessus dans notre nœud webhook, assurez-vous que le webhook fonctionne en cliquant sur le bouton "Test request" en haut à droite. Sous Response, vous verrez qu'il renvoie toutes les données de notre table Notion. À l'aide de la réponse, définissez le chemin d'accès à l'objet et associez-le à un paramètre. Si vous avez besoin d'aide, consultez mon blog qui [approfondit le mappage des réponses] (LIEN VERS MON BLOG).
Connexion(s) : 2xx pour collecter les entrées
![The image displays a section of a user interface titled "Response Mapping" for a software application, likely related to API or database interaction. It shows a configuration setup for handling JSON responses, with mappings from object paths in the JSON structure to named parameters. For example, "results[0].properties.Message.title[0].plain_text" is mapped to the parameter "$RETURNED_MESSAGE," and similar mappings are made for "Option1," "Option2," "Option3," "NextID1," "NextID2," and "NextID3," each pointing to their respective returned parameters. This setup is used to extract specific pieces of data from a JSON response and assign them to variables within the application The image shows a graphical user interface for mapping JSON response data to specific parameters within a software application. It lists various JSON object paths such as "results[0].properties.Message.title[0].plain_text" and corresponding parameters like "$RETURNED_MESSAGE". The mapping is designed to translate the structured JSON data into variables that the application can use in its operations.](https://s3.amazonaws.com/a.storyblok.com/f/270183/203701/1dc90d45ac/response-mapping.png) Response Mapping
Response Mapping
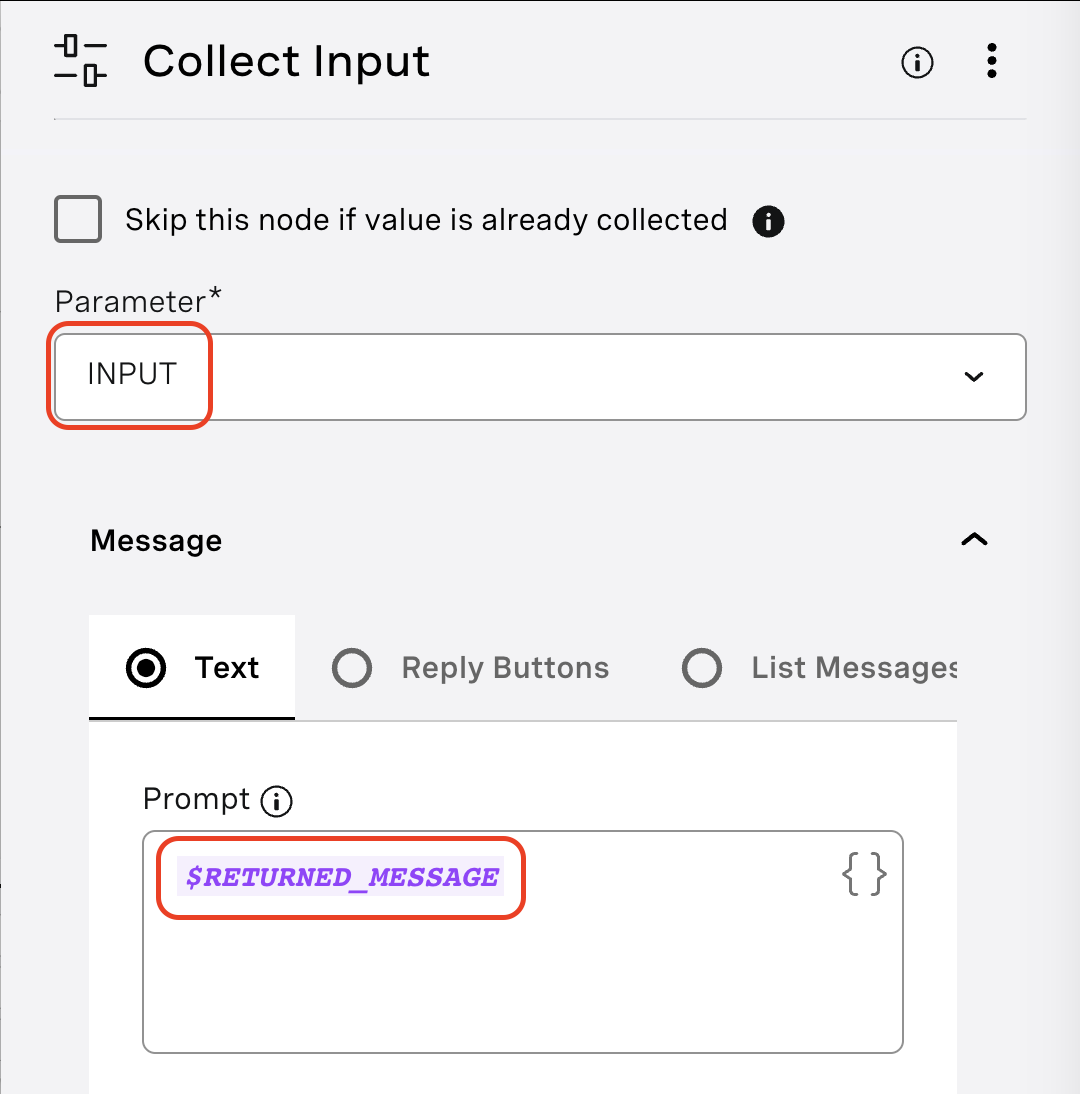
NODES > Conversation > Collecte des données
Nom du nœud : Collect Input
Paramètre : INPUT
Invite de texte : $RETURNED_MESSAGE (vous devez taper ce texte au lieu de le copier-coller)
Entrée attendue : Texte
Connexion(s) : Texte aux conditions
 Collect Input
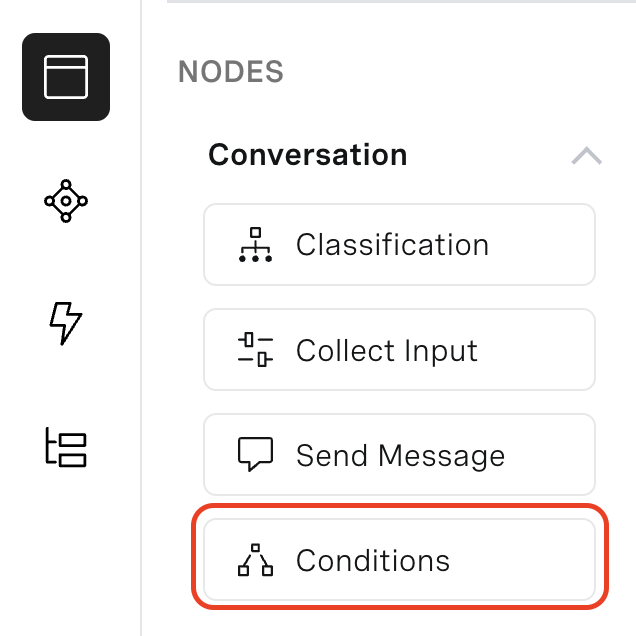
Nœuds > Conversation > Conditions
Nom du nœud : Conditions
Nom(s) de la condition :
Option 1
* Parameter: INPUT * Operation: Is equal to * Value: $RETURNED_OPTION1CopieOption 2
* Parameter: INPUT * Operation: Is equal to * Value: $RETURNED_OPTION2CopieOption 3
* Parameter: INPUT * Operation: Is equal to * Value: $RETURNED_OPTION3CopiePas de fin
* Parameter: RETURNED_ID
* Operation: Is equal to
* Value: 9

	_or_

* Parameter: RETURNED_ID
* Operation: Is not equal to
* Value: 11

	_or_

* Parameter: RETURNED_ID
* Operation: Is not equal to
* Value: 12

	_or_

* Parameter: RETURNED_ID
* Operation: Is not equal to
* Value: 15

	_or_

* Parameter: RETURNED_ID
* Operation: Is not equal to
* Value: 16

	_or_

* Parameter: RETURNED_ID
* Operation: Is not equal to
* Value: 18

	_or_

* Parameter: RETURNED_ID
* Operation: Is not equal to
* Value: 19
Copie
Connexion(s) :
- Option 1 pour régler le paramètre 1
- Option 2 pour régler le paramètre 2
- Option 3 pour régler le paramètre 3
 Conditions
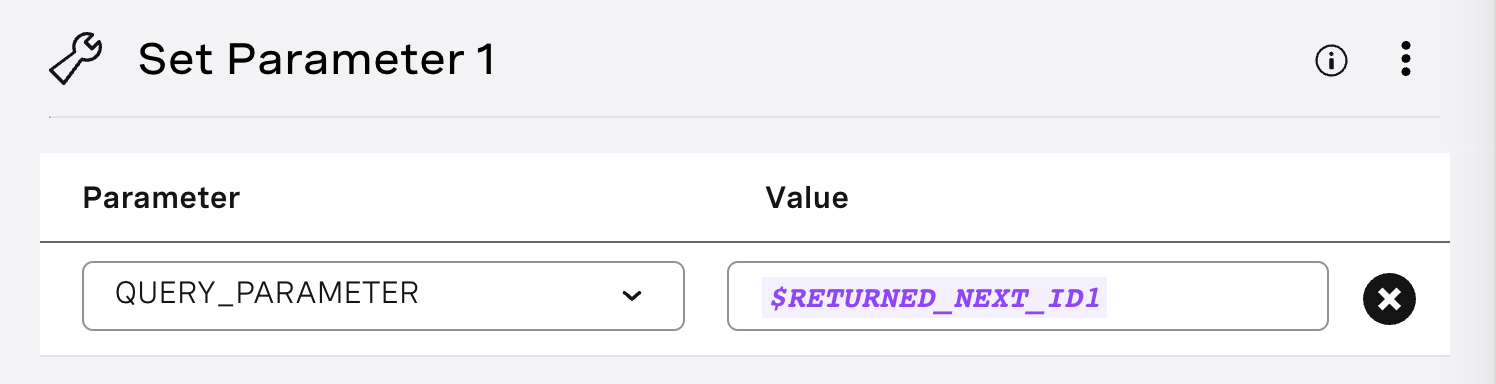
Propriétés > Paramètres
Nom de la propriété : Set Parameter 1
Paramètre : QUERY_PARAMETER
Valeur : $RETURNED_NEXT_ID1
Connexion(s) : $QUERY_PARAMETER aux points de sortie
En fonction de l'option choisie par le joueur, cette propriété pointera vers l'ID du prochain message que le joueur devrait recevoir après avoir envoyé le message "1".
 Set Parameter 1
Propriétés > Paramètres
Nom de la propriété : Set Parameter 2
Paramètre : QUERY_PARAMETER
Valeur : $RETURNED_NEXT_ID2
Connexion(s) : $QUERY_PARAMTER aux points de sortie
En fonction de l'option choisie par le joueur, cette propriété pointera vers l'ID du prochain message que le joueur devrait recevoir après avoir envoyé le message "2".
Propriétés > Paramètres
Nom de la propriété : Set Parameter 3
Paramètre : QUERY_PARAMETER
Valeur : $RETURNED_NEXT_ID3
Connexion(s) : $QUERY_PARAMTER aux points de sortie
En fonction de l'option choisie par le joueur, cette propriété pointera vers l'ID du prochain message que le joueur devrait recevoir après avoir envoyé le message "3".
Nœuds > Conversation > Conditions
Nom du nœud : Points de sortie
Nom(s) de la condition :
QUERY_ID NOT 0
*Parameter: QUERY_PARAMETER* Operation: Is not equal to *Value: 0* Connection(s): $QUERY_ID NOT 0 to WebhookCopieQUERY_ID = 0
*Parameter: QUERY_PARAMETER*
	 Operation: Is equal to
	 *Value: 0*
	 Connection(s): $QUERY_ID = 0 to End Game
Copie
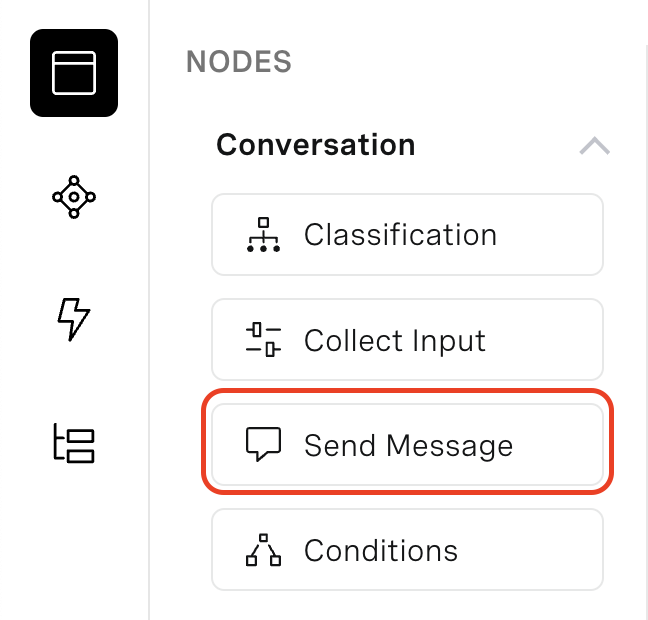
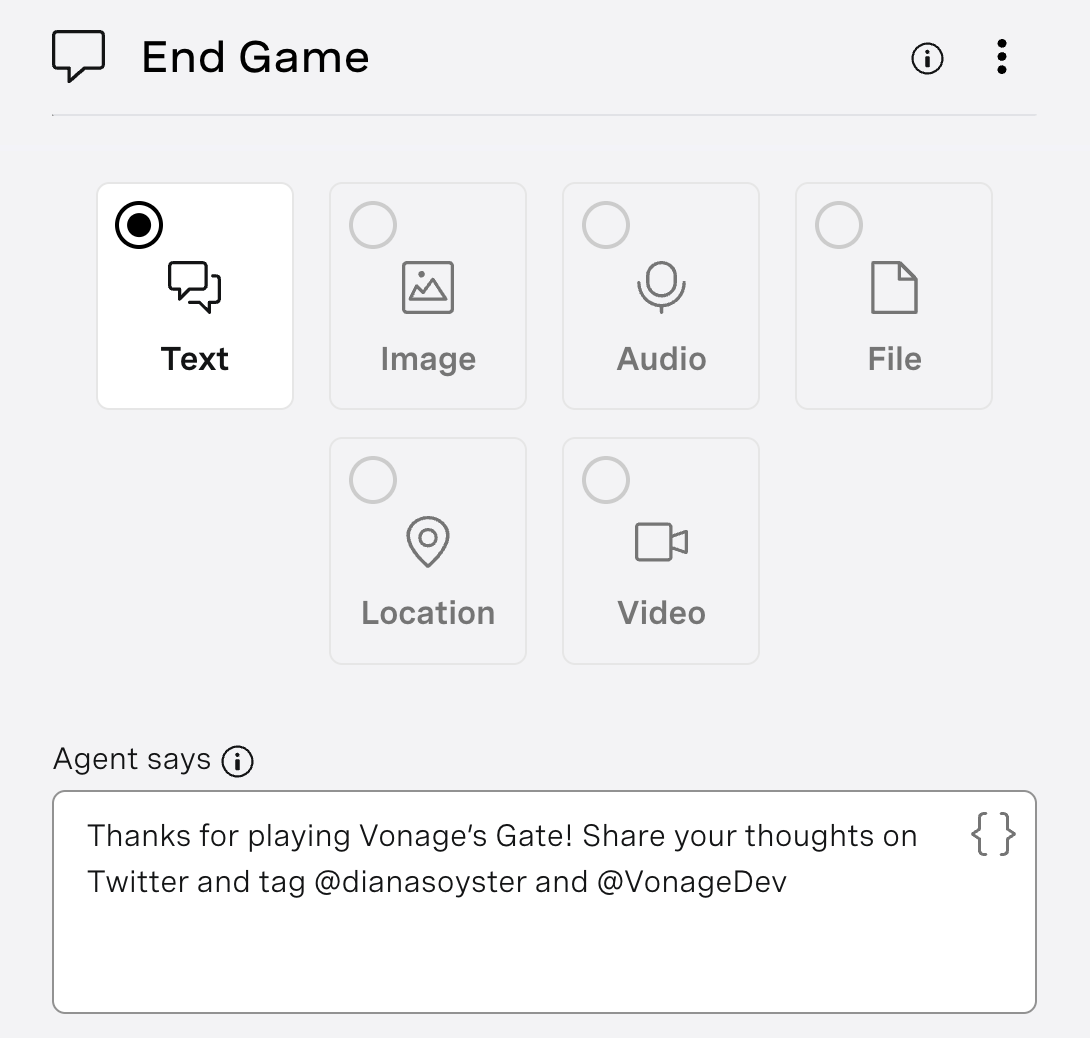
Nœuds > Conversation > Envoyer un message
Nom du nœud : End Game
Texte : Merci d'avoir joué à Vonage's Gate ! Partagez vos impressions sur Twitter et identifiez @dianasoyster et @VonageDev.
Connexion(s) : Merci d'avoir joué jusqu'à FIN DE LA CONVERSATION
 Send Message
Ce nœud est envoyé après que le joueur a atteint la fin de son aventure. Cela signifie que toutes les valeurs du tableau sont à 0 et qu'ils envoient "1" pour continuer comme demandé.
 End Game
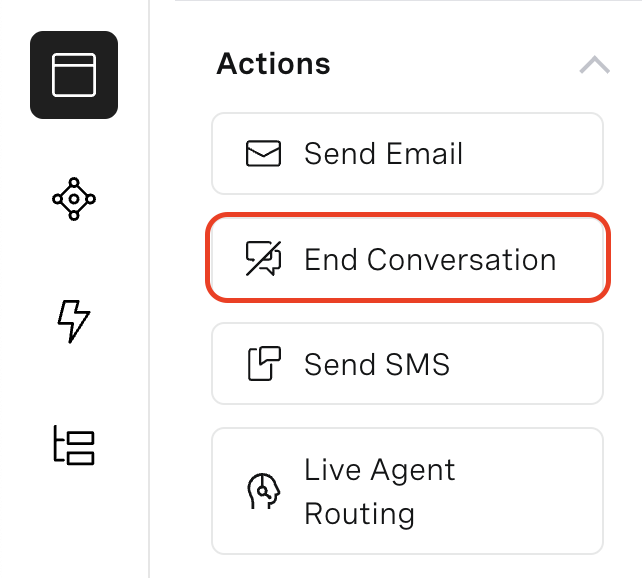
Nœuds > Actions > Fin de la conversation
Nom du nœud : Fin de la conversation
 End Conversation
Techniquement, vous n'avez pas besoin de ce nœud, mais pour des raisons de bonne pratique, nous devons l'inclure.
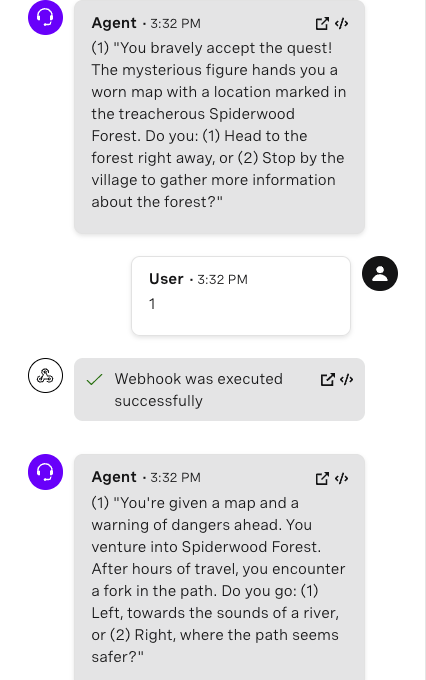
Dans le coin supérieur droit de Vonage AI Studio, il y a un bouton noir Tester. Cliquez dessus pour jouer.
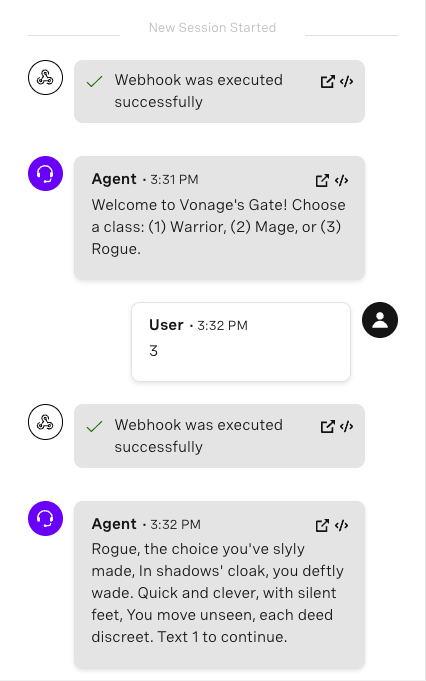 Testing the Agent in AI Studio - Part 1
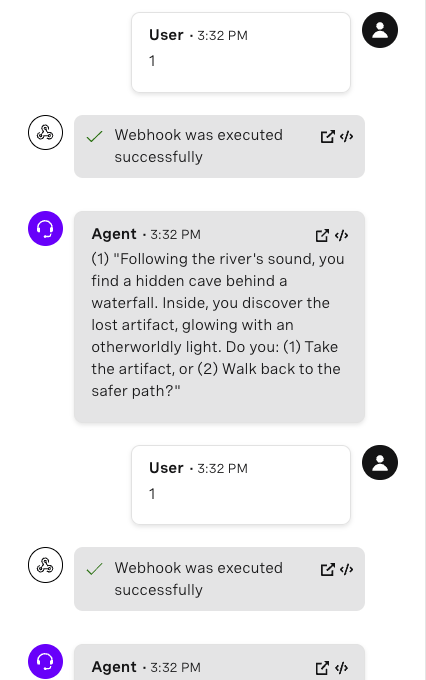
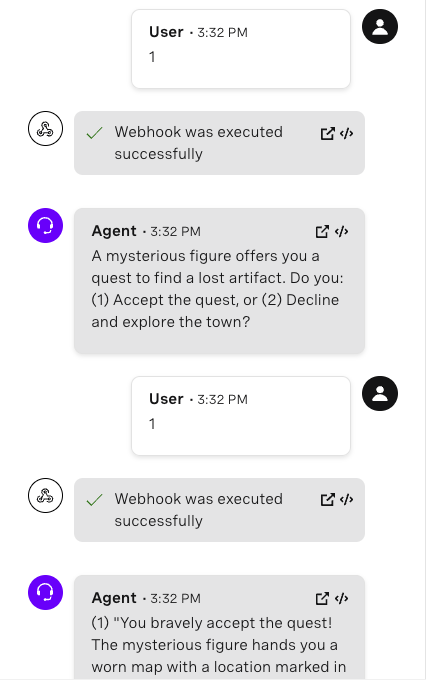 Testing the Agent in AI Studio - Part 2
 Testing the Agent in AI Studio - Part 3
 Testing the Agent in AI Studio - Part 4
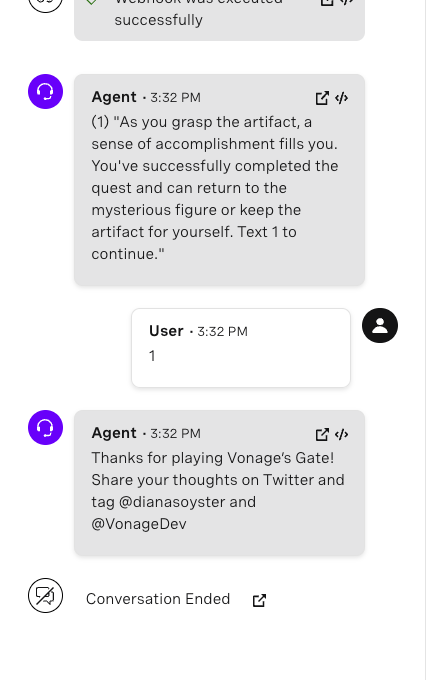 Testing the Agent in AI Studio - Part 5
Comme le dit Baldur's Gate 3, "On ne peut pas faire de compromis avec le mal. Dans ce tutoriel, nous avons appris à utiliser les meilleures pratiques pour le stockage des données afin que vous n'ayez pas à faire face à une dette technologique "diabolique" au cas où vous auriez besoin d'apporter des changements à vos textes à l'avenir. Nous avons également appris à intégrer une base de données à Vonage AI Studio et à l'API Messages. Si vous souhaitez obtenir les données de cet exemple, n'hésitez pas à rejoindre notre " classe " de développeurs sur Slack et suivez-nous sur Xanciennement connu sous le nom de Twitter. Si vous créez une application similaire, n'hésitez pas à la partager et à taguez-moi - J'aimerais entendre parler de votre aventure !