
Compartir:
Benjamin Aronov es desarrollador de Vonage. Es un constructor de comunidades con experiencia en Ruby on Rails. Benjamin disfruta de las playas de Tel Aviv, a la que llama hogar. Su base en Tel Aviv le permite conocer y aprender de algunos de los mejores fundadores de startups del mundo. Fuera de la tecnología, a Benjamin le encanta viajar por el mundo en busca del perfecto pain au chocolat.
How to Send SMS Messages with Ruby on Rails
Tiempo de lectura: 6 minutos
Despite the rise of messaging apps like WhatsApp and Facebook Messenger, SMS remains essential. It works on any mobile device without extra software, boasts higher engagement for time-sensitive messages, and is the most reliable option since it doesn’t require an internet connection.
This tutorial demonstrates how to send SMS messages in a Ruby on Rails application using Vonage. This is the first post as part of the Vonage Ruby on Rails Quick Start series, getting you started with the core functionality of the Vonage API suite in your Ruby on Rails application.
TL;DR Skip ahead and find all the Quickstart code on GitHub
Note this tutorial series uses the Messages API which easily integrates omnichannel support. Vonage also offers the SMS API.
 A demonstration of the Vonage Rails Quickstart application sending an SMS message in real time.
Ruby and Rails installed on your machine. For any questions about Rails conventions, the documentation is quite thorough.
A Vonage Virtual Number.
Para comprar un número de teléfono virtual, vaya a su panel API y siga los pasos que se indican a continuación.
 Purchase a phone number
Vaya a su Panel API
Vaya a CONSTRUIR Y GESTIONAR > Numbers > Comprar Numbers.
Elija los atributos necesarios y haga clic en Buscar
Pulse el botón Comprar junto al número que desee y valide su compra
Para confirmar que ha adquirido el número virtual, vaya al menú de navegación de la izquierda, en CONSTRUIR Y GESTIONAR, haga clic en Numbers y, a continuación, en Sus Numbers.
This tutorial will assume you have a basic understanding of Ruby and Rails, sticking to the commands required without too much deeper explanation.
First, we’ll create our new project.
rails new vonage-rails-quickstartNext, move into the project and add the Vonage gem to your Gemfile so we can access the Vonage SDK. We’ll also add dotenv-rails so we can use environment variables safely.
#Gemfile
gem 'vonage'
gem 'dotenv-rails', groups: [:development, :test]Then run the bundler to install our gems.
bundle installNow, we’ll need to create our SmsMessage model, which defines its attributes and how they are stored in the database. We’ll need 6 fields:
to: the recipient of the SMS.
from: the sender of the SMS.
text: the content of the message.
status: whether an SMS has successfully been delivered or not. See more information in the API Reference.
message_uuid: the Vonage ID associated with the message, which will be important for tracking the status of messages.
is_inbound: whether the message is sent or received by our application; this will be important in the following blog post.
rails g model SmsMessage to:string from:string text:text status:string message_uuid:string is_inbound:boolean
We’ll also need to update our database with the new model.
rails db:migrateLet’s create our controller to handle our logic.
rails g controller OutboundSms new createLastly, let’s define our routes for outbound SMS.
# config/routes.rb

Rails.application.routes.draw do
 # For OutboundSms controller, new & create
  get  '/outbound_sms/new', to: 'outbound_sms#new',    as: :new_outbound_sms
  post '/outbound_sms',     to: 'outbound_sms#create', as: :outbound_sms
end
Now that our Rails App is ready, we’ll also need to create and set up our Vonage Application. First, we need to create our app in the Vonage Dashboard. Give the app a name and turn on the Messages capability. You can add placeholder URLs for the webhooks for now. We will update these in further blog posts.
 The Vonage Developer dashboard showing the creation of a new application with authentication, privacy, and messaging capabilities settings.
Make sure to generate a private.key, click ‘Generate public and private key’. This will download a private.key file to your computer. Then move the private.key file to the root of your rails application.
When your application is created, take note of the application ID. You’ll need the application ID, your API Key, and your API Secret in the next step.
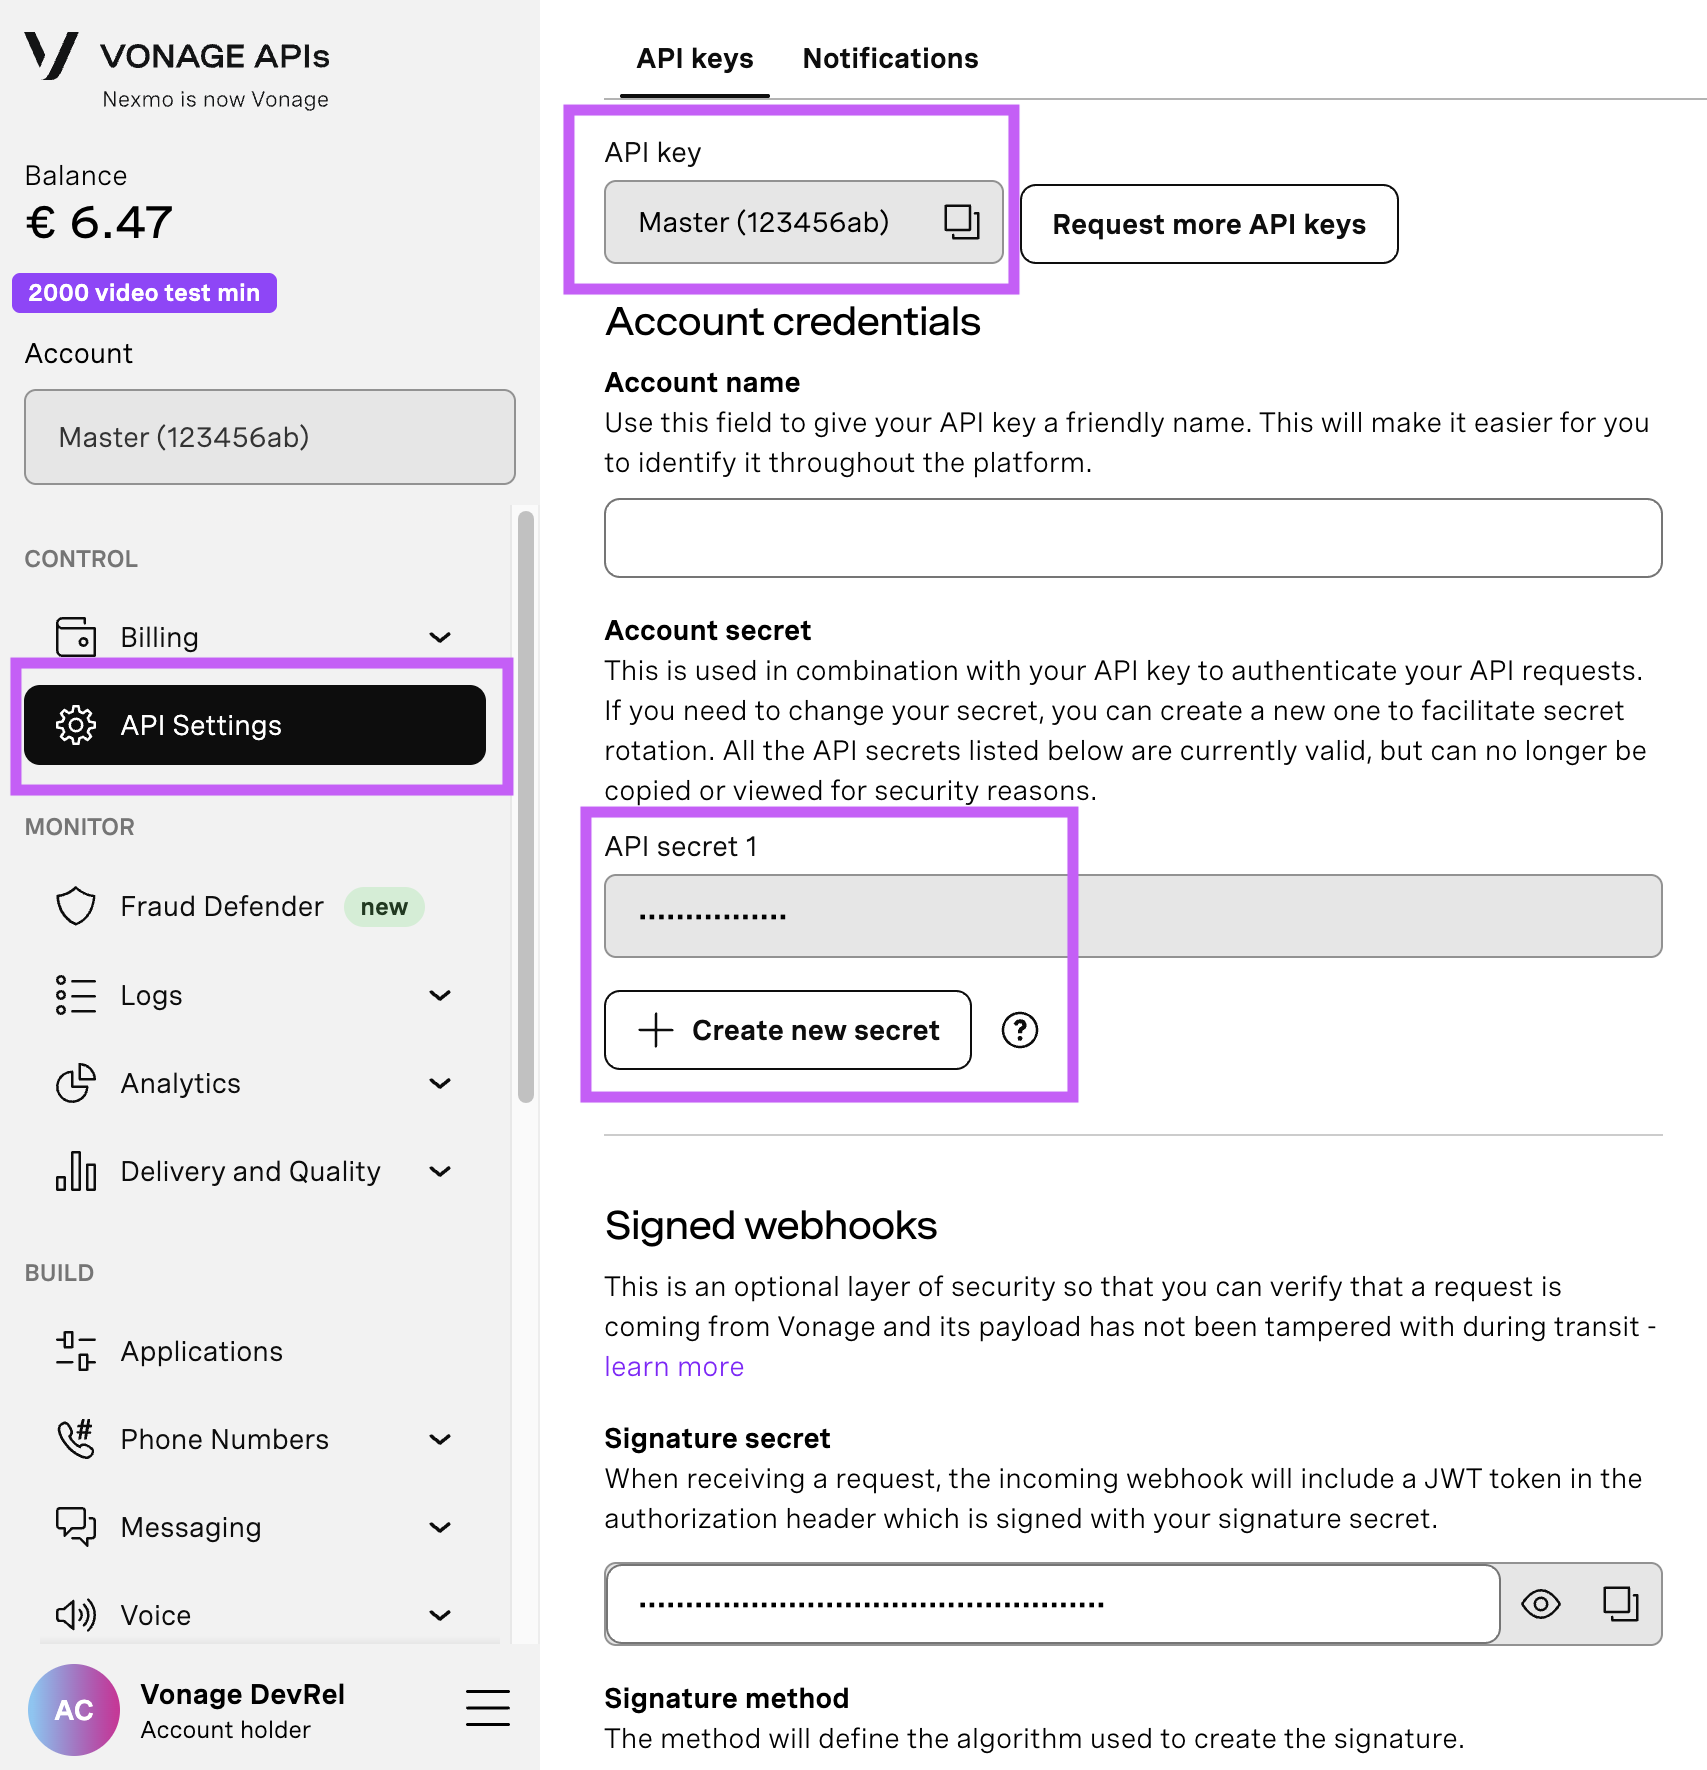
Abra su Página de configuración de API para acceder a tu clave y secreto de API de Vonage, que aparecen como se muestra en la captura de pantalla a continuación. La clave de API se encuentra en la parte superior de la página, y para acceder a tu secreto de API, consulta la subsección "Secreto de Account".
Nota: En caso de que no recuerde su secreto de API creado anteriormente, haga clic en "+ Crear nuevo secreto" y guárdelo de forma segura.
Create an .env file in the root of your Rails application:
touch .envLastly, add the following keys with your credentials.
#.env

VONAGE_APPLICATION_ID=''
VONAGE_PRIVATE_KEY='./private.key'
The REST API client allows us easy access to 15 Vonage APIs, not just the Messages API. You can learn more about the supported APIs.
Before enabling the Ruby client in a full Rails application, let’s see how we could use it more generally in Ruby code. To use the client, we’ll just need to initialize an instance with our application information stored in our environment file.
 vonage = Vonage::Client.new(
 	application_id: ENV["VONAGE_APPLICATION_ID"],
private_key: ENV["VONAGE_PRIVATE_KEY"]
)
Now that our client is initialized, sending an SMS becomes quite simple. We call the messaging method to tell the client to use the Messages API and then call send with the required fields.
# app/controllers/outbound_sms_controller.rb
response = vonage.messaging.send(
   "message_type": "text",
   "text": "Hello from Vonage!",
   "to": "447700900000",
   "from": "447700900001",
   "channel": "sms"
)
You can see all the options for different channels and fields in the API Reference.
Now that we’ve covered how to use the Vonage Ruby client to send SMS, let’s integrate a Ruby on Rails send SMS functionality into our app with a simple form and controller. We’ll need a nice UI to handle the to, from, and text fields. You can copy and add the form to your /app/views/outbound_sms/new.html.erb view and associated CSS.
 A Vonage-powered SMS form where users can input a sender's phone number or name, the recipient's phone number, and a message before sending an SMS.
Note: Not every country accepts a name as a valid ‘to’ field
Now, let’s implement the logic to make our form work. First, we’ll need to create an empty SMS instance to load the form. Then we call the create method which saves the SMS to our database and then sends it via the deliver method.
#app/controllers/outbound_sms_controller.rb

 def new
    @sms_message = SmsMessage.new
 end

  def create
    # Create a SMS record to be stored in the database
    @sms_message = SmsMessage.new(safe_params)

    if @sms_message.save
      deliver @sms_message
      redirect_to :new_outbound_sms, notice: 'SMS Sent'
    else
      flash[:alert] = 'Something went wrong'
      render :new
    end
  end

  private

 def safe_params
    params.require(:sms_message).permit(:to, :from, :text)
endThe deliver method is largely the same as what we used in the previous section, except now using the Messages message object and handling the API response.
If the message is sent successfully, it returns a 202 status code along with a message UUID. This UUID helps track delivery status using the Message Status, which we’ll cover in the next post.
 def deliver(sms_message)
    message = vonage.messaging.sms(message: sms_message.text)

    response = vonage.messaging.send(
      from: sms_message.from,
      to: sms_message.to,
      **message
    )

    if response.http_response.code == '202'
      sms_message.update(
        message_uuid: response.entity.attributes[:message_uuid]
      )
    end
end> See the full outbound_sms_controller.rb file.
Now start your rails server:
rails s
And open http://localhost:3000/outbound_sms/new in your browser. You can start sending SMS via your Ruby on Rails app!
You did it! You learned how to build a Vonage application, initialize and use the Vonage Ruby client, and successfully send SMS from a Ruby on Rails application. In future posts, we'll add more SMS and Voice features to this application.
If you have any questions or suggestions for more Ruby content, send us a message over on the Community Slack. You can also stay in the loop on our developer content and events on X, formerly known as Twitter.
Compartir:
Benjamin Aronov es desarrollador de Vonage. Es un constructor de comunidades con experiencia en Ruby on Rails. Benjamin disfruta de las playas de Tel Aviv, a la que llama hogar. Su base en Tel Aviv le permite conocer y aprender de algunos de los mejores fundadores de startups del mundo. Fuera de la tecnología, a Benjamin le encanta viajar por el mundo en busca del perfecto pain au chocolat.