Compartir:
Diana es desarrolladora de Vonage. Le gusta comer ostras frescas.
Cómo crear un juego de rol con Vonage AI Studio y Notion
Tiempo de lectura: 7 minutos
Cuando era más joven, pasaba parte de mi tiempo jugando a videojuegos que me regalaban, auténticas joyas por derecho propio, pero con los que pasaba demasiado tiempo, a menudo ganándome alguna que otra reprimenda. Disfrutaba con una gran variedad de juegos, desde simulaciones sociales y juegos de plataformas hasta shooters en primera persona y mis favoritos, los juegos de rol (RPG). Sin que yo lo supiera, cada hora que pasaba en esos mundos de fantasía perfeccionaba sutilmente mi creatividad y mi capacidad para resolver problemas. En poco tiempo, esas mismas aventuras de juego sentaron las bases de este blog.
El año pasado, Larian Studios publicó Baldur's Gate 3un RPG basado en el juego de mesa Dungeon & Dragons. Piensa en un RPG como si te sumergieras en un libro en el que, en lugar de leer la historia, te conviertes en el protagonista. Navegarás a través de aventuras, tomarás decisiones, interactuarás con otros personajes y darás forma al desenlace de la historia en función de tus elecciones. Es una oportunidad de experimentar una narrativa de forma práctica, en la que el mundo reacciona a lo que tú decides.
Yo mismo jugué y quedé impresionado por lo única y atractiva que era la experiencia de cada jugador, ya que seguía el estilo de "elige tu propia aventura". Entonces me sentí obligado a recrear una versión más sencilla de un juego de rol utilizando Vonage AI Studio y Messages API - ¡La puerta de Vonage!
Así es como crearemos una experiencia narrativa en la que los jugadores decidirán el destino de sus personajes. Ahora, canaliza la energía de tu personaje principal, ¡y pongámonos a construir!
¡Como práctica recomendada, almacenaremos todos los valores utilizados en el juego en una base de datos; para este ejemplo, utilizaremos Notion!
Es una opción fácil de usar, no requiere conocimientos avanzados de bases de datos y es muy práctica porque los cambios aparecen al instante, lo que es perfecto para mantener nuestro contenido fresco y receptivo. Aunque es menos escalable que las bases de datos tradicionales, puede manejar todo lo que necesitamos para esta aplicación. Lo mejor es que se integra fácilmente con Vonage AI Studio y otras plataformas de código bajo, ¡lo que nos facilita mucho la vida!
Cree su hoja de cálculo
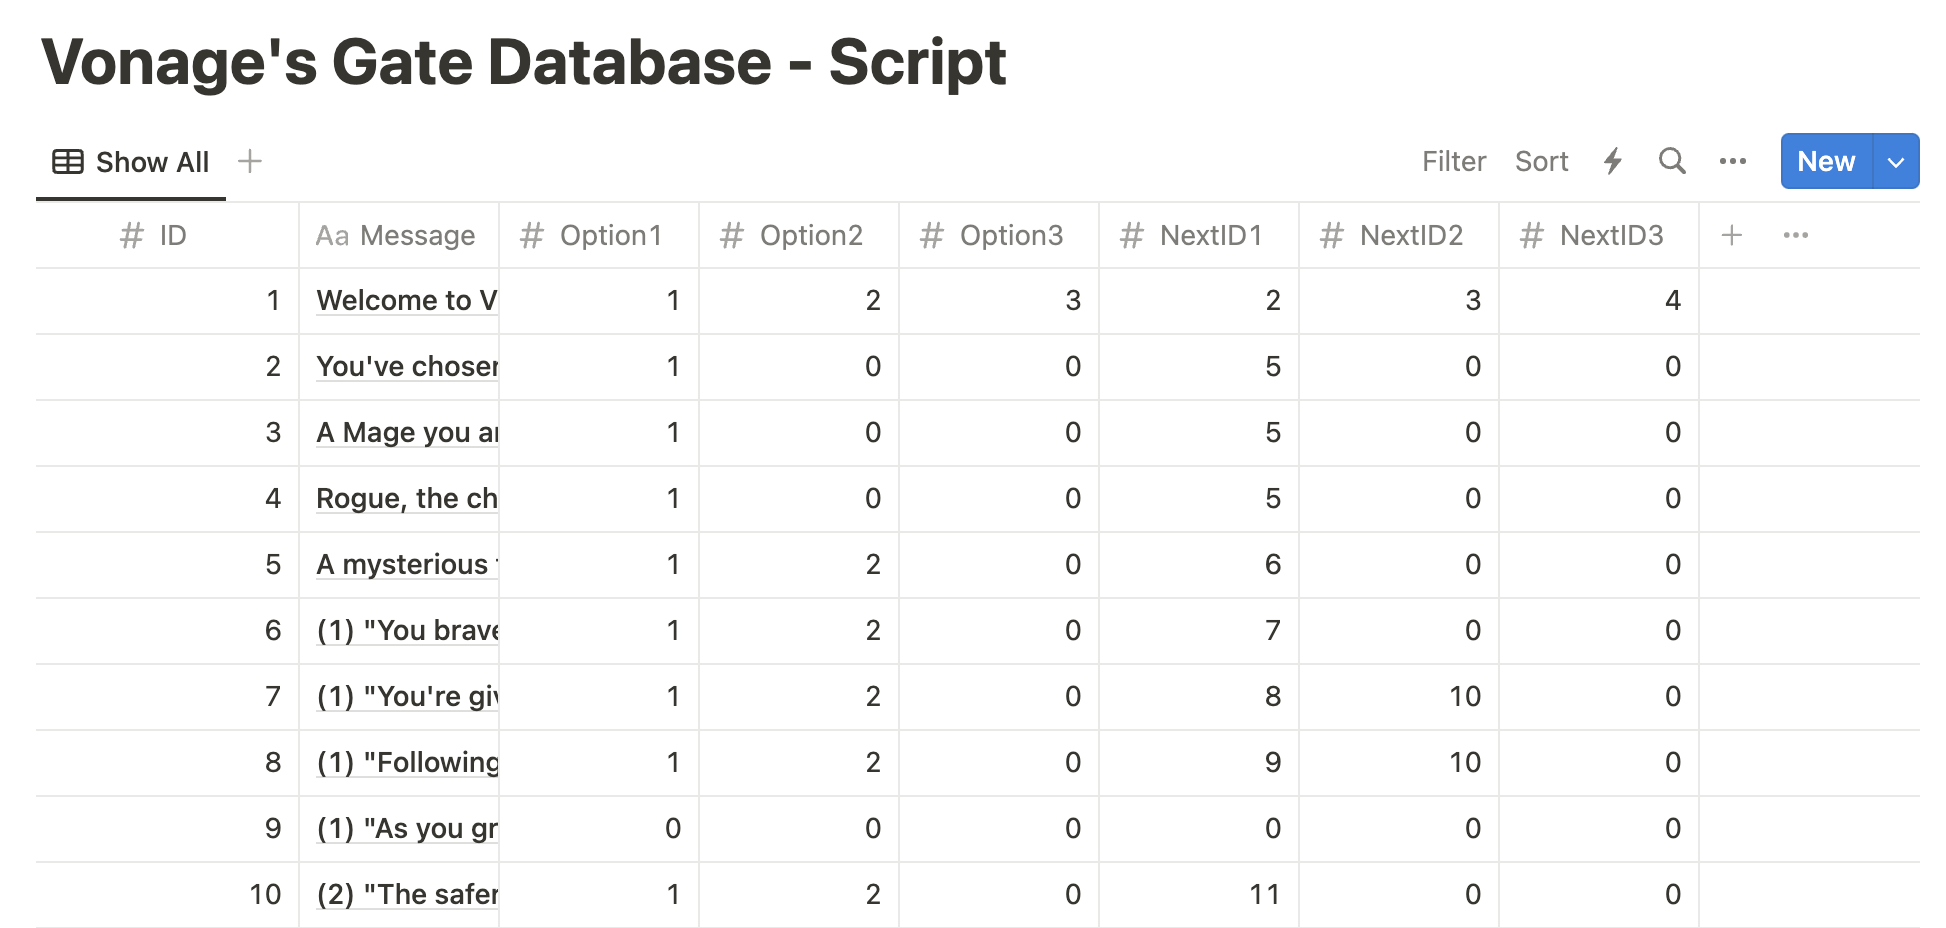
Ir a Noción. Haga clic en el botón (+) para añadir una página. En la nueva página, en BASE DE DATOS, haga clic en "Tabla". Cree las siguientes columnas:
ID (tipo: número) - el ID del mensaje se envía por MMS
Mensaje (tipo: título) - el texto real enviado
Opción1 (tipo: número) - la respuesta que envía un jugador al elegir la opción 1
Opción2 (tipo: número) - la respuesta que envía un jugador al elegir la opción 2
Opción3 (tipo: número) - la respuesta que envía un jugador al elegir la opción 3
NextID1 (tipo: número) - el ID del siguiente mensaje que recibe el jugador después de elegir la opción 1
NextID2 (tipo: número) - el ID del siguiente mensaje que recibe el jugador tras elegir la opción 2.
NextID3 (tipo: número) - el ID del siguiente mensaje que recibe el jugador después de elegir la opción 3.
Puedes personalizar la historia como quieras. En mi historia, el jugador se queda con el artefacto. Los textos enviados al jugador se activan por sus respuestas al mensaje anterior.
Creación de personajes
Mensaje inicial: Envía una breve introducción y una elección sencilla para la creación del personaje.
En mi base de datos, puedes ver que el ID 1 muestra el mensaje inicial: "¡Bienvenido a Vonage's Gate! Elige una clase: (1) Guerrero, (2) Mago, o (3) Pícaro".
Confirmación del personaje: Una vez que respondan con una elección, envíe una confirmación con una breve descripción del personaje.
Progresión del juego
Inmediatamente después de la confirmación del personaje, presente el primer escenario sencillo que requiera una decisión. Cuando el jugador haga una elección, responda con un breve resultado y otro punto de decisión. Continúe con una serie de puntos de decisión sencillos que mantengan la historia en movimiento sin requerir interacciones complejas. En esta demostración, los jugadores responderán con mensajes de un solo carácter. Tras unas cuantas rondas de decisiones, podemos concluir la demo con un final sencillo.
 Database Setup
¡Ahora viene la parte divertida! Con la interfaz fácil de usar de Vonage AI Studio, puedes diseñar el flujo de conversación de tu chatbot. Es una configuración de arrastrar y soltar, lo que significa que no necesitas conocimientos de codificación para ponerte en marcha. Puedes agregar diferentes nodos de diálogo y definir respuestas.
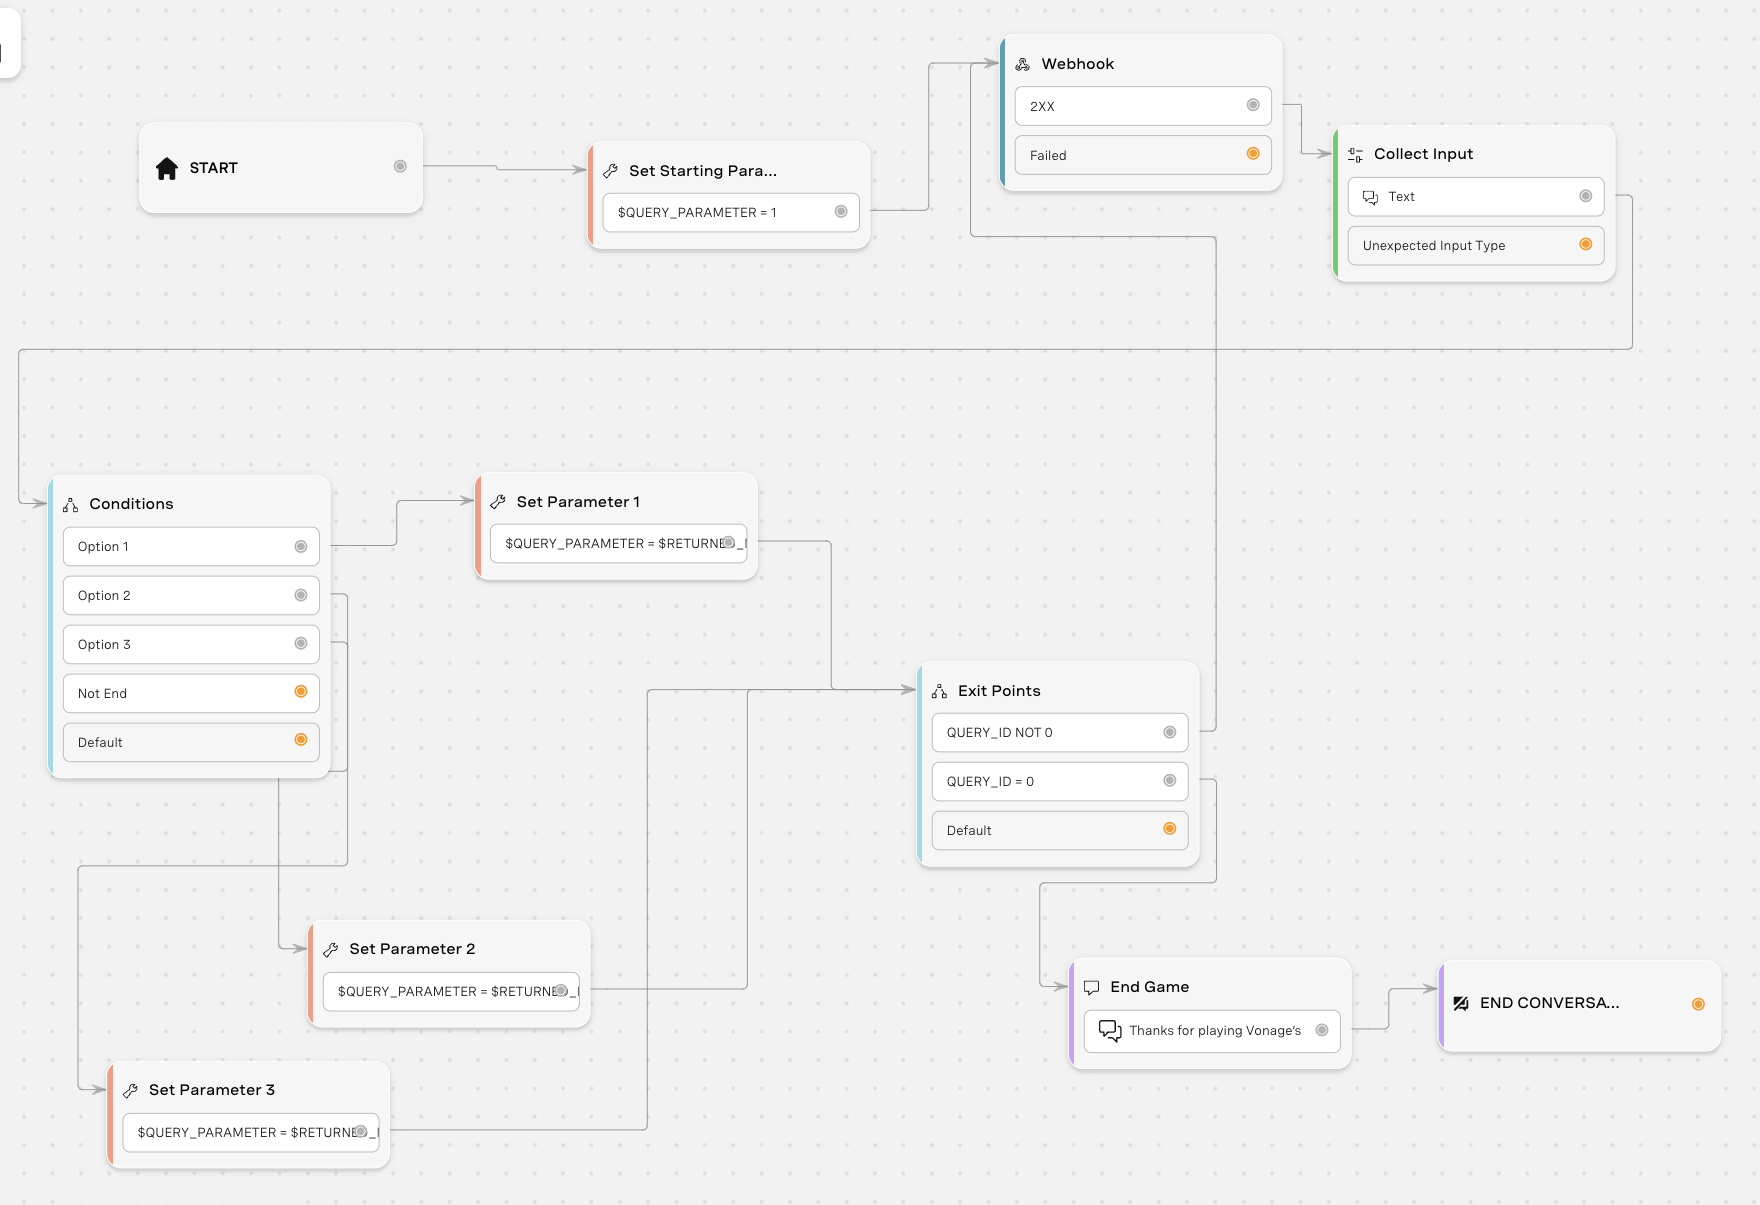
Nuestro flujo debería ser así:
 Conversation Flow
Primero, configura Vonage AI Studio.
A continuación, vamos a hacer nodos y propiedades para conectarse entre sí para el flujo de conversación. También puedes descargar el archivo zip de esta muestra e importar el agente en Vonage AI Studio. Si quieres construir esto desde cero, aquí están los nodos que necesitaremos crear y a qué nodos y propiedades necesitamos conectarlos:
Propiedades > Parámetros
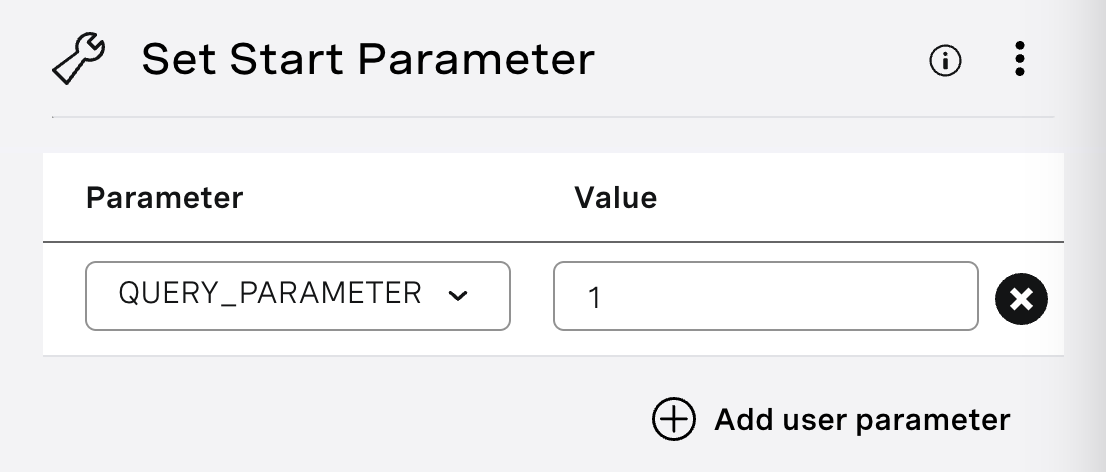
Nombre de la propiedad: Set Start Parameter
Crea un parámetro llamado QUERY_PARAMETER y ponlo a 1 ya que nuestro primer ID empieza en 1.
Conexión(es): START (izquierda) y $QUERY_PARAMATER = 1 a Webhook
 Set Start Parameter
NODOS > Integraciones > Webhook
Nombre de nodo: Webhook
Método: POST URL de solicitud: https://api.notion.com/v1/databases/<databaseid>/consulta
Para encontrar el ID de una base de datosNavegue hasta la URL de la base de datos en su espacio de trabajo Notion. El ID es la cadena de caracteres de la URL que se encuentra entre la barra oblicua que sigue al nombre del espacio de trabajo (si procede) y el signo de interrogación. El ID es una cadena alfanumérica de 32 caracteres.
Cabeceras (Cabecera HTTP : Valor)
Autorización : Portador $NOTION_ACCESS_TOKEN
Notion-Version : 2022-06-28
Para encontrar su $NOTION_ACCESS_TOKENpase por el proceso de autorización para un integración interna interna en Notion.
Cuerpo
Pon el siguiente texto en el cuerpo:
{
 "filter": {
  "property": "ID",
  "unique_id": {
   "equals": $QUERY_PARAMETER
  }
 }
}Mapa de respuestas
Tipo de respuesta: JSON Ruta del objeto
Después de rellenar la información anterior en nuestro nodo webhook, asegúrate de que el webhook está funcionando haciendo clic en el botón 'Test request' en la parte superior derecha. En Respuesta, verás que devuelve todos los datos de nuestra tabla Notion. Usando la respuesta, define la ruta del objeto y asígnala a un parámetro. Si necesitas ayuda, echa un vistazo a mi blog que [profundiza en el mapeo de respuestas](LINK A MI BLOG).
Conexión(es): 2xx para recoger entradas
![The image displays a section of a user interface titled "Response Mapping" for a software application, likely related to API or database interaction. It shows a configuration setup for handling JSON responses, with mappings from object paths in the JSON structure to named parameters. For example, "results[0].properties.Message.title[0].plain_text" is mapped to the parameter "$RETURNED_MESSAGE," and similar mappings are made for "Option1," "Option2," "Option3," "NextID1," "NextID2," and "NextID3," each pointing to their respective returned parameters. This setup is used to extract specific pieces of data from a JSON response and assign them to variables within the application The image shows a graphical user interface for mapping JSON response data to specific parameters within a software application. It lists various JSON object paths such as "results[0].properties.Message.title[0].plain_text" and corresponding parameters like "$RETURNED_MESSAGE". The mapping is designed to translate the structured JSON data into variables that the application can use in its operations.](https://s3.amazonaws.com/a.storyblok.com/f/270183/203701/1dc90d45ac/response-mapping.png) Response Mapping
Response Mapping
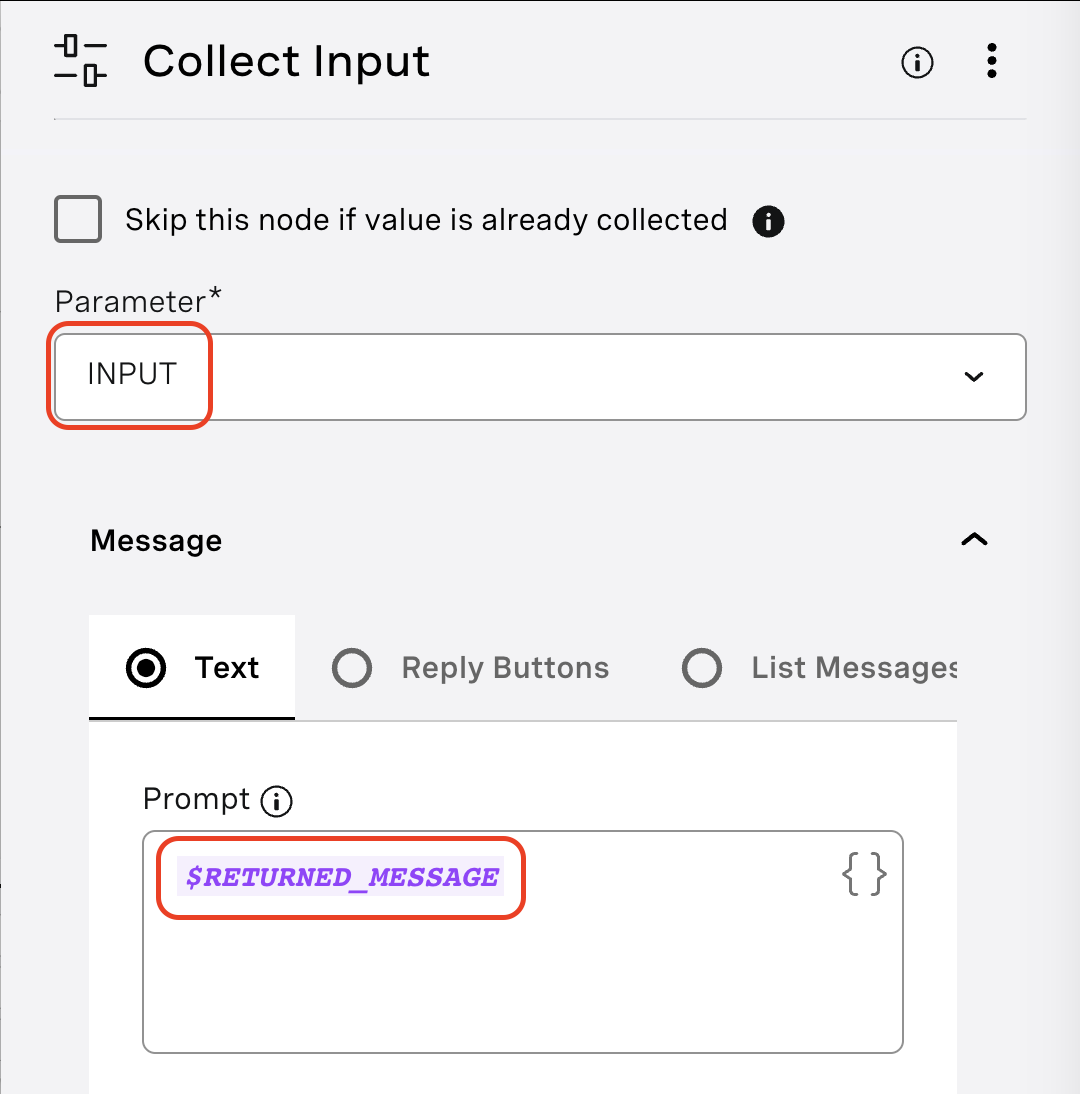
NODOS > Conversación > Recoger aportaciones
Nombre del nodo: Recoger entradas
Parámetros: ENTRADA
Mensaje de texto: $RETURNED_MESSAGE (deberá escribirlo en lugar de copiar y pegar este texto)
Entrada esperada: Texto
Conexión(es): Texto a condiciones
 Collect Input
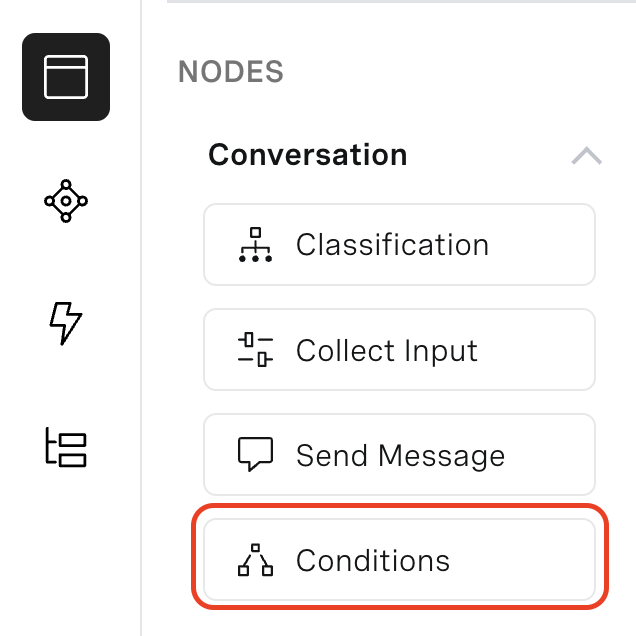
Nodos > Conversación > Condiciones
Nombre del nodo: Condiciones
Nombre(s) de la condición:
Opción 1
* Parameter: INPUT * Operation: Is equal to * Value: $RETURNED_OPTION1CopiaOpción 2
* Parameter: INPUT * Operation: Is equal to * Value: $RETURNED_OPTION2CopiaOpción 3
* Parameter: INPUT * Operation: Is equal to * Value: $RETURNED_OPTION3CopiaNo Fin
* Parameter: RETURNED_ID
* Operation: Is equal to
* Value: 9

	_or_

* Parameter: RETURNED_ID
* Operation: Is not equal to
* Value: 11

	_or_

* Parameter: RETURNED_ID
* Operation: Is not equal to
* Value: 12

	_or_

* Parameter: RETURNED_ID
* Operation: Is not equal to
* Value: 15

	_or_

* Parameter: RETURNED_ID
* Operation: Is not equal to
* Value: 16

	_or_

* Parameter: RETURNED_ID
* Operation: Is not equal to
* Value: 18

	_or_

* Parameter: RETURNED_ID
* Operation: Is not equal to
* Value: 19
Copia
Conexión(es):
- Opción 1 para ajustar el parámetro 1
- Opción 2 para ajustar el parámetro 2
- Opción 3 para ajustar el parámetro 3
 Conditions
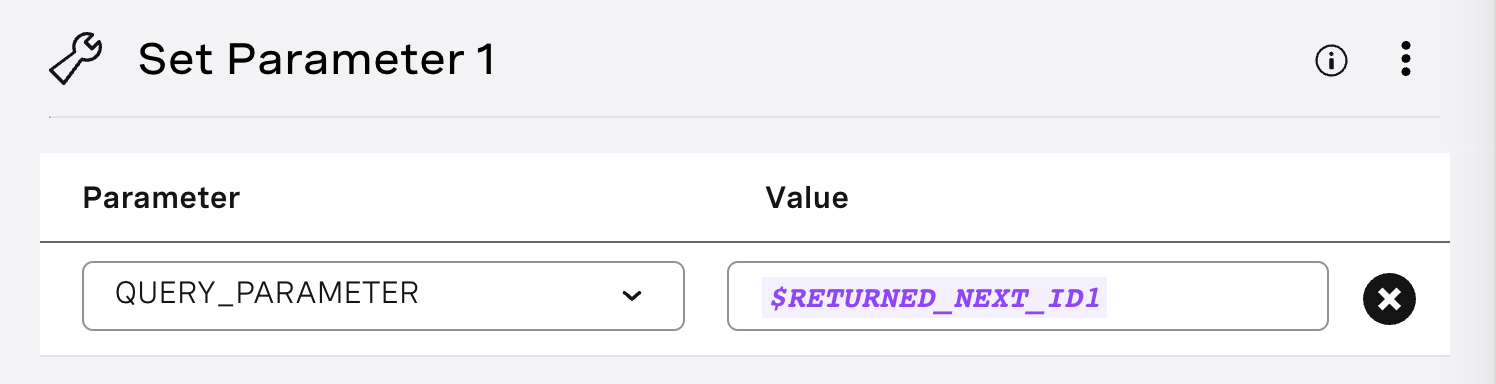
Propiedades > Parámetros
Nombre de la propiedad: Set Parameter 1
Parámetro: PARÁMETRO_CONSULTA
Valor: $RETURNED_NEXT_ID1
Conexión(es): $QUERY_PARAMETER a Puntos de Salida
Dependiendo de la opción que elija el jugador, esta propiedad apuntará al ID del siguiente mensaje que el jugador debería recibir después de enviar "1".
 Set Parameter 1
Propiedades > Parámetros
Nombre de la propiedad: Set Parameter 2
Parámetro: PARÁMETRO_CONSULTA
Valor: $RETURNED_NEXT_ID2
Conexión(es): $QUERY_PARAMTER a Puntos de Salida
Dependiendo de la opción que elija el jugador, esta propiedad apuntará al ID del siguiente mensaje que el jugador debería recibir después de enviar "2".
Propiedades > Parámetros
Nombre de la propiedad: Set Parameter 3
Parámetro: PARÁMETRO_CONSULTA
Valor: $RETURNED_NEXT_ID3
Conexión(es): $QUERY_PARAMTER a Puntos de Salida
Dependiendo de la opción que elija el jugador, esta propiedad apuntará al ID del siguiente mensaje que el jugador debería recibir después de enviar "3".
Nodos > Conversación > Condiciones
Nombre del nodo: Puntos de salida
Nombre(s) de la condición:
QUERY_ID NOT 0
*Parameter: QUERY_PARAMETER* Operation: Is not equal to *Value: 0* Connection(s): $QUERY_ID NOT 0 to WebhookCopiaQUERY_ID = 0
*Parameter: QUERY_PARAMETER*
	 Operation: Is equal to
	 *Value: 0*
	 Connection(s): $QUERY_ID = 0 to End Game
Copia
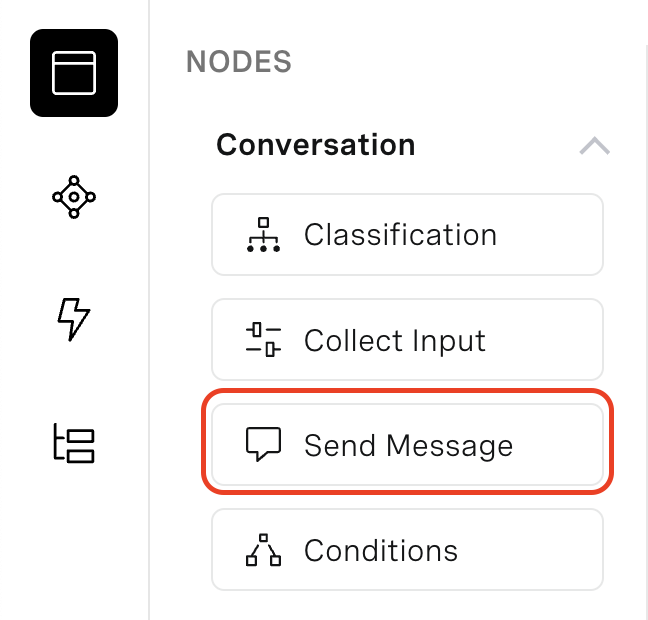
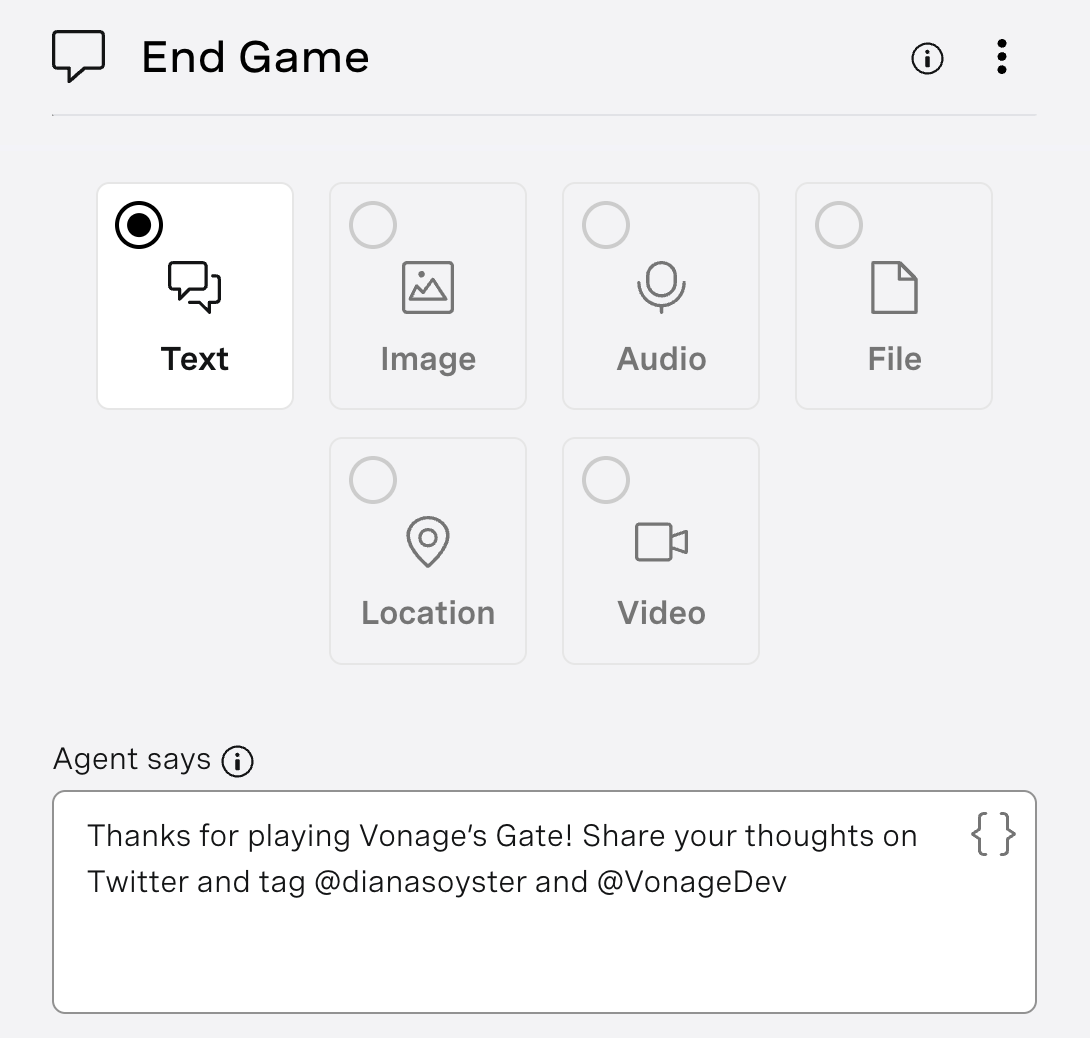
Nodos > Conversación > Enviar mensaje
Nombre del nodo: End Game
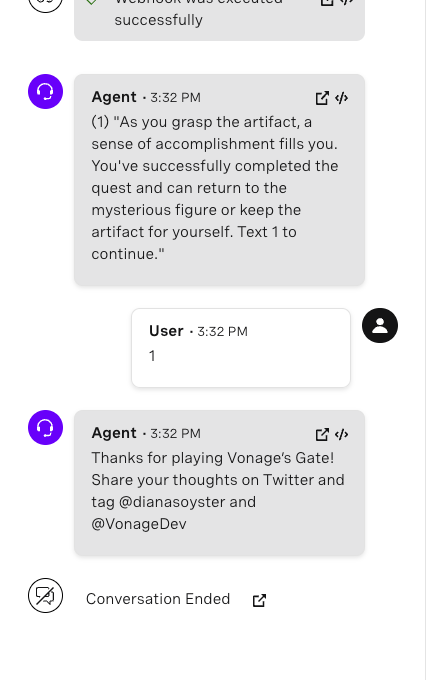
Texto: ¡Gracias por jugar a Vonage's Gate! Comparte tus opiniones en Twitter y etiqueta a @dianasoyster y @VonageDev
Conexión(es): Gracias por jugar a FIN DE LA CONVERSACIÓN
 Send Message
Este nodo se envía cuando el jugador llega al final de su aventura. Esto significa que todos los valores de la tabla son 0 y envían "1" para continuar como se les pide.
 End Game
Nodos > Acciones > Finalizar conversación
Nombre del nodo: Fin de la conversación
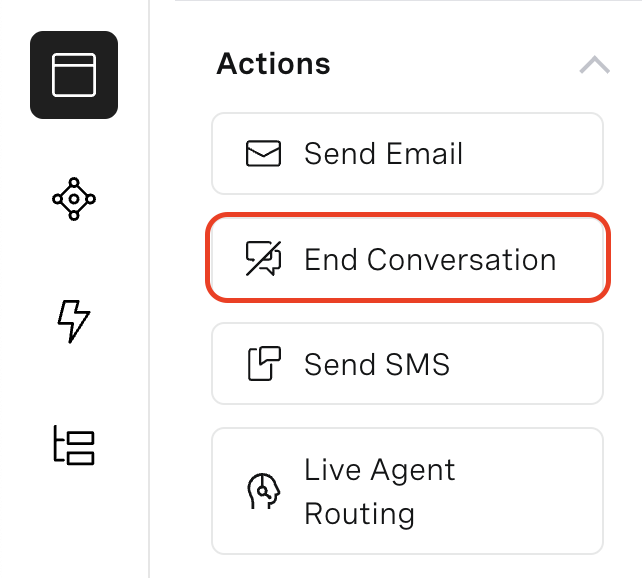 End Conversation
Técnicamente, no necesitas este nodo, pero por buena práctica, deberíamos incluirlo.
En la esquina superior derecha de Vonage AI Studio, hay un botón negro de Probador. Haz clic en él para jugar.
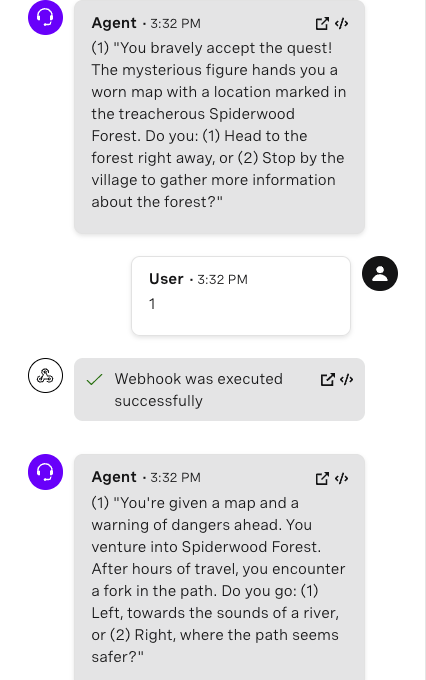
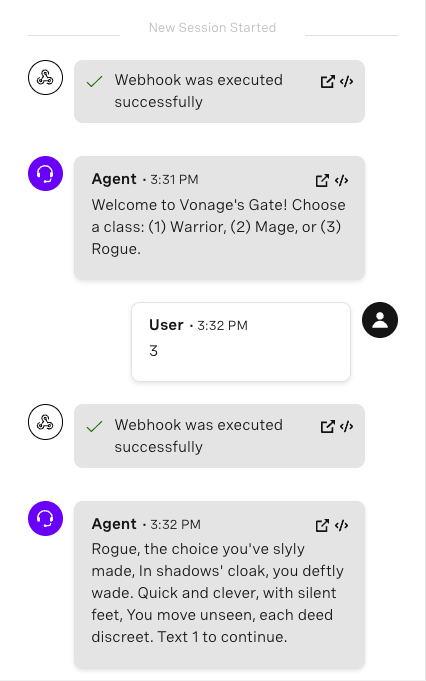 Testing the Agent in AI Studio - Part 1
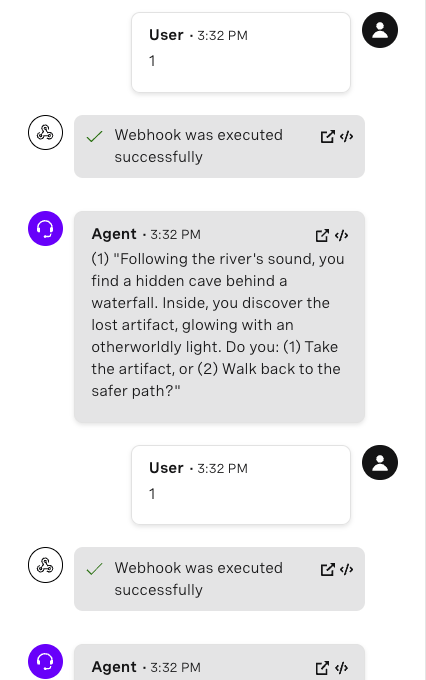
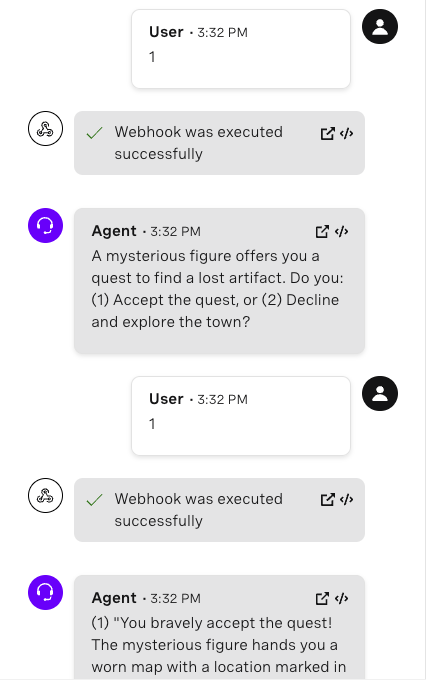 Testing the Agent in AI Studio - Part 2
 Testing the Agent in AI Studio - Part 3
 Testing the Agent in AI Studio - Part 4
 Testing the Agent in AI Studio - Part 5
Como se cita en Baldur's Gate 3, "No se puede transigir con el mal. En este tutorial, aprendimos a usar las mejores prácticas cuando almacenamos datos para que no tengas que lidiar con la "malvada" deuda tecnológica en caso de que necesites hacer cambios a tus textos en el futuro. También aprendimos a integrar una base de datos con Vonage AI Studio y Messages API. Si quieres los datos de este ejemplo, no dudes en unirte a nuestra "clase" de desarrolladores en Slack y síguenos en Xantes conocido como Twitter. Si crea una aplicación similar, compártala y etiquétame - Me encantará conocer tu aventura.