Getting Started with the Vonage API Dashboard
This guide will walk you through your first login, help you navigate the Dashboard interface, and show you how to get your API credentials so you can start building with Vonage.
Please note: Some Dashboard features require account verification and payment method setup. You can explore most features with a free trial account.
Prerequisites
Before you begin, make sure you have:
- A Vonage account - Sign up for free if you don't have one yet
- Verified email address - Check your inbox for the verification email
- Payment method (optional for trial) - Required for production use and certain features
Log In to Your Dashboard
Access your Vonage API Dashboard and familiarize yourself with the interface.
Using an Email and Password
-
Navigate to the Vonage API Dashboard
-
Enter your email address and password.
-
Complete two-factor authentication (2FA) if enabled on your account.
If this is your first login, you may see an onboarding wizard. Follow the prompts to set up your account preferences.
-
After successful login, you'll see the Dashboard homepage.
Using a Passkey
What is a Passkey?
A passkey is a modern, passwordless authentication credential based on the FIDO2/WebAuthn standard. Instead of a password, a passkey uses a cryptographic key pair - a private key stored securely on the user's device (or in a password manager), and a public key registered with the service. Authentication is performed using biometrics (Face ID, Touch ID, Windows Hello), a device PIN, or a hardware security key, without ever transmitting a secret over the network.
Passkeys are natively supported by all major platforms and browsers (Apple, Google, Microsoft) and can be synced across devices via iCloud Keychain, Google Password Manager, or third-party managers such as 1Password and Keeper.
How Do Passkeys Work?
-
Registration: When a user creates a passkey, the device generates a public/private key pair. The public key is stored on the Vonage server; the private key never leaves the user's device or password manager.
-
Authentication: At login, the server sends a cryptographic challenge. The device signs it with the private key (after the user verifies their identity via biometrics or PIN) and returns the signature. The server verifies the signature using the stored public key.
-
Cross-device login: If the passkey is not available on the current device, the user can scan a QR code with another device that holds the passkey, or use a hardware security key (FIDO2 USB/NFC token).
How to Configure a Passkey
Once you have created an account and have logged in for the first time, you will see the following screen prompting you to create a passkey:
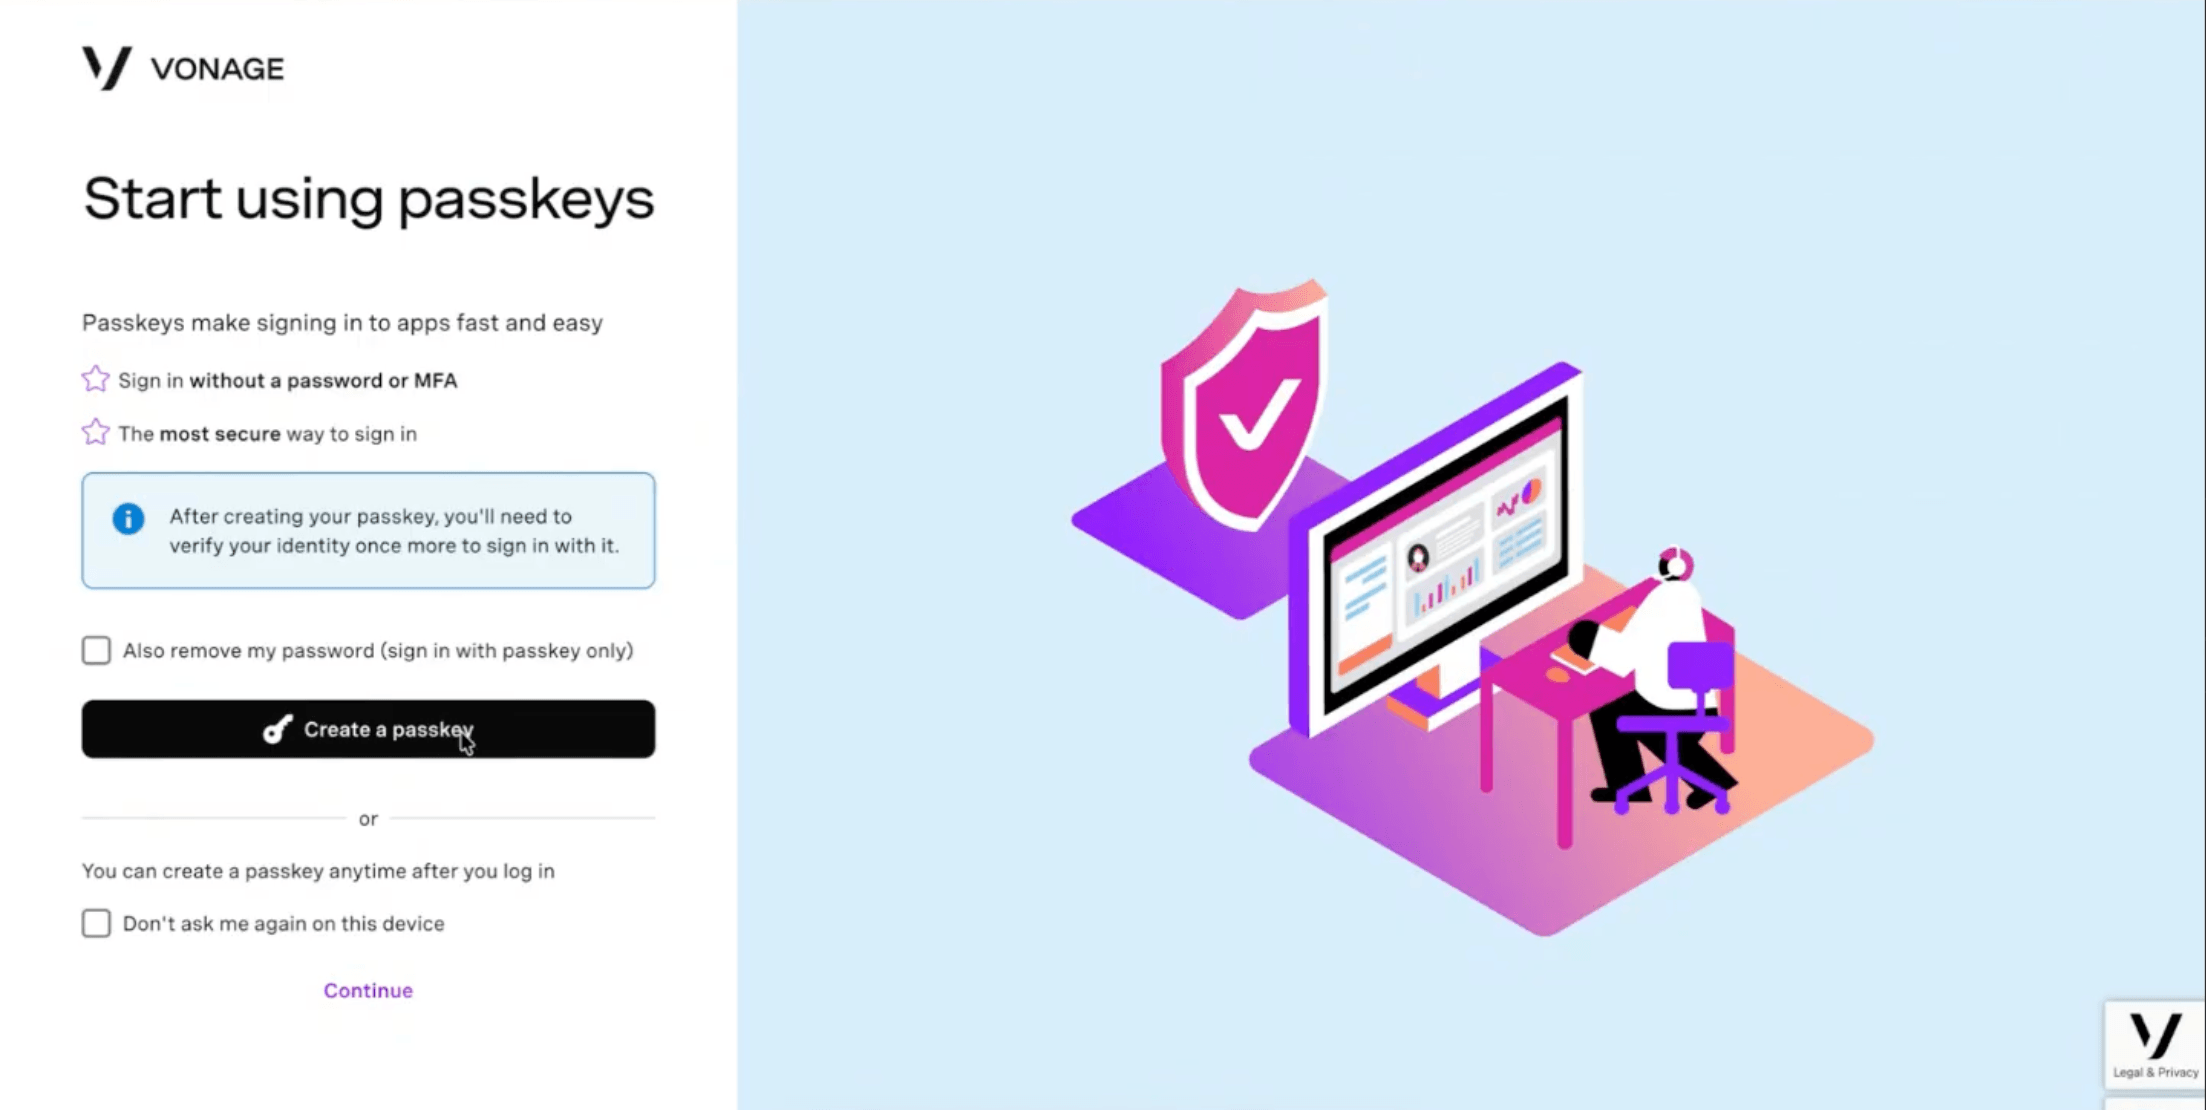
Click the Create a passkey button to begin; your browser will prompt you for biometric / PIN confirmation and register the passkey. If you have a password manager installed, such as iCloud Keychain, 1Password, or Keeper, you can choose to register the passkey there. The passkey will then be available across all devices linked to that password manager account.
You can also select 'Also remove my password' - this will delete your password and enforce passkey-only login for maximum security.
Note: You can also configure a passkey at any time from the Account security section.
Logging in Using your Passkey
When you visit the Vonage dashboard, you will see the 'Log in with a passkey' button:
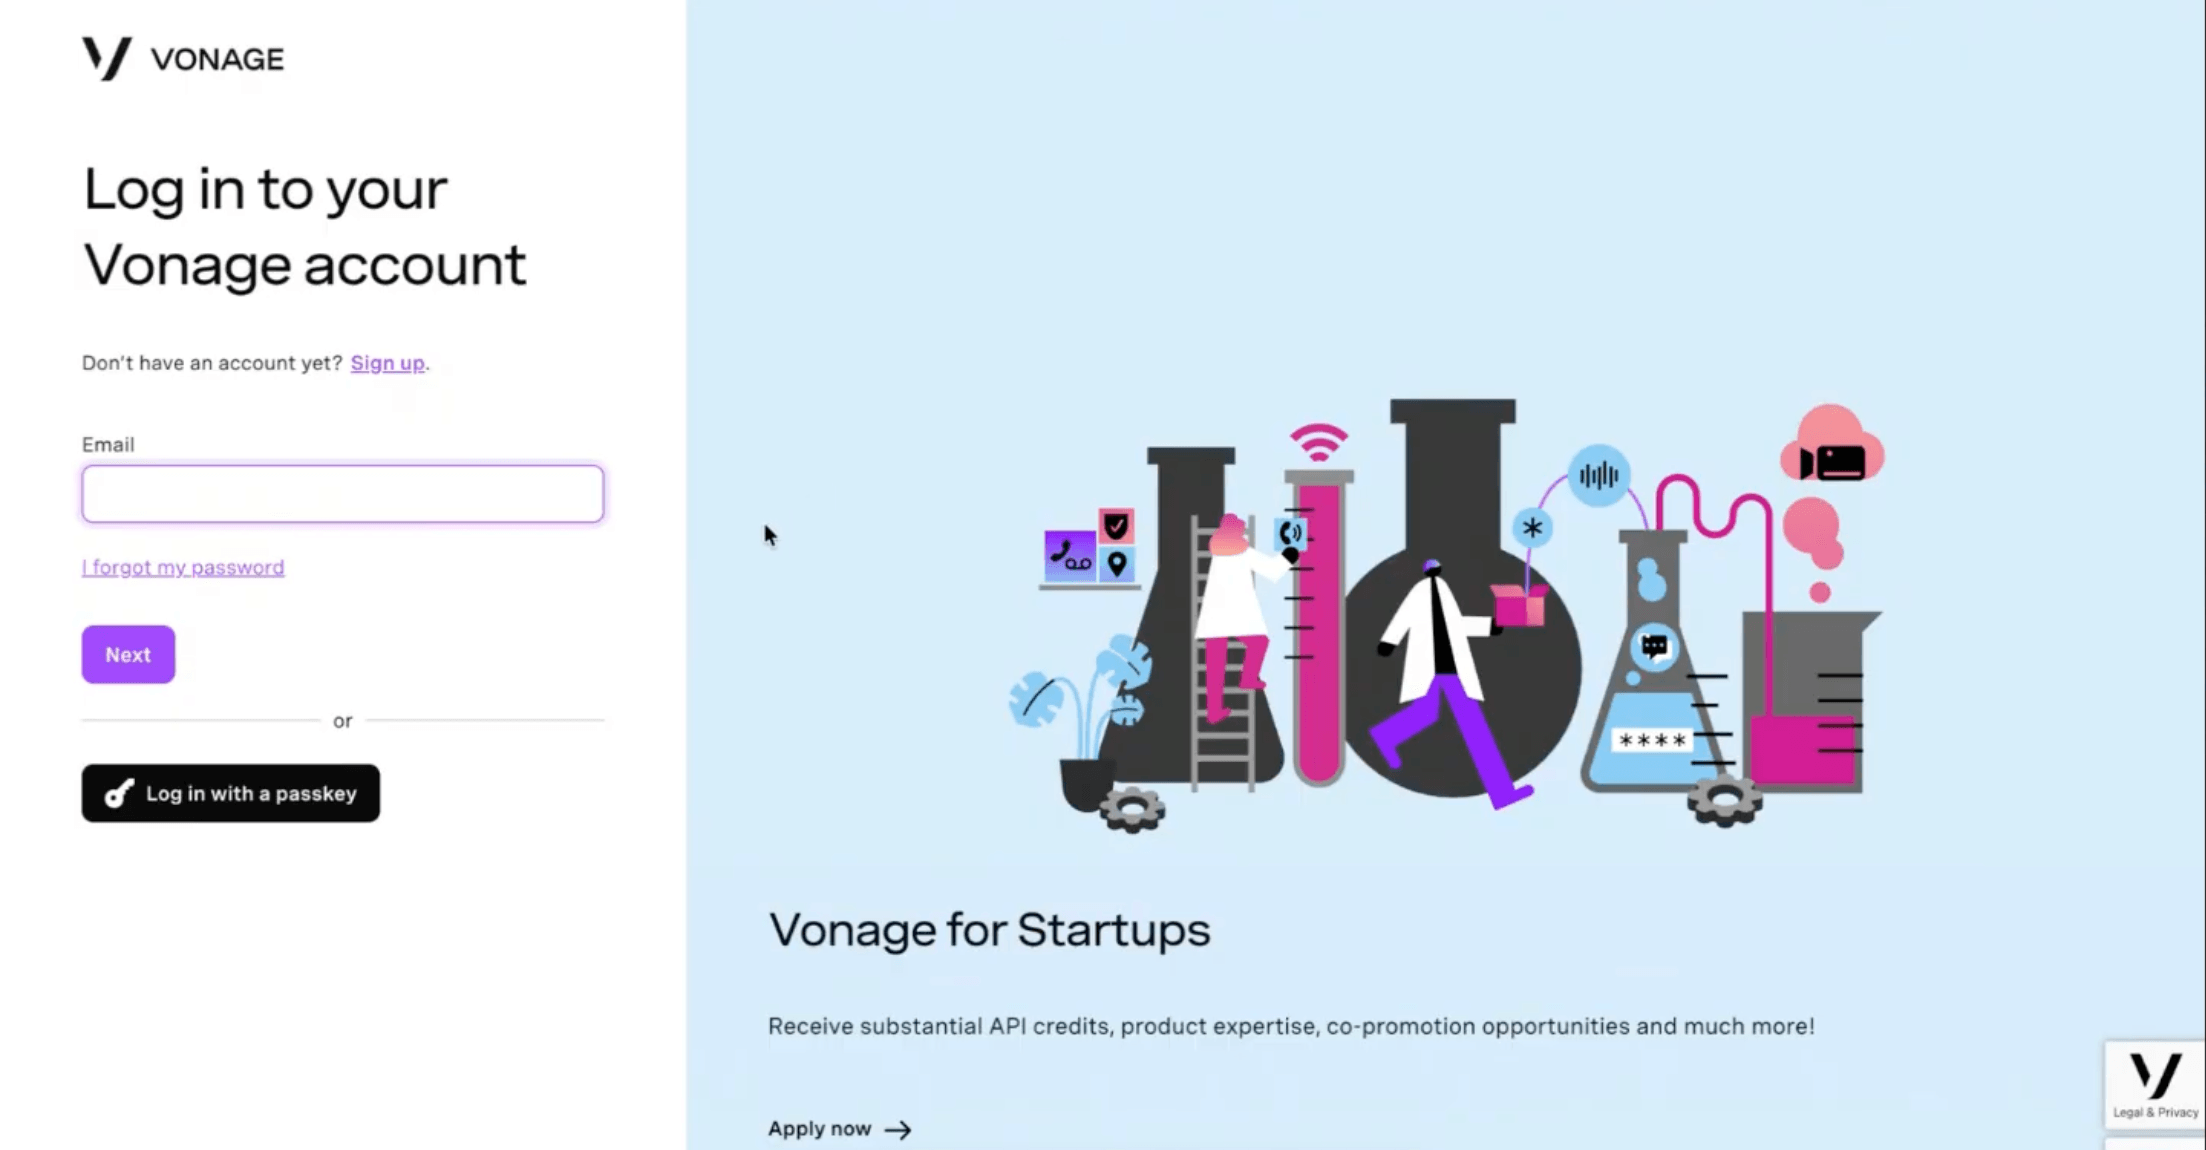
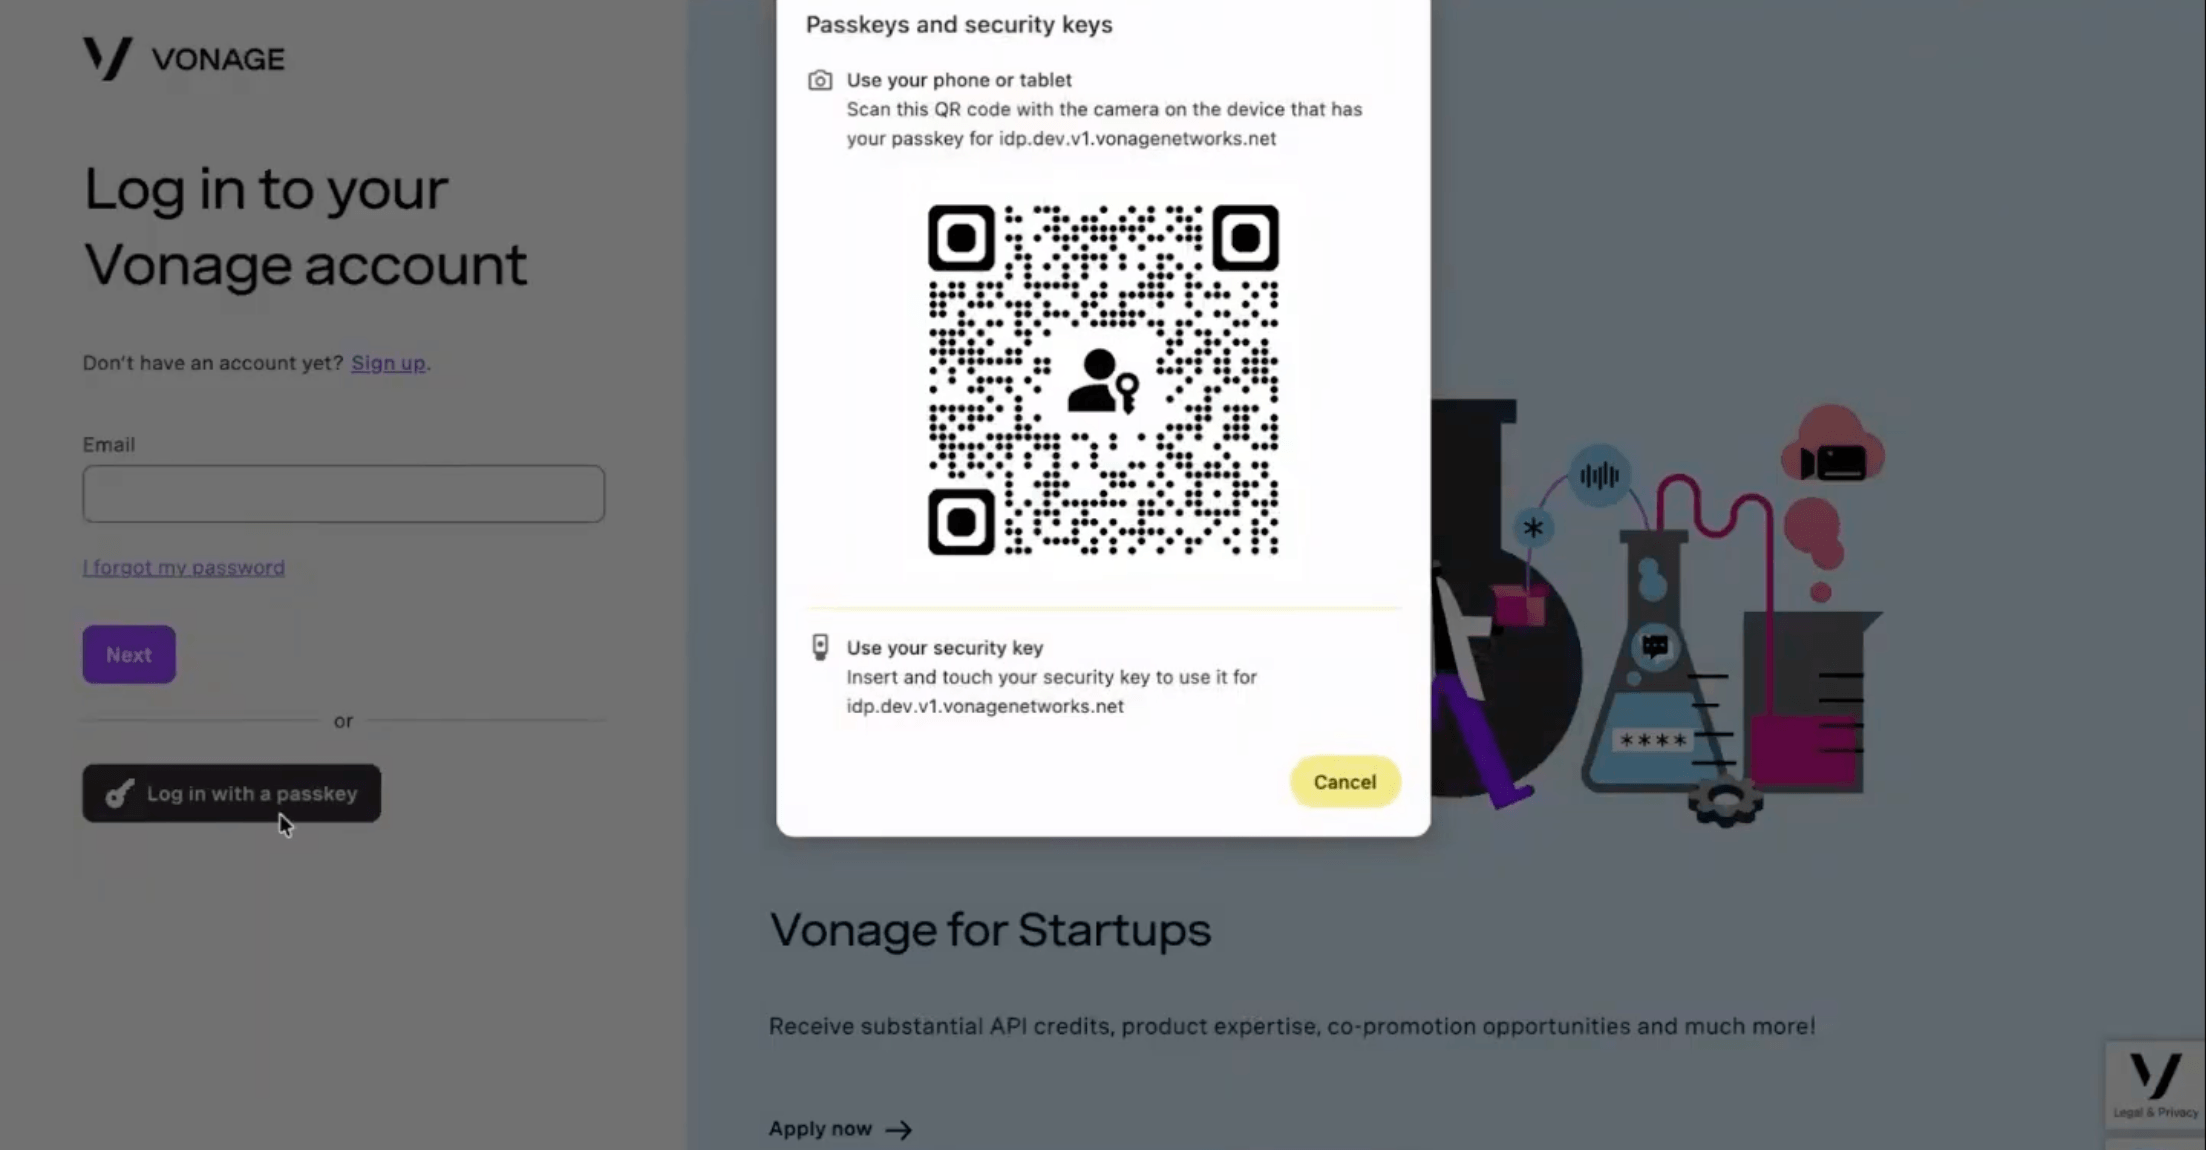
Once clicked, you will see a prompt to log in using your configured passkey. If your passkey is not on the device you are using, you will see a modal providing two cross-device options:
- Use your phone or tablet: scan the QR code with the camera on the device that holds the passkey, then follow the on-screen prompt to approve the sign-in.
- Use your security key: insert and touch a FIDO2 hardware security key.
Managing Your Passkeys
A new "Manage your registered passkeys" section is available in the Account Security section - from the dashboard, select your name in the bottom left, and then My Profile to find it:
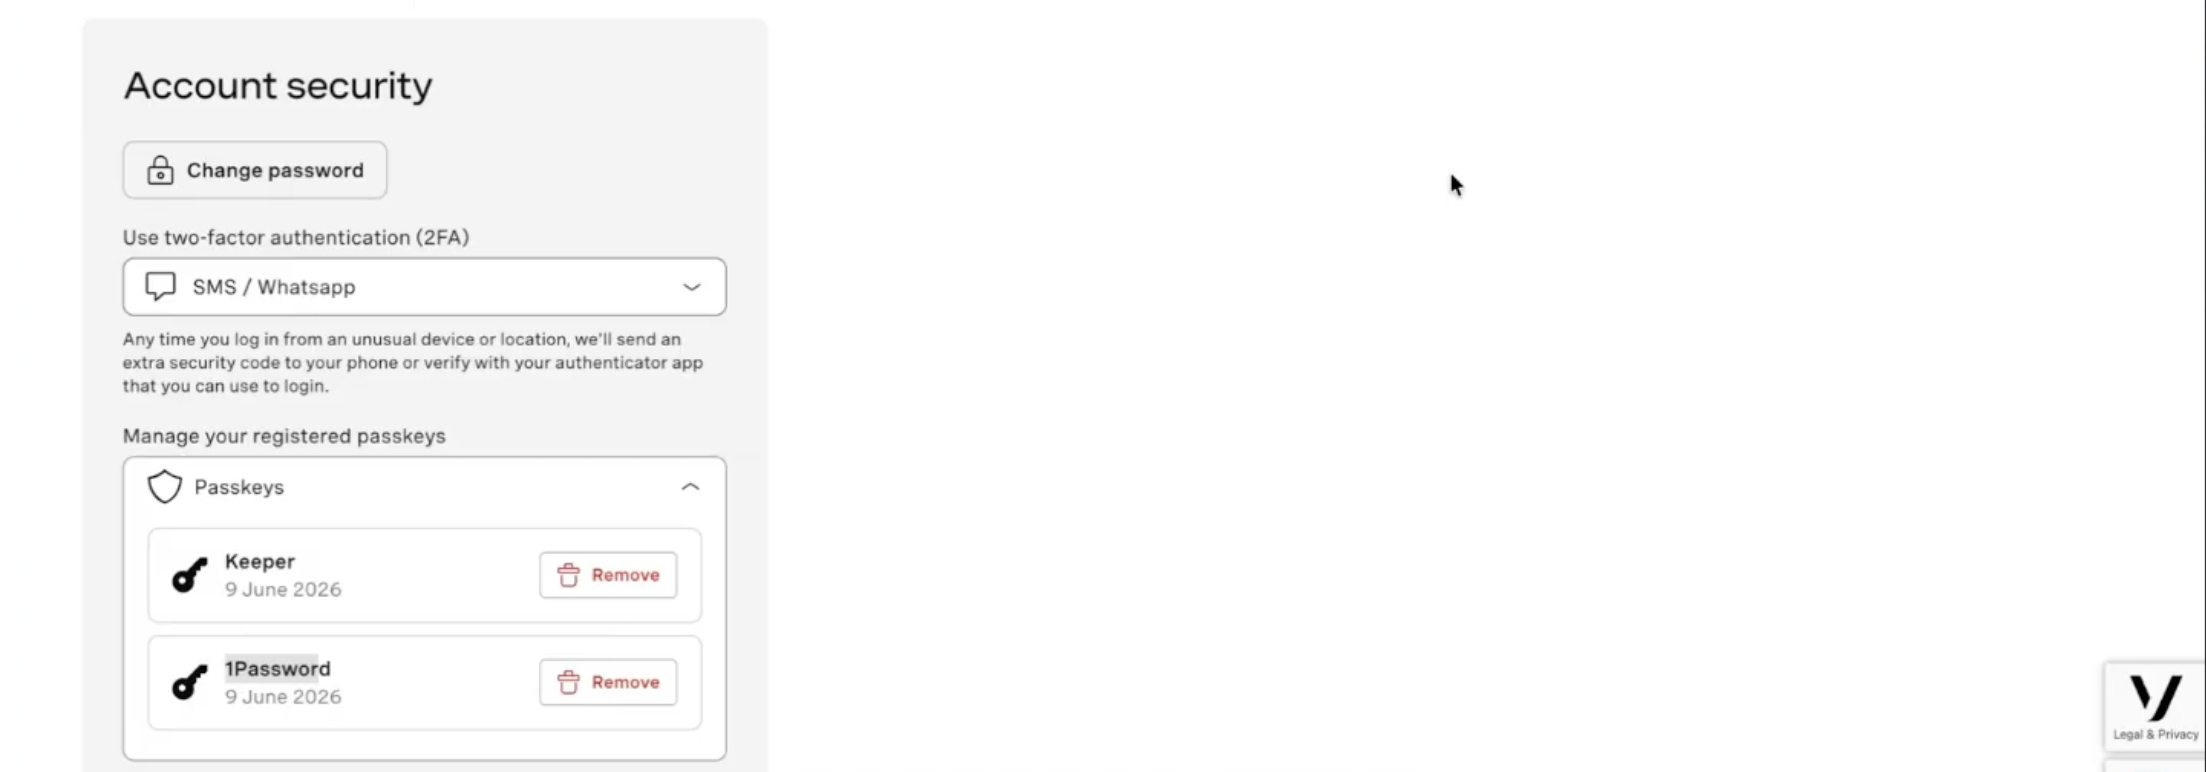
From here, you can view all registered passkeys with their credential name (e.g., Keeper, 1Password) and registration date, and remove individual passkeys.
Your existing 2FA methods (SMS / WhatsApp, Authenticator App) remain available alongside passkey management.
Note: If you lose access to your passkey, you can regain access to your Vonage account via the standard password reset flow, which includes a two-factor check. Once logged in, you can create a new passkey from the Account Security page.
Understanding the Dashboard Layout
The Dashboard is organized into three main sections accessible from the left navigation:
Control - Manage Your Account
Access billing, payments, and core account settings:
- Billing & Payments - Add payment methods, view balance, download invoices
- API Settings - Manage your API keys and secrets securely
- Pricing - View per-destination pricing for all products
- Account Settings - Update profile, notifications, and preferences
Monitor - Track Your Usage
View real-time activity and protect your account:
- Logs - Real-time logs for SMS, voice, and messaging traffic
- Analytics - Usage patterns and delivery metrics
- Fraud Defender - Set rules to detect and block suspicious activity
- Delivery Reports - Monitor message and call quality
Build - Configure Products
Set up and test Vonage API products:
- Applications - Create applications that store webhooks and configuration
- Phone Numbers - Buy and manage virtual numbers globally
- Messaging - Send test SMS, configure WhatsApp, set up 10DLC
- Voice - Test calls, configure SIP trunking, use voice playground
- Video - Access video session tools and configuration
Top Navigation Bar
Left side:
- Vonage APIs logo - Click to return to the homepage
- Search for help - Quick search for documentation and support articles
Right side:
- Account balance - Shows your current credit (e.g., "You have €39.27 credit left")
- Add funds button - Quick access to top up your account
Get Your First API Credentials
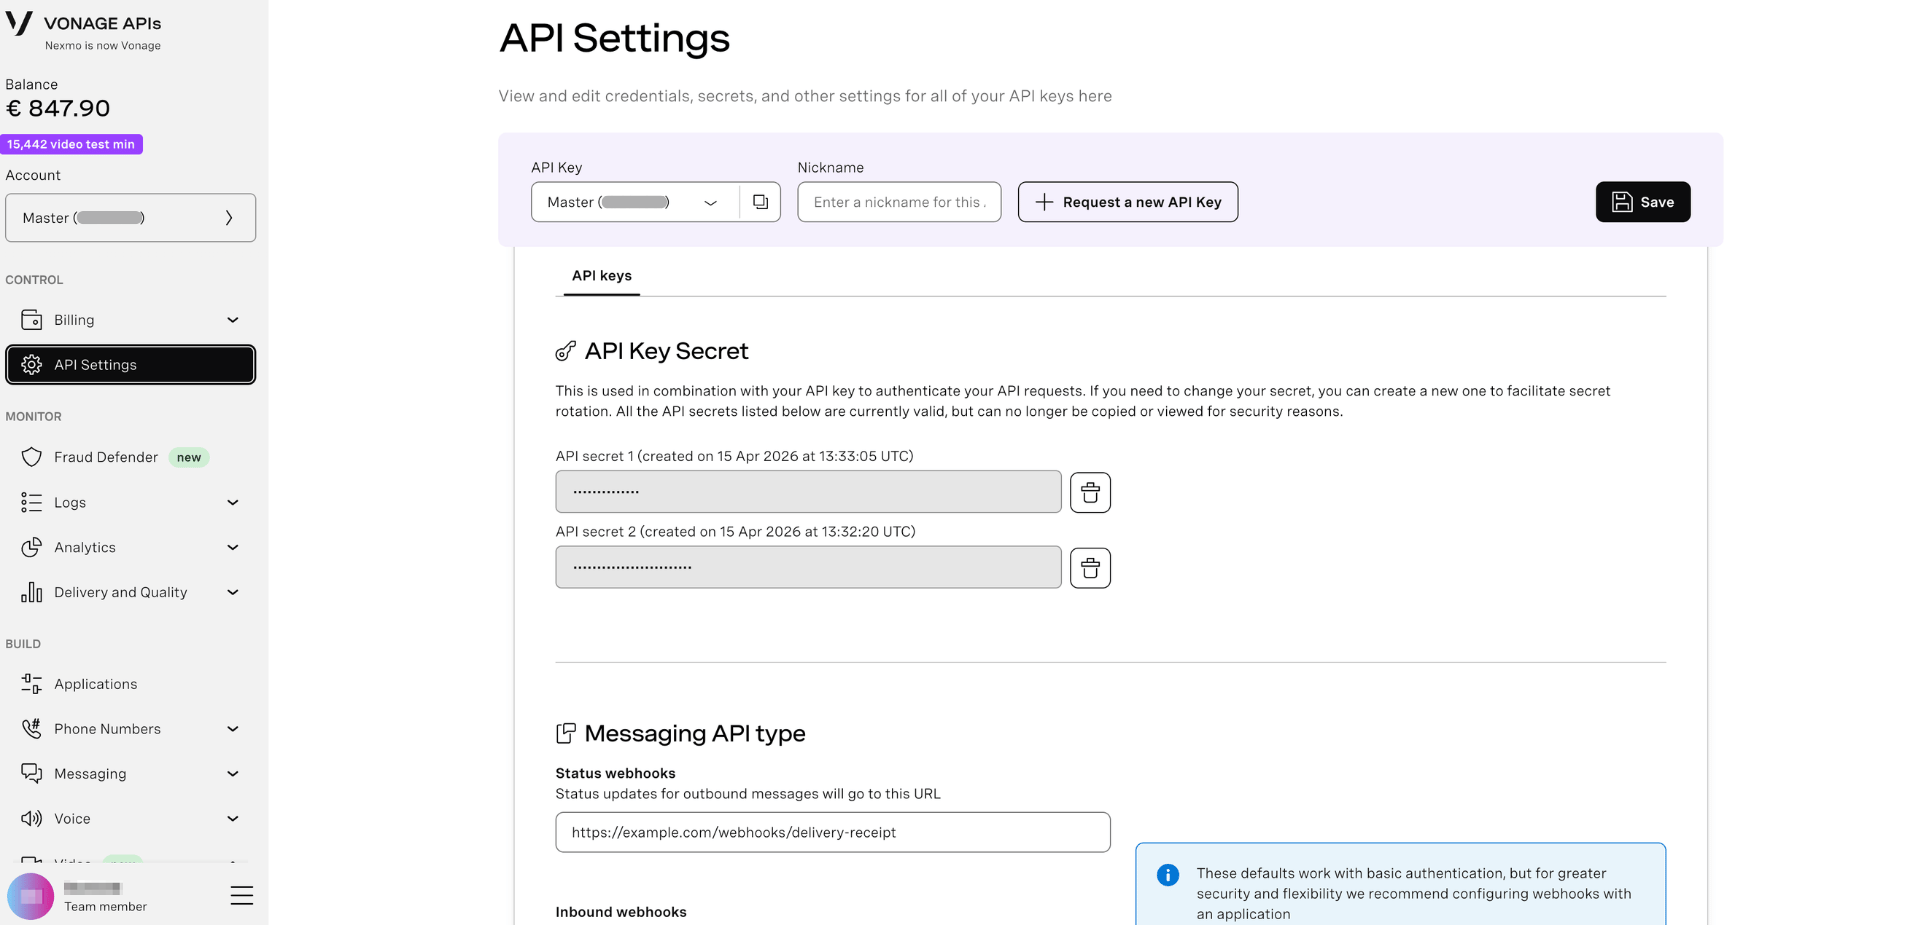
Your API key and secret are required to authenticate API requests.
-
From the Dashboard homepage, navigate to API Settings in the left sidebar.
-
On the API Settings page, you'll see your API Key (1) and API Secret (2).
-
Click the copy icon next to each credential to copy it to your clipboard.
Security Note: Never commit your API secret to source control. Store credentials securely using environment variables or a secrets management system.
-
(Optional) Click "Show" next to the API secret to reveal the full value before copying.
Your API secret is hidden by default for security. Only reveal it when you need to copy it.
Learn more: API Settings Guide
Next Steps
Now that you're familiar with the Dashboard, explore based on your use case:
For Messaging
- Send Your First SMS - Use the Dashboard to send a test message
- Buy a Virtual Number - Purchase numbers for two-way messaging
For Voice
- Configure Voice Settings - Make first voice call
- Test with Voice Playground - Make test calls from the Dashboard
- Set Up SIP Trunking - Configure SIP for enterprise voice
For Security & Monitoring
- Set Up Fraud Defender - Protect your account from fraud
- View Activity Logs - Monitor real-time API activity
- Enable Usage Alerts - Get notified of unusual activity
For Account Management
- Invite Team Members - Add users with specific permissions
- Set Up Auto-Reload - Never run out of credit
Getting Help
- Dashboard Questions? Contact Vonage API Support
- API Integration Help? See product-specific documentation in Documentation
- Technical Issues? Visit the Support Portal
- Billing Questions? Visit Billing Support