

Vonage Email API Is Now Generally Available
Time to read: 5 minutes
We're excited to announce that the Vonage Email API is now Generally Available to all customers as a channel within the Vonage Messages API.
Developers can now add email alongside SMS, WhatsApp, Viber, and other channels without bringing in a separate vendor. Email is just one more channel in the Messages API, so it uses the same authentication and webhooks your application already has set up.
In this post, we’ll walk through the features available and show you how to make your first API call to try it out.
Before you can start using Email, you will need to complete your Domain Authentication Setup. You can read about how to do this, but the TLDR is: adding and configuring DNS records from your provider allows services to know Vonage is permitted to send messages on your behalf. Once you have done this, you’ll need to configure your authentication with Vonage, which we’ll walk you through now.
 Security FirstIf you don’t already have an authentication mechanism in place, you will need to set it up. First, create a new Vonage application in the Dashboard and download your private key:
To create an application, go to the Create an Application page on the Vonage Dashboard, and define a Name for your Application.
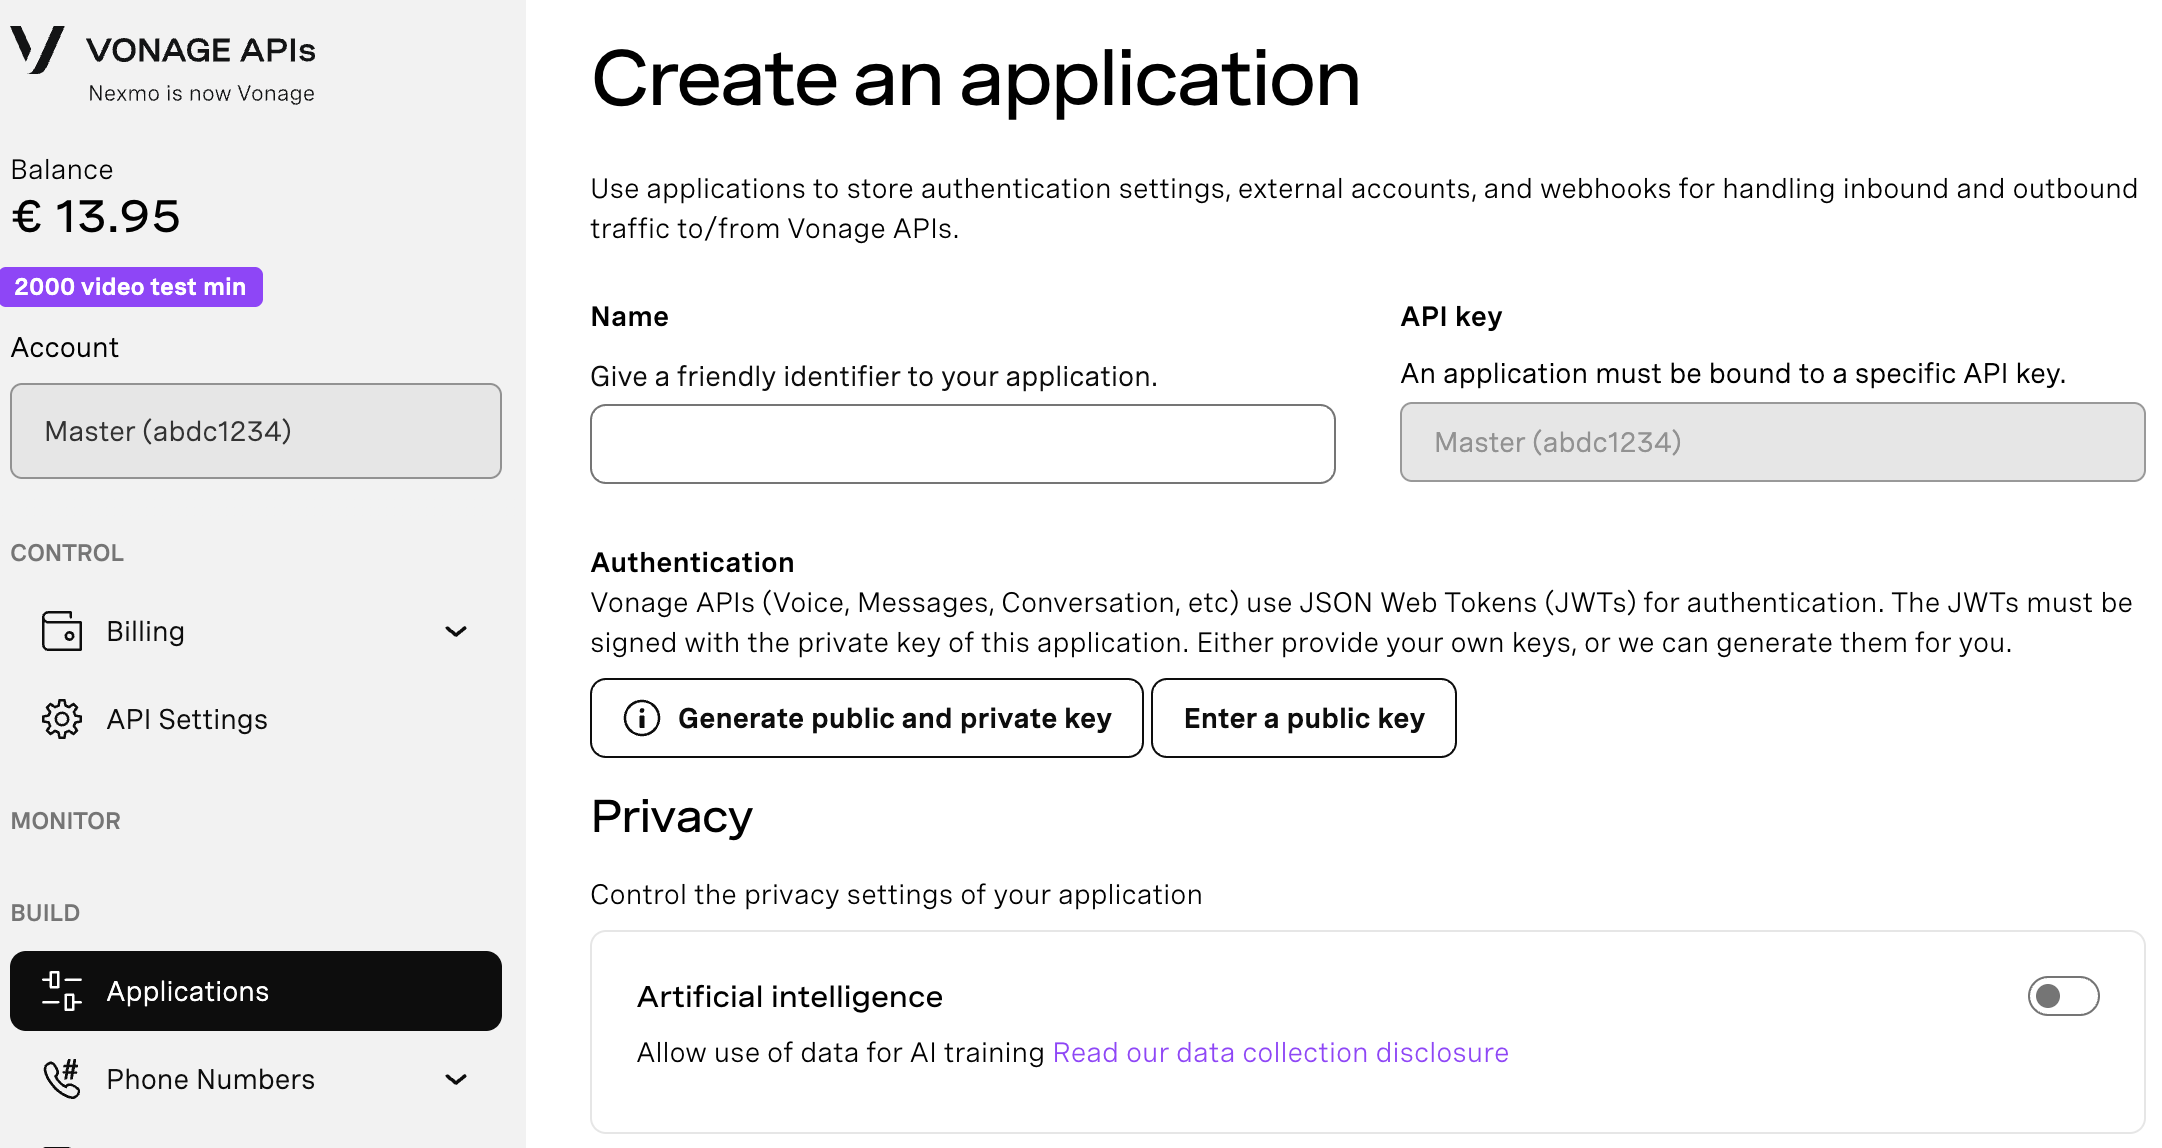
If you intend to use an API that uses Webhooks, you will need a private key. Click “Generate public and private key”, your download should start automatically. Store it securely; this key cannot be re-downloaded if lost. It will follow the naming convention private_<your app id>.key. This key can now be used to authenticate API calls. Note: Your key will not work until your application is saved.
Choose the capabilities you need (e.g., Voice, Messages, RTC, etc.) and provide the required webhooks (e.g., event URLs, answer URLs, or inbound message URLs). These will be described in the tutorial.
To save and deploy, click "Generate new application" to finalize the setup. Your application is now ready to use with Vonage APIs.
The Vonage Node SDK takes care of authentication for you: give it your application ID and private key, and it generates a signed JWT for every request, so you never have to create or refresh a token by hand. To install it, you will need to have Node.js installed, so you can use a Package Manager such as npm or yarn. Once you have installed node, create a new project folder and install the SDK:
npm install @vonage/server-sdkNext, in the same directory as your downloaded private.key, create a file called send-email.js and initialise the client with your application_id:
const { Vonage } = require('@vonage/server-sdk');

const vonage = new Vonage(
  {
    applicationId: '<your_app_id>',
    privateKey: './private.key',
  },
  {
    apiHost: 'https://api-eu.nexmo.com',
  },
); The apiHost option points the SDK at the EU endpoint, so it should match the region where your sending domain was set up.
Add the following to send-email.js, below the client setup, replacing the sender and recipient addresses with your own. Then run it from the command line with node send-email.js:
vonage.messages
  .send({
    channel: 'email',
    messageType: 'text',
    from: 'sender@yourdomain.com',
    to: 'recipient@example.com',
    text: 'Hello! Your order has been confirmed.',
    email: {
      subject: 'Order Confirmation',
    },
  })
  .then((resp) => console.log(resp.messageUUID))
.catch((err) => console.error(err)); This will send a plain-text email. The SDK uses camelCase property names messageType rather than message_type) and converts them to the API’s format for you. The messageType field also allows you to send HTML; for example:
vonage.messages
  .send({
    channel: 'email',
    messageType: 'html',
    from: 'sender@yourdomain.com',
    to: 'recipient@example.com',
    html: {
      body: '<h1>Order Confirmed</h1><p>Thank you for your purchase. Your order is on its way!</p>',
    },
    email: {
      subject: 'Order Confirmation',
    },
  })
  .then((resp) => console.log(resp.messageUUID))
.catch((err) => console.error(err)); A handy feature is that you can nest both content types by setting messageType to content, which allows you to have compatibility fallbacks for different end devices:
vonage.messages
  .send({
    channel: 'email',
    messageType: 'content',
    from: 'Your Brand <sender@yourdomain.com>',
    to: 'recipient@example.com',
    content: [
      { type: 'text', text: 'Your order has been confirmed.' },
      { type: 'html', body: '<p>Your order has been <strong>confirmed</strong>.</p>' },
    ],
    email: {
      subject: 'Order Confirmation',
    },
  })
  .then((resp) => console.log(resp.messageUUID))
.catch((err) => console.error(err));Once a message has been sent to the API, the promise resolves with a messageUUID (the API itself returns a 202 response with a message_uuid, the same as you would with other channels).
Webhooks let you consume delivery notifications for messages sent through the Email API. There are five delivery statuses, matching the other channels in the Messages API: delivered, rejected, undeliverable, read, and submitted.
You’ll need a back-end framework to read incoming messages. That’s outside the scope of this announcement, but there’s one neat feature worth mentioning.
If you install ngrok, you can use the Vonage CLI as a wrapper for it. The CLI temporarily swaps the domain in your application’s webhook URLs for a local ngrok address, while keeping the paths you’ve set. These are the webhooks shown in the Application panel on the Dashboard.
For example, say your application’s events are configured to go to https://example.com/webhooks/status. First, install the CLI if you haven’t already:
npm install -g @vonage/cliThen run the command to open your tunnel:
vonage tunnel ngrok "<your-application-id>" --port=8000It will boot ngrok, and change your local domain to something like https://sa9s8d.ngrok.app/webhooks/status. Very handy when testing your integration. An incoming status delivery will look something like this:
{
  "message_uuid": "aaaaaaaa-bbbb-4ccc-8ddd-0123456789ab",
  "from": "sender@yourdomain.com",
  "to": "recipient@example.com",
  "timestamp": "2026-06-01T10:00:01.000Z",
  "status": "delivered",
  "channel": "email"
}
Previously, if you wished to run a marketing campaign that used both SMS (with something like 10DLC) and Email, you would need a separate Email service. Now you can use the Vonage Messages API to scale out a campaign with multiple delivery methods to however large you need it.
In vertical markets such as logistics or e-commerce, you’ll typically want to send out confirmation requests or delivery confirmations via email rather than other communication channels. The introduction of Email as a channel now allows this.
The Email channel is used in our Verify API when One-Time Password (OTP) delivery is required (and can also be used alongside other channels such as SMS or WhatsApp). Note that this is also a General Availability feature. However, with an Email channel in the Messages API, you can also integrate Messages into your own authentication stack, such as sending account verification emails or password resets.
Messages already has a fallback feature for delivery, so the additional Email as a channel now means you can attempt to complete the delivery of vital information via multiple means to ensure better confirmation of delivery. I’ve already mentioned that e-commerce is a typical vertical market where Email would be used, so the following is an example of when you want to send purchase confirmation via WhatsApp (because the end user has specified it as a preferred method of communication), but the delivery cannot be completed (the end user ordered it in an unsupported territory, or there is no cellular coverage), and so confirmation is sent by Email:
{
  "template": {
    "name": "order_confirmation",
    "parameters": [{ "type": "text", "text": "ORD-12345" }]
  },
  "workflow": [
    {
      "channel": "whatsapp",
      "from": "15551234567",
      "to": "15559876543"
    },
    {
      "channel": "email",
      "from": "orders@yourdomain.com",
      "to": "customer@example.com",
      "message_type": "html",
      "html": { "body": "<p>Your order ORD-12345 is confirmed!</p>" },
      "email": { "subject": "Order Confirmation - ORD-12345" }
    }
  ]
}
Even though it has gone GA, there are plenty of extra features in the roadmap coming up, including dynamic email templates, integrations with Conversation Connect (campaign manager UI), contact management, advanced analytics, and full marketing automation.
Whether you're sending order confirmations, OTPs, or building omnichannel failover workflows, the addition of the Email channel to the Messages API gives developers more options and power to integrate communications into their applications.
Ready to get started? Check out the developer documentation and reach out to your Account Manager to get your domain onboarded.
Want to learn, stay connected, or share what you're building?
Keep learning
Explore use cases and structured learning paths in the Vonage Learning Center
Watch tutorials on our Vonage Developer YouTube Channel
Stay connected
Subscribe to the Vonage Developer Newsletter
Follow us on X for updates
Connect with us on LinkedIn
Help us improve our developer experience by filling out our Voice of the Developer Feedback