)
Validate Phone Numbers With Firebase and Vonage Identity Insights
Time to read: 5 minutes
This tutorial shows how to build a demonstration serverless solution using Firebase Callable Functions and the Vonage Identity Insights API, which automatically attempts to cleanse user input. You don't have to worry if your users submit numbers mixed with dashes, spaces, or alphanumeric characters. The API will do its best to parse and validate the phone number.
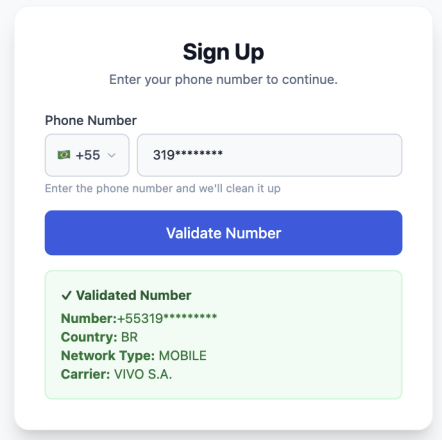
Validating phone numbers and making sure they're cleaned and correctly formatted is a must. In the demonstration we will build, you can input a phone number and use the Vonage Identity Insights API to return the format validity, international format, country code, current and original carrier name, and network type.
 Phone Number Validation
Make sure you have:
A Google account with Firebase with Blaze billing enabled (required for Node.js functions).
The Firebase CLI installed:
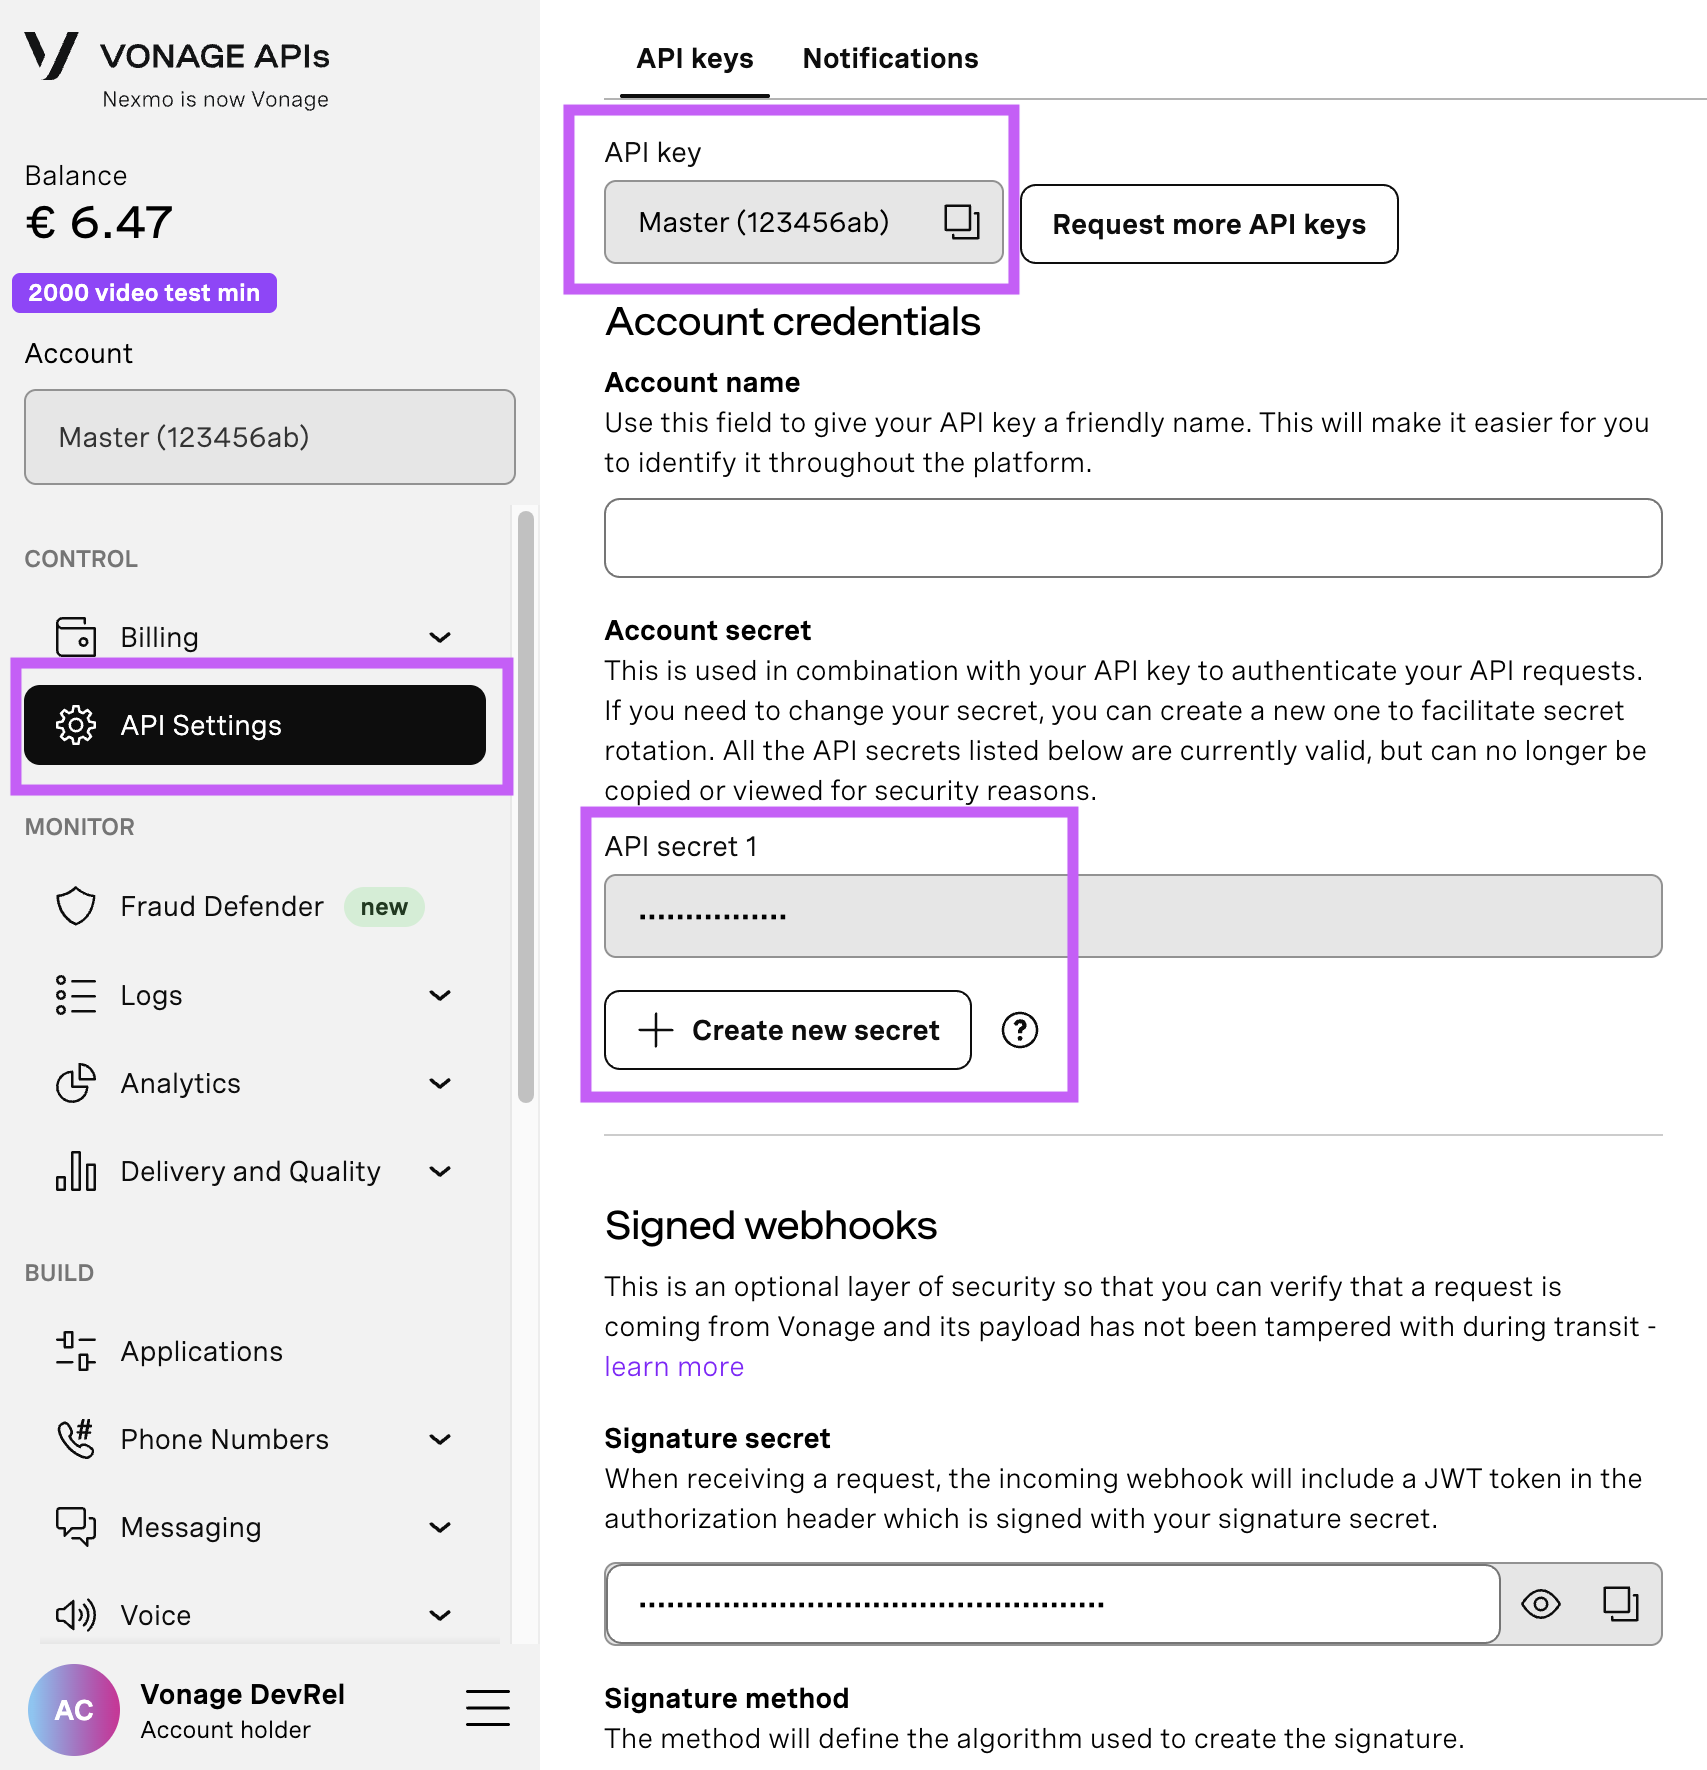
npm install -g firebase-toolsOpen your API Settings Page to access your Vonage API Key and Secret, both of which are displayed as shown in the screenshot below. The API Key is located at the top of the page, and to access your API Secret, please refer to the “Account secret” subsection.
Note: In case you cannot remember your previously created API Secret, click on “+ Create new secret” and save it securely.
The sample code for this project follows the structure below.
my-firebase-project/
├── firebase.json
├── functions/
│   ├── index.js
│   └── package.json
└── public/
└── index.htmlLet's associate this project directory with a Firebase project. You can create multiple project aliases by running firebase use --add.
Initialize Firebase Functions in your project directory:
firebase init functionsSelect JavaScript when prompted. There's also the option to choose TypeScript and Python. Next, navigate into your functions folder and install the Vonage Server SDK:
cd functions
npm install @vonage/server-sdkTo create an application, go to the Create an Application page on the Vonage Dashboard, and define a Name for your Application.
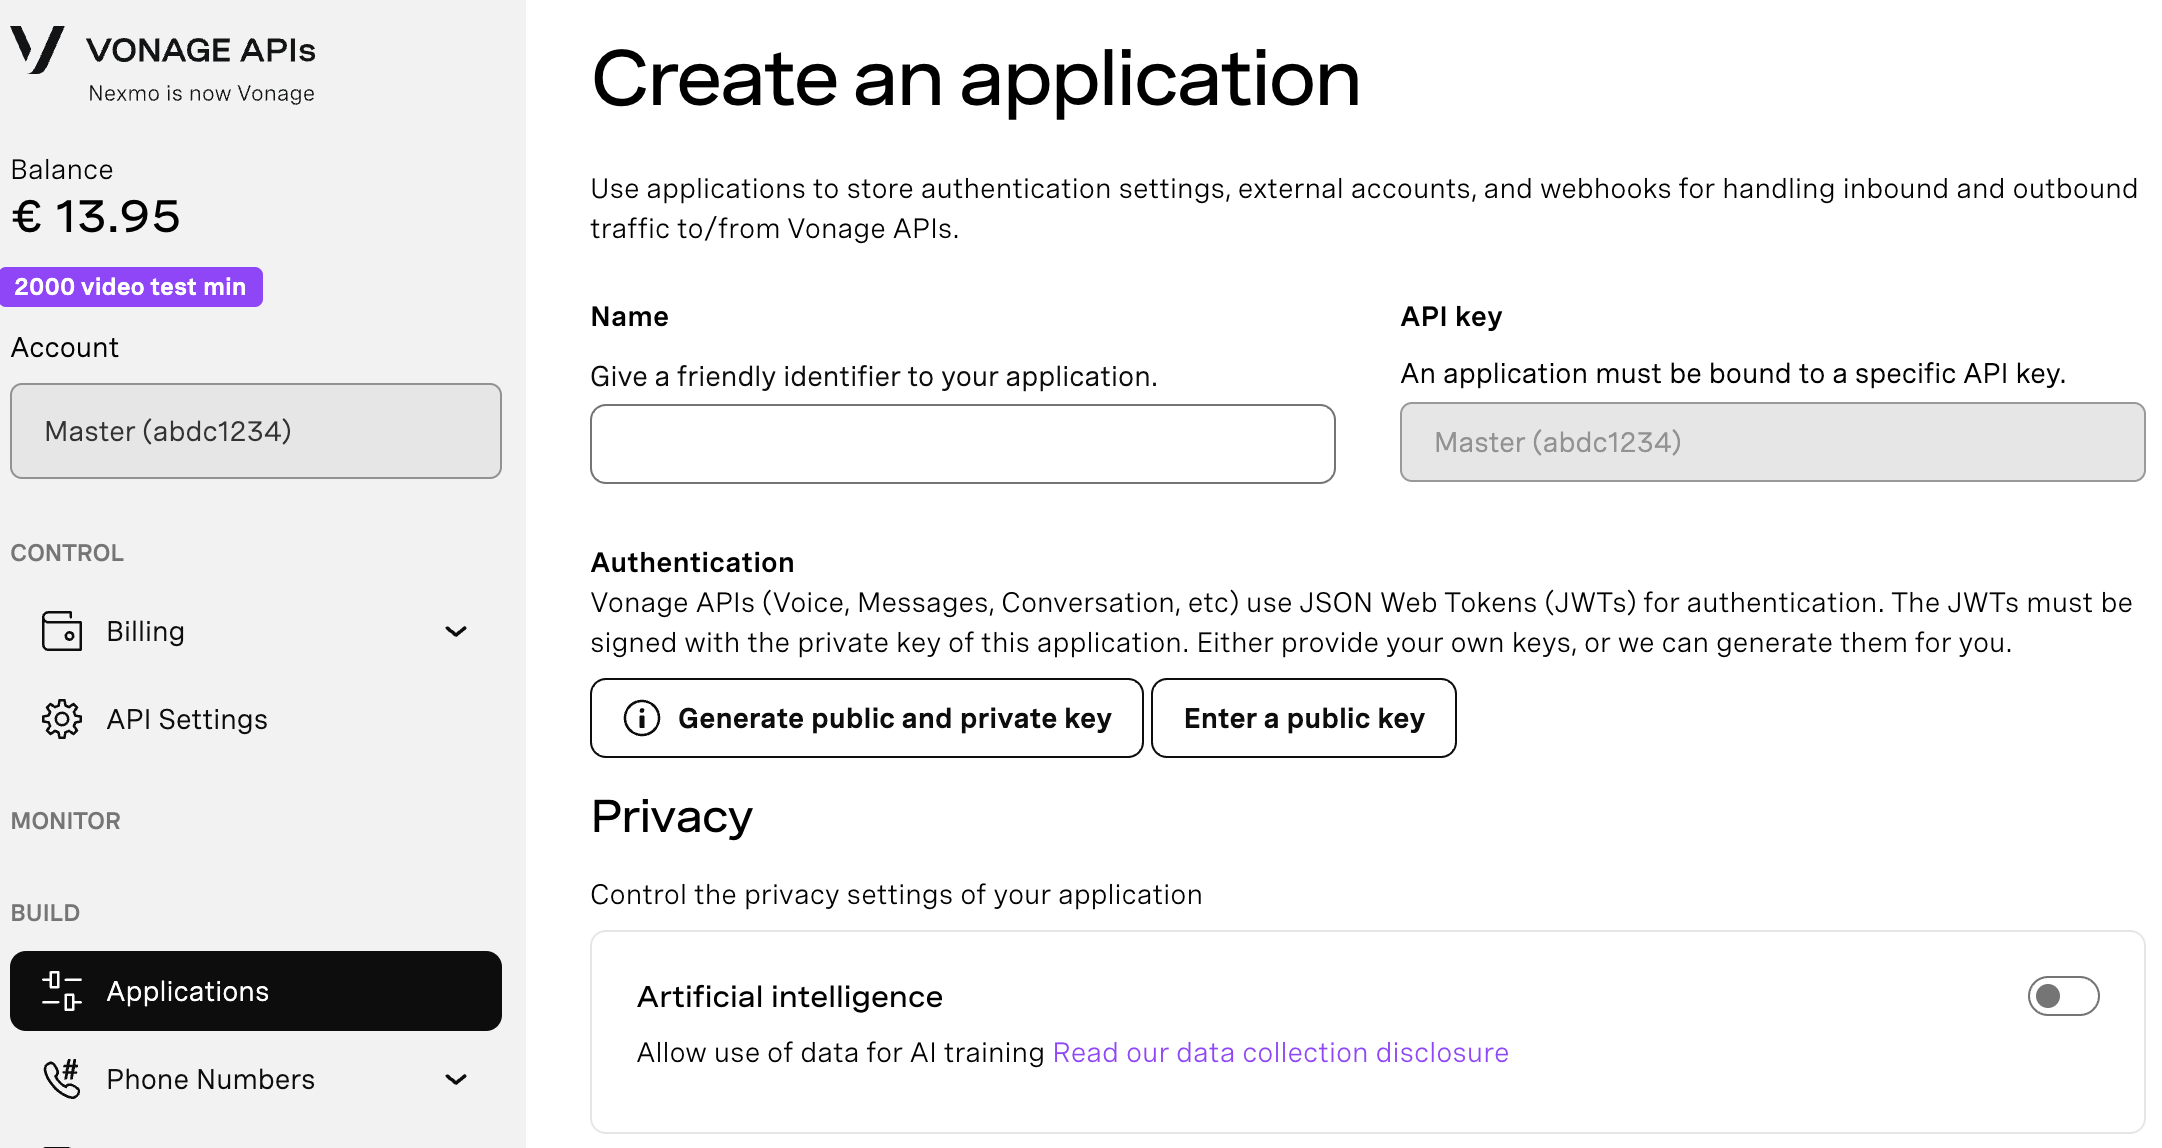
If you intend to use an API that uses Webhooks, you will need a private key. Click “Generate public and private key”, your download should start automatically. Store it securely; this key cannot be re-downloaded if lost. It will follow the naming convention private_<your app id>.key. This key can now be used to authenticate API calls. Note: Your key will not work until your application is saved.
Choose the capabilities you need (e.g., Voice, Messages, RTC, etc.) and provide the required webhooks (e.g., event URLs, answer URLs, or inbound message URLs). These will be described in the tutorial.
To save and deploy, click "Generate new application" to finalize the setup. Your application is now ready to use with Vonage APIs.
The Vonage Identity Insights API uses JWTs, so we need to securely store our Application ID and Private Key. We'll use Firebase's built-in Secret Manager so these values never live in our source code:
firebase functions:secrets:set VONAGE_APPLICATION_ID
It will then prompt you to add the Vonage Application ID.
firebase functions:secrets:set VONAGE_PRIVATE_KEYIt will then prompt you to add the Vonage Private Key associated with your application ID.
We'll use the Vonage Identity Insights API. Firebase Callable Functions handle CORS and authentication automatically, allowing your frontend to call them. You can follow along with the full index.js file in the sample repository.
We initialize the Vonage client. Identity Insights requires JWT authentication. We're initializing the client using the secrets we stored earlier.
const vonage = new Vonage({
  applicationId: process.env.VONAGE_APPLICATION_ID,
  privateKey: process.env.VONAGE_PRIVATE_KEY.replace(/\n/g, '
')
});

exports.validatePhone = onCall(async (request) => {
const phoneNumber = request.data.phone;Note: The
.replace(/\n/g, '\n')is a fix for handling newline formatting issues when using Firebase Secret Manager.
We request both the format and current_carrier Identity Insights API insights to know not just if the phone number is technically valid, but also whether it's a mobile line we can actually send an SMS to.
 if (!phoneNumber) {
    throw new HttpsError('invalid-argument', 'Phone number is required.');
  }

  try {
    // Call the Vonage Identity Insights API
    // We request both the 'format' and 'current_carrier' datasets
    const response = await vonage.identityInsights.getInsights({
      phone_number: phoneNumber,
      insights: {
        format: {},
        current_carrier: {}
      }
    });

    const formatData = response.format || {};
const carrierData = response.current_carrier || {};We package everything up and send a response object back to our frontend, so it doesn't have to parse raw API responses.
   return {
      valid: formatData.is_format_valid === true,
      country: formatData.country_code || 'Unknown',
      formattedNumber: formatData.number_international || phoneNumber,
      carrier: carrierData.name || 'Unknown',
      networkType: carrierData.network_type || 'Unknown'
    };
  } catch (error) {
    console.error('Validation error:', error);
    throw new HttpsError('internal', 'Failed to validate phone number.');
  }
});
Run the following command in your terminal from the root directory of your project to deploy your function to Firebase:
firebase deploy --only functionsDuring the deployment process, the Firebase CLI will package your function source code, upload it to Cloud Functions, and set up the necessary Cloud Secret Manager permissions for your configured secrets. You will see progress logs in your terminal detailing each step, ending with a success message and the URL endpoint for your deployed function.
To verify that the deployment was successful, open the Firebase Console, select your project, and navigate to the Functions section. You should see validatePhone listed under the dashboard along with its status, runtime, and trigger type.
Because we used a Callable Function, invoking this from your web app is clean. You don't need to mess with fetch requests, HTTP headers, or parsing JSON.
Create an index.html file and paste the code, remembering to swap in your Firebase project configuration.
// TODO: Replace with your Firebase project configuration
const firebaseConfig = {
  projectId: "YOUR_PROJECT_ID",
  apiKey: "YOUR_WEB_API_KEY"
};
Open the HTML file in your browser, type a phone number in the input field including the country code, and hit Validate Number. You'll get information about the phone number, just as shown in the image at the beginning of this tutorial.
The Identity Insights API helps your application accept only real, routable phone numbers while gathering valuable carrier intelligence. To learn more about what data you can extract from phone numbers, check out the Vonage Identity Insights API documentation.
Have a question or want to share what you're building?
Subscribe to the Developer Newsletter
Follow us on X (formerly Twitter) for updates
Prefer video? Watch tutorials on our YouTube channel
Connect with us on the Vonage Developer page on LinkedIn
Help us improve our developer experience by filling out our Voice of the Developer Feedback
Stay connected and keep up with the latest developer news, tips, and events.