Share:

Benjamin Aronov is a developer advocate at Vonage. He is a proven community builder with a background in Ruby on Rails. Benjamin enjoys the beaches of Tel Aviv which he calls home. His Tel Aviv base allows him to meet and learn from some of the world's best startup founders. Outside of tech, Benjamin loves traveling the world in search of the perfect pain au chocolat.
Set Up a Vonage Rails Initializer With vonage-rails
Time to read: 6 minutes
If Rails has a founding religion, it’s convention over configuration. One of its firmest commandments: keep your controllers thin. A controller action should receive a request, coordinate the response, and get out of the way. It shouldn’t also be responsible for instantiating and configuring an API client. That’s a separate concern, and mixing it in violates the Single Responsibility Principle that Rails architecture is built around.
So you might be doing this over and over throughout your code:
# Without vonage-rails — the wrong way
def create
  client = Vonage::Client.new(
    application_id: ENV["VONAGE_APPLICATION_ID"],
    private_key: File.read(ENV["VONAGE_PRIVATE_KEY"])
  )
  client.messaging.send(...)
endThe vonage-rails gem solves this the Rails way: one generator command drops an initializer into config/initializers/, boots a global Vonage client at startup, and gets out of your controllers’ way.
This tutorial walks through setting up a Rails initializer with the vonage-rails gem, configuring your credentials with environment variables, and building a working endpoint that sends a text message via the Vonage Messages API, demonstrating how Rails initializers keep SDK setup out of your controllers and in the right place.
TL;DR Sample code on GitHub
Before starting, make sure you have:
Ruby 3.x installed (check with
ruby -v)Rails 6.1 or later
A Vonage account with a Vonage application, application ID, and private key
If you haven’t created a Vonage application yet, head to the Vonage Dashboard, create a new application, and enable the Messages capability. When prompted, generate a public/private key pair and download the private key file. Keep both handy. You’ll need them shortly.
When creating the Vonage application, the Dashboard will prompt you for inbound and status webhook URLs. Use placeholder values for now (for example https://example.com/webhooks/inbound and https://example.com/webhooks/status). You can update them with real URLs once your app is deployed.
To create an application, go to the Create an Application page on the Vonage Dashboard, and define a Name for your Application.
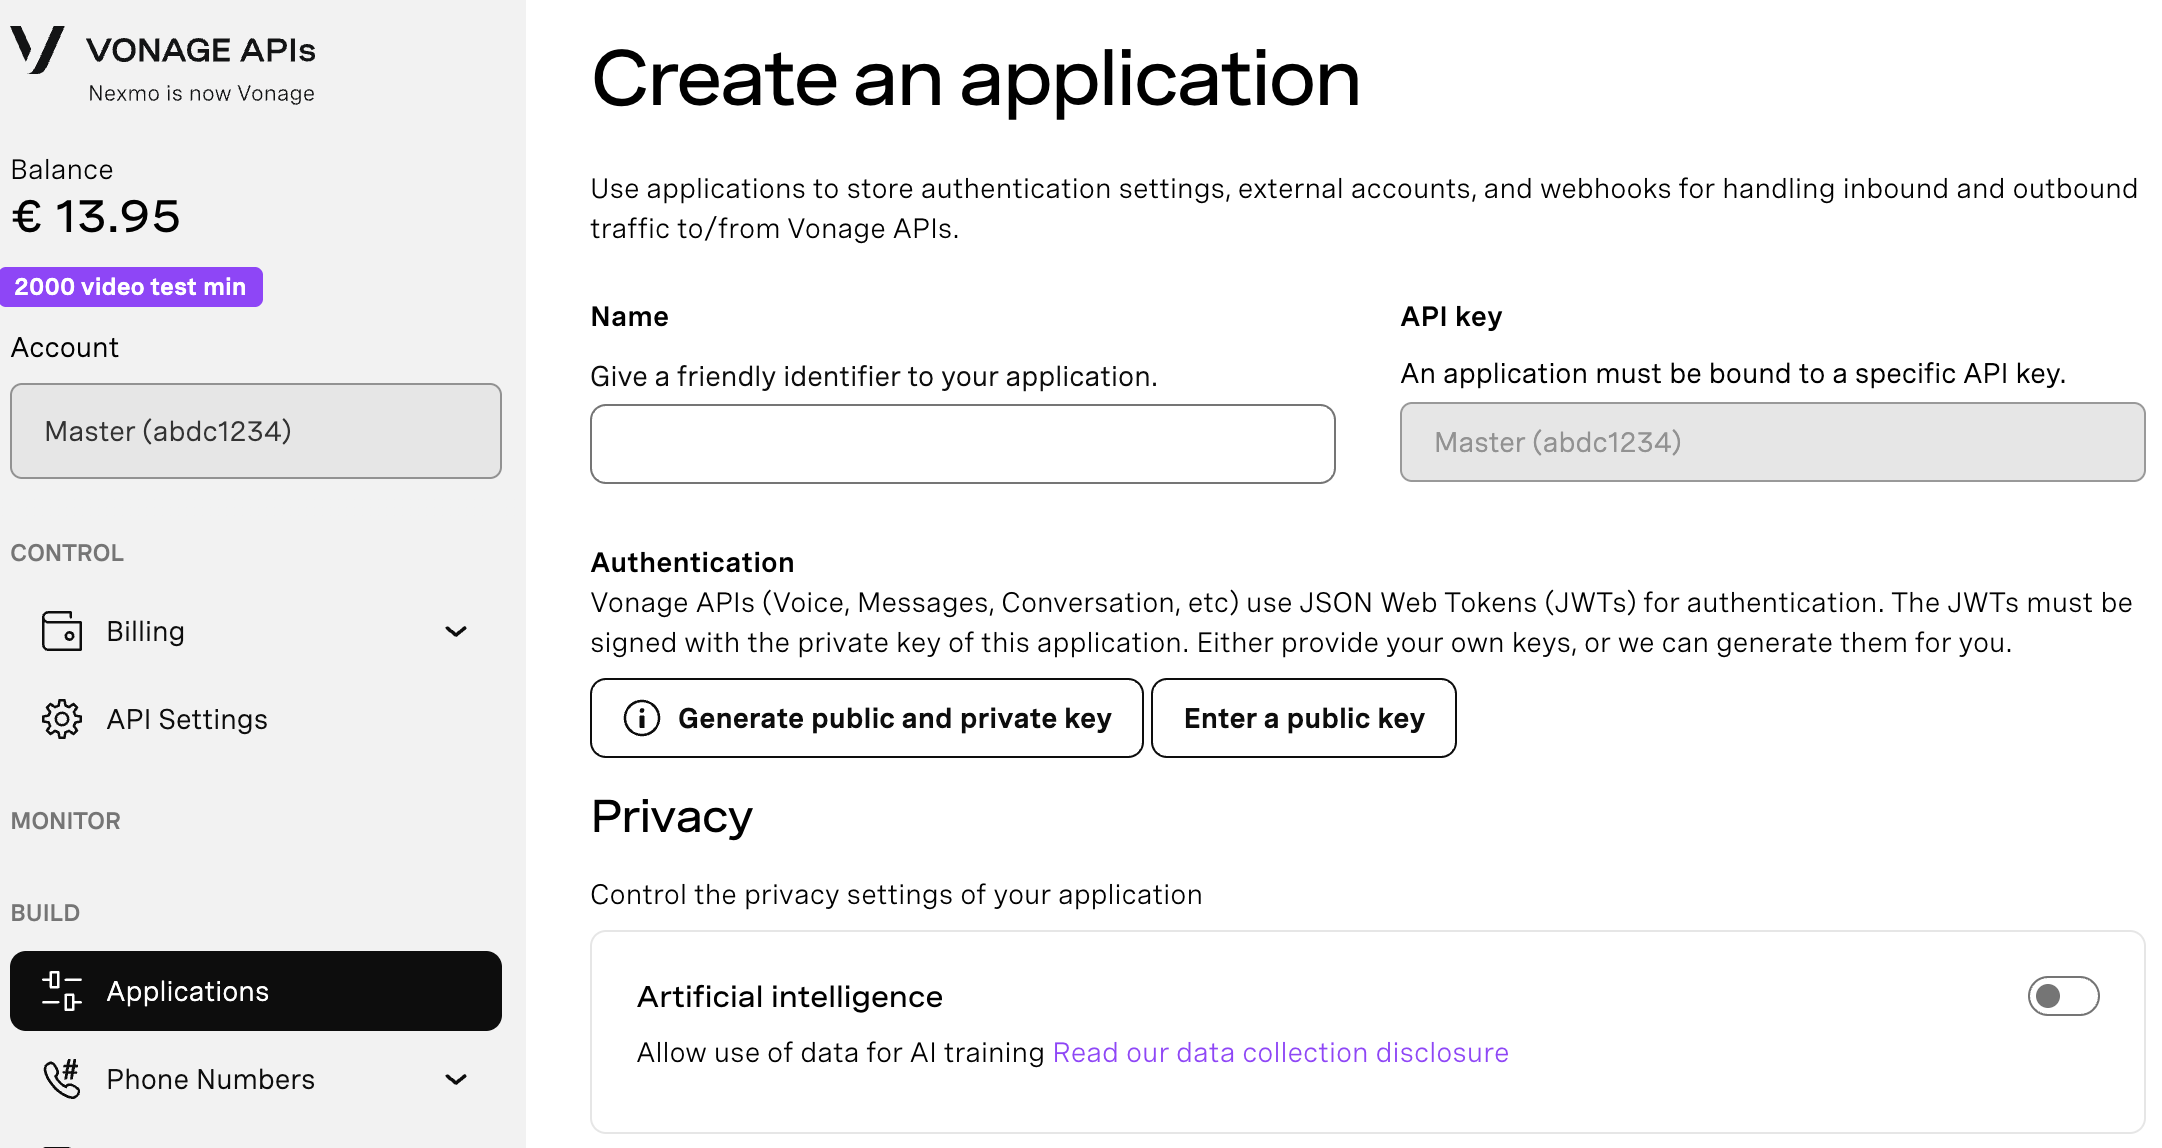
If you intend to use an API that uses Webhooks, you will need a private key. Click “Generate public and private key”, your download should start automatically. Store it securely; this key cannot be re-downloaded if lost. It will follow the naming convention private_<your app id>.key. This key can now be used to authenticate API calls. Note: Your key will not work until your application is saved.
Choose the capabilities you need (e.g., Voice, Messages, RTC, etc.) and provide the required webhooks (e.g., event URLs, answer URLs, or inbound message URLs). These will be described in the tutorial.
To save and deploy, click "Generate new application" to finalize the setup. Your application is now ready to use with Vonage APIs.
Start with a fresh Rails API app:
rails new vonage_initializer_demo --api
cd vonage_initializer_demoThe --api flag keeps the project lightweight by stripping out views and browser middleware you won’t need for a backend messaging service.
Open your Gemfile in your editor and add:
gem "vonage_rails"Note the underscore in vonage_rails — the gem name uses underscores in the Gemfile, not hyphens. Save the file, then run:
bundle installView on GitHub: Gemfile
vonage_rails ships with dotenv-rails as a runtime dependency, so it installs automatically. One thing worth knowing: because it’s a runtime dependency (not scoped to :development or :test), .env files will be loaded in all environments, including production. In production, it’s preferable to set environment variables directly through your platform’s secrets manager or config rather than relying on a .env file.
Place your private key file in the root of the project. Then create a .env file in the root:
VONAGE_APPLICATION_ID=your_application_id_here
VONAGE_PRIVATE_KEY=./private.key
VONAGE_NUMBER=447700900000View on GitHub: .env.example
Replace your_application_id_here with the application ID from your Vonage Dashboard, and make sure private.key matches the filename you downloaded. Replace 447700900000 with the Vonage virtual number linked to your Vonage app.
Note: the value for VONAGE_PRIVATE_KEY is the path to your private key file, not the key contents. Vonage.setup reads the file automatically.
Before committing anything, add both files to .gitignore:
.env
*.keyView on GitHub: .gitignore
With the gem installed, run the generator:
rails generate vonage_initializerThis creates config/initializers/vonage.rb.
Open the file and you’ll see a Vonage.setup block with five explicit ENV lookups:
Vonage.setup do |config|
  config.api_key = ENV['VONAGE_API_KEY']
  config.api_secret = ENV['VONAGE_API_SECRET']
  config.signature_secret = ENV['VONAGE_API_SIGNATURE']
  config.application_id = ENV['VONAGE_APPLICATION_ID']
  config.private_key = ENV['VONAGE_PRIVATE_KEY']
end
At boot time, Rails loads the initializer, calls Vonage.setup, and configures the Vonage module. The gem uses Ruby’s Forwardable module to delegate every method call on Vonage to the underlying Vonage::Client instance. The Vonage constant is the module itself, not a reassigned client instance, which is why Vonage.messaging, Vonage.voice, and the rest all work correctly.
From here, any controller, service, or background job has access to every API the Ruby SDK supports through the same Vonage constant:
Constant | API |
|---|---|
| Messages API (SMS, MMS, WhatsApp, RCS) |
| Voice API |
| Verify API |
| Numbers API |
| Number Insight API |
| Account API |
| Applications API |
| Conversation API |
| Subaccounts API |
| Redact API |
| SMS API (legacy) |
This table shows a commonly used subset. The Ruby SDK currently exposes 29 delegated namespaces in total. Delegation is set up once at gem load time against Vonage::Client.instance_methods(false). When the SDK adds a new API, it becomes available through Vonage after running bundle update vonage and restarting the server.
With the initializer in place, wire up a controller and route.
Generate a controller:
rails generate controller Messages createThis creates the controller file and also injects get "messages/create" into config/routes.rb. Replace the entire contents of config/routes.rb with the correct POST route:
# config/routes.rb
Rails.application.routes.draw do
  resources :messages, only: [:create]
endView on GitHub: config/routes.rb
Now update the controller action to send a text message using the global Vonage constant:
# app/controllers/messages_controller.rb
class MessagesController < ApplicationController
  def create
    result = Vonage.messaging.send(
      message_type: "text",
      channel:      "sms",
      to:           params.require(:to),
      from:         ENV["VONAGE_NUMBER"],
      text:         params.require(:text)
    )

    if result.message_uuid
      render json: { status: "sent", message_uuid: result.message_uuid }, status: :ok
    else
      render json: { status: "error" }, status: :unprocessable_entity
    end
  end
endView on GitHub: app/controllers/messages_controller.rb
A successful Messages API response includes a message_uuid. If that field is present, the message was accepted for delivery. Error handling for network failures and API errors is omitted here for brevity; the complete repository includes a fuller implementation.
Start the server:
rails serverIn a second terminal, send a test request. The to parameter is a real mobile destination number in E.164 format that you want to message:
curl -X POST http://localhost:3000/messages \
  -d "to=YOUR_NUMBER" \
-d "text=Hello from vonage-rails"With valid credentials, you’ll get back {"status":"sent","message_uuid":"..."} and a text message on the destination number.
You don’t want live API calls firing in tests. First, add rspec-rails to your Gemfile:
group :development, :test do
  gem "rspec-rails"
endThen run:
bundle install
rails generate rspec:installStub the Vonage constant at the method level using a test double:
# spec/controllers/messages_controller_spec.rb
RSpec.describe MessagesController, type: :controller do
  before do
    messaging_double = instance_double(Vonage::Messaging)
    allow(messaging_double).to receive(:send).and_return(
      double(message_uuid: "abc-123-def")
    )
    allow(Vonage).to receive(:messaging).and_return(messaging_double)
  end

  it "returns 200 on a successful send" do
    post :create, params: { to: "15551234567", text: "Hello" }
    expect(response).to have_http_status(:ok)
  end
endThis keeps the suite fast, removes the credential requirement from CI, and keeps assertions focused on controller behavior.
Note: Confirm
Vonage::Messagingagainst your installed SDK version before usinginstance_double. If the class name differs, RSpec will flag the mismatch immediately.
Not all Vonage APIs require an API key and secret. The Messages API uses JWT authentication (your application ID and private key), so leaving those ENV vars unset is fine here. For APIs that do require them, check the Vonage API documentation and add them to your .env when needed.
This is the SDK’s own design, and it works, but it surprises people the first time they see it. Vonage.messaging.send(...) is not Ruby’s built-in Object#send method. It’s the Vonage Messages API send endpoint exposed as a Ruby method. If you’re debugging and trying to call a method dynamically using Object#send, use public_send instead to avoid the collision.
The Vonage constant is a single configured instance. If your app needs two separate clients, like one for messaging and another for a different Vonage application with separate credentials, define a second named constant in the same initializer. Because Vonage.setup does the File.exist? path resolution, but raw Vonage::Client.new does not, you need to pass key contents directly when bypassing setup:
# config/initializers/vonage.rb

# Primary client: reads from ENV via Vonage.setup
Vonage.setup do |config|
  config.api_key = ENV['VONAGE_API_KEY']
  config.api_secret = ENV['VONAGE_API_SECRET']
  config.signature_secret = ENV['VONAGE_API_SIGNATURE']
  config.application_id = ENV['VONAGE_APPLICATION_ID']
  config.private_key = ENV['VONAGE_PRIVATE_KEY']
end

# Second client: raw Vonage::Client.new requires key contents, not a path
VonageVoice = Vonage::Client.new(
  application_id: ENV["VONAGE_VOICE_APPLICATION_ID"],
  private_key:    File.read(ENV["VONAGE_VOICE_PRIVATE_KEY"])
)This is an edge case for most apps, but it’s worth knowing the pattern before you need it.
The vonage-rails gem does one thing well: it puts Vonage client setup where it belongs, in an initializer that runs once at boot. Your credentials stay in the environment, your controllers stay focused on application logic, and every Vonage API is one method call away from anywhere in the app.
Want to learn, stay connected, or share what you're building?
Keep learning
Explore use cases and structured learning paths in the Vonage Learning Center
Watch tutorials on our Vonage Developer YouTube Channel
Stay connected
Subscribe to the Vonage Developer Newsletter
Follow us on X for updates
Connect with us on LinkedIn
Help us improve our developer experience by filling out our Voice of the Developer Feedback
Share:
Benjamin Aronov is a developer advocate at Vonage. He is a proven community builder with a background in Ruby on Rails. Benjamin enjoys the beaches of Tel Aviv which he calls home. His Tel Aviv base allows him to meet and learn from some of the world's best startup founders. Outside of tech, Benjamin loves traveling the world in search of the perfect pain au chocolat.